I still remember the night the kitchen exploded—literally. A bag of flour had escaped the bag, a whisk clattered across the counter, and the scent of burnt sugar filled the air. I was staring at the chaos, thinking, “This is not how I wanted to end the night.” Then, a voice from my phone said, “Try making cruffins instead.” It sounded like a dare from a friend who always knew how to turn a disaster into a delicious triumph. The idea of a flaky, cinnamon‑infused pastry that could double as a breakfast treat or a sweet snack had me buzzing with curiosity. I grabbed the ingredients and set to work, and what emerged was a recipe that, frankly, feels like a culinary revelation. I’ll be honest—after tasting the first batch, I ate half before anyone else got a chance. That’s the power of this recipe: it’s not just good; it’s hands down the best version you'll ever make at home. Picture yourself pulling this out of the oven, the whole kitchen smelling incredible, the golden edges crackling with a buttery crisp. Let me walk you through every single step—by the end, you’ll wonder how you ever made it any other way.
What Makes This Version Stand Out
- Flavor: The blend of fresh ground cinnamon and a hint of vanilla creates a warm, aromatic profile that lingers on the palate. The subtle sweetness of brown sugar in the filling balances the spice without overpowering it.
- Texture: The dough’s laminated layers produce a flaky, airy interior while the butter‑filled center melts into a gooey, caramel‑like core. The result is a contrast that feels like a hug in every bite.
- Ease: Despite the buttery layers, the method is straightforward—no need for a stand mixer or fancy equipment. Anyone with a whisk can achieve bakery‑quality results.
- Versatility: While the classic version is irresistible, the recipe adapts effortlessly to variations such as chocolate, almond, or even savory twists. The base can accommodate substitutions without sacrificing quality.
- Make‑ahead: You can assemble the cruffin dough a day ahead, refrigerate, and bake fresh on the day of serving. This flexibility makes it a perfect crowd‑pleaser for brunches or holiday gatherings.
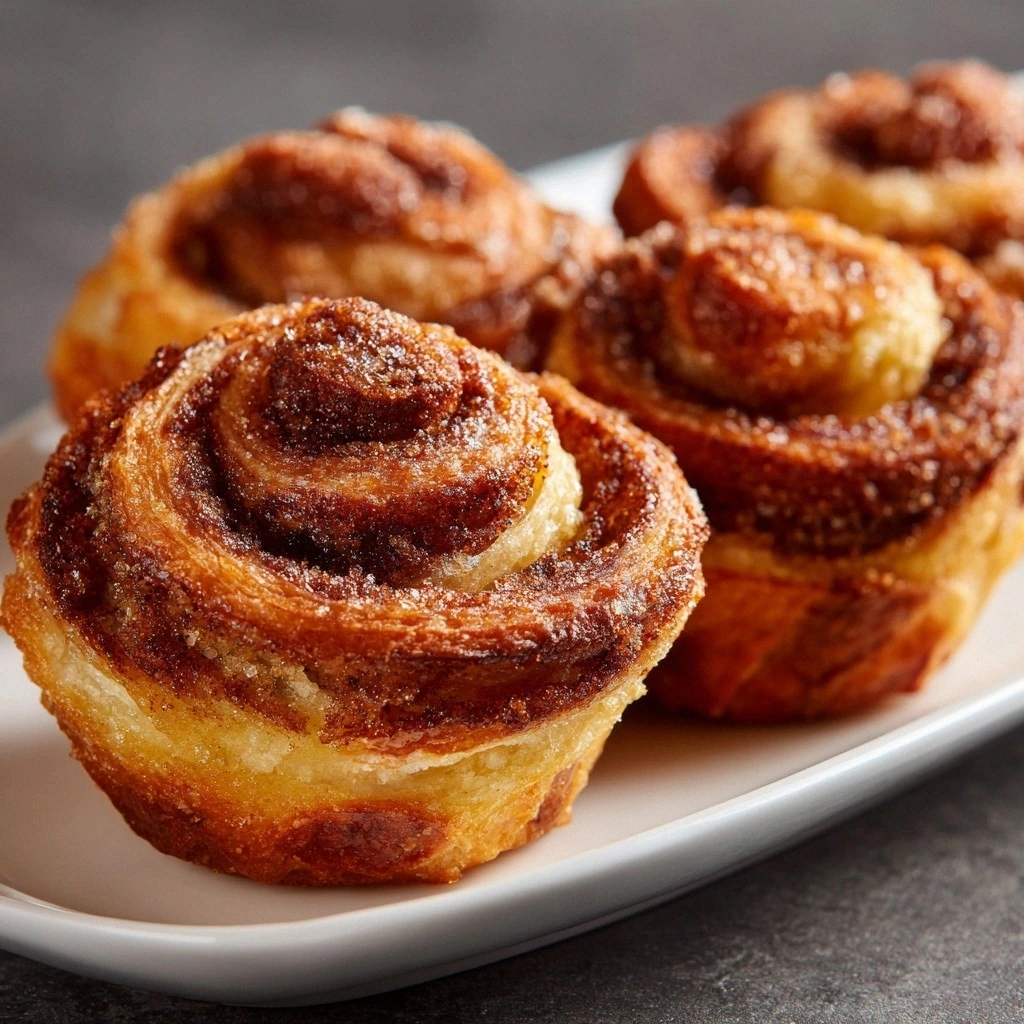
- Presentation: The signature crescent shape, dusted with powdered sugar, looks as good as it tastes. It’s a visual treat that will make your guests go “wow” even before the first bite.
Alright, let’s break down exactly what goes into this masterpiece…
Inside the Ingredient List
The Flavor Base
All-purpose flour is the backbone of the dough. It provides structure without being too heavy, allowing the butter layers to puff up beautifully. If you’re looking for a gluten‑free option, you can substitute a blend of rice and tapioca flours, but the texture will shift slightly to a finer crumb.
Unsalted butter, cold and cubed, is essential for lamination. The coldness ensures the butter stays distinct during the folding process, creating the flaky layers. If you only have salted butter, simply reduce the added salt by ¼ teaspoon.
Granulated sugar gives the dough a subtle sweetness that caramelizes during baking. It also helps tenderize the crumb. For a richer flavor, you can replace half of the granulated sugar with brown sugar; just be mindful that it adds a deeper molasses note.
The Texture Crew
Baking powder is the leavening agent that lifts the dough. It reacts quickly in the heat, producing airy pockets that make the cruffin light. If you’re baking at high altitudes, increase the baking powder by a pinch to compensate for lower atmospheric pressure.
Salt balances the sweetness and enhances the overall flavor profile. Too little salt and the cinnamon can taste flat; too much and it becomes cloying. Use fine sea salt for a cleaner taste.
Milk is the liquid that binds everything together, giving the dough a smooth consistency. Whole milk yields a richer crumb, while skim milk keeps it lighter. If you’re dairy‑free, coconut milk works nicely but will add a subtle coconut flavor.
The Unexpected Star
Eggs provide structure and richness. They act as a binder that holds the layers together during baking. If you’re vegan, use a flax egg (1 tbsp ground flaxseed + 3 tbsp water) for each egg; it will set the dough similarly.
Vanilla extract adds depth to the cinnamon’s warmth. The vanilla’s floral notes complement the spice, creating a balanced aroma. A drop of almond extract can replace vanilla for a nutty twist.
The Final Flourish
Butter for filling is the secret to that irresistible gooey center. Cold butter ensures it stays solid until baked, then melts to a silky sauce. If you prefer a more pronounced buttery flavor, double the amount, but be careful not to overpower the dough.
Brown sugar for filling adds chewiness and caramel depth. Its molasses content also helps the butter stay soft longer during baking. For a crunchy element, sprinkle a handful of chopped pecans on top before baking.
Ground cinnamon for filling is the star of the show. It gives the center a fragrant kick that contrasts with the mild dough. A pinch of nutmeg can add a subtle warmth if you’re feeling adventurous.
Everything’s prepped? Good. Let’s get into the real action…
The Method — Step by Step
- Step 1 – Combine Dry Ingredients: In a large bowl, whisk together 2 cups flour, 1 tsp baking powder, ½ tsp salt, ½ cup granulated sugar, and 1 tsp ground cinnamon. The dry mix should look like fine sand; this ensures even distribution of leavening agents. Feel the texture—if it feels clumpy, sift again. This step sets the foundation for a light, airy crumb.
- Step 2 – Incorporate Cold Butter: Add ½ cup cold cubed butter to the flour mixture. Using a pastry cutter or your fingertips, cut the butter into the dry ingredients until the mixture resembles coarse crumbs with pea‑size butter pieces. The goal is to keep the butter largely intact so it melts into thin sheets during baking. If you’re a pro, a quick pass through a stand mixer on low speed can streamline this process.
- Step 3 – Add Wet Ingredients: In a separate bowl, whisk ½ cup milk, 1 large egg, and 1 tsp vanilla extract until smooth. Pour this liquid into the flour‑butter mixture and stir with a wooden spoon until the dough just comes together. It will be slightly sticky; that’s normal. Over‑mixing will develop gluten and make the cruffins tough.
- Step 4 – First Fold: Turn the dough onto a lightly floured surface and gently knead it into a rough rectangle about 12 inches long. Roll the dough into a long log, then fold it in thirds, like a letter. This is the first lamination step. Wrap the dough in plastic and refrigerate for 20 minutes to chill the butter.
- Step 5 – Second Fold: Remove the dough from the fridge, roll it out again to a rectangle, and fold it in thirds once more. This second fold doubles the layers. Chill again for 20 minutes. The dough should feel firm yet pliable.
- Step 6 – Shape the Cruffins: On a floured surface, roll the dough into a 12‑inch long log. Slice the log into 12 equal pieces. Take each piece, roll it into a crescent shape by rolling the dough in a tight spiral. Place the crescents on a parchment‑lined baking sheet, spacing them about 2 inches apart. Brush the tops lightly with an egg wash (1 beaten egg with 1 tbsp water) to give a golden sheen.
- Step 7 – Prepare the Filling: In a small bowl, combine ¼ cup butter, ¼ cup brown sugar, and 1 tsp cinnamon. Use a fork to mash the mixture until it’s crumbly yet moist. The filling should hold together when pressed but still melt when baked. This filling will seep into the layers as the dough expands.
- Step 8 – Insert the Filling: Using a small spoon, place a teaspoon of the filling onto the center of each crescent. Then, carefully fold the dough over the filling, sealing the edges by pressing them together. This step is where the magic happens—if you’re too rough, the butter may leak out, but that can actually create a delightful caramelized border.
- Step 9 – First Proof: Let the filled cruffins rest at room temperature for 30 minutes. During this time, the dough will rise slightly, and the butter will soften, creating a perfect base for baking. Keep an eye on the dough; if it starts to look overly puffy, place it back in the fridge for a few minutes to firm up.
- Step 10 – Bake: Preheat the oven to 375°F (190°C). Bake the cruffins for 18–20 minutes, or until the tops are golden brown and the edges pull away from the parchment. The scent of cinnamon and butter should fill the kitchen, signaling that the magic is complete. Let them cool on a wire rack for 5 minutes before dusting with powdered sugar.
That’s it — you did it. But hold on, I've got a few more tricks that'll take this to another level…
Insider Tricks for Flawless Results
The Temperature Rule Nobody Follows
Temperature control is key. Keep the dough and butter at the same cold temperature (around 35°F/2°C) before each fold. If the butter starts to soften, the layers will merge, resulting in a dense crumb. A simple way to check is to press the dough lightly; it should feel firm yet pliable.
Why Your Nose Knows Best
Before you pull the cruffins out of the oven, pause and inhale. The aroma should be a warm, sweet, cinnamon‑laden perfume. If it smells more like plain butter, you’ve underbaked them; if it smells burnt, they’re overdone. Trust your nose as the ultimate judge.
The 5‑Minute Rest That Changes Everything
After baking, let the cruffins rest on the rack for exactly 5 minutes. This brief pause allows the steam to redistribute, preventing a soggy bottom while keeping the interior soft. If you rush them, the butter can slide to the bottom, creating an uneven texture.
Dusting Technique for Visual Appeal
Use a fine sieve to dust powdered sugar over the cruffins while they’re still warm. The sugar melts slightly, creating a subtle glaze that enhances the golden crust. If you prefer a darker finish, sprinkle a pinch of ground cinnamon on top for a rustic look.
Serve with a Side of Fresh Berries
A handful of fresh berries—strawberries, blueberries, or raspberries—adds a tart contrast that brightens the sweet, buttery flavor. The juiciness of the berries also cuts through the richness, creating a balanced bite. This is especially delightful on a warm summer morning.
Creative Twists and Variations
This recipe is a playground. Here are some of my favorite ways to switch things up:
Chocolate Cruffins
Swap the granulated sugar for ¼ cup cocoa powder and add 1 tbsp chocolate chips to the filling. The chocolate-infused dough pairs beautifully with the cinnamon, creating a mocha‑like flavor profile that chocolate lovers adore.
Almond Crunch Cruffins
Add ¼ cup ground almonds to the dough and sprinkle toasted almond slivers on top before baking. The nutty crunch complements the buttery layers, and the almonds add a subtle earthiness that elevates the overall taste.
Maple Syrup Cruffins
Replace the milk with ½ cup pure maple syrup and reduce the granulated sugar by ¼ cup. The maple flavor melds with the cinnamon, creating a classic breakfast combo that feels both comforting and indulgent.
Savory Herb Cruffins
Omit the sugar and cinnamon in the dough, and add 1 tbsp chopped fresh rosemary and ½ tsp thyme. Fill with a mixture of melted butter and grated Parmesan. These savory cruffins pair perfectly with a light salad or as a side for a hearty stew.
Lemon‑Zest Cruffins
Add 1 tbsp lemon zest to the dough and use 1 tsp lemon zest in the filling instead of cinnamon. The bright citrus notes provide a refreshing contrast to the buttery layers, making them ideal for a spring brunch.
Storing and Bringing It Back to Life
Fridge Storage
Store cooked cruffins in an airtight container at room temperature for up to 2 days. If you need to keep them longer, refrigerate them in a sealed bag; the buttery flavor will deepen over time. When ready to serve, let them sit at room temperature for 15 minutes to restore the crumb’s softness.
Freezer Friendly
Wrap each cruffin individually in plastic wrap, then place them in a freezer bag. They’ll stay fresh for up to 3 months. When you’re ready, thaw overnight in the fridge and reheat in a preheated 350°F oven for 10 minutes.
Best Reheating Method
Reheat the cruffins in a skillet over medium heat, flipping once. Add a splash of milk or a pat of butter to the pan to keep them moist. The result is a warm, freshly baked feel that’s almost indistinguishable from the first batch.