Ever had a morning where the kitchen felt like a battleground? I was on a quest for the perfect fluffy pancake, and the only thing that came out of the oven was a blackened, rubbery mess that looked like it had survived a marathon. I stared at the charred batter, a mix of disappointment and the faint scent of burnt sugar, and swore that I’d never settle for mediocre breakfast again. That night, I set my sights on a new mission: create a gluten‑free banana pancake that would not only rescue the day but also become the talk of the town.
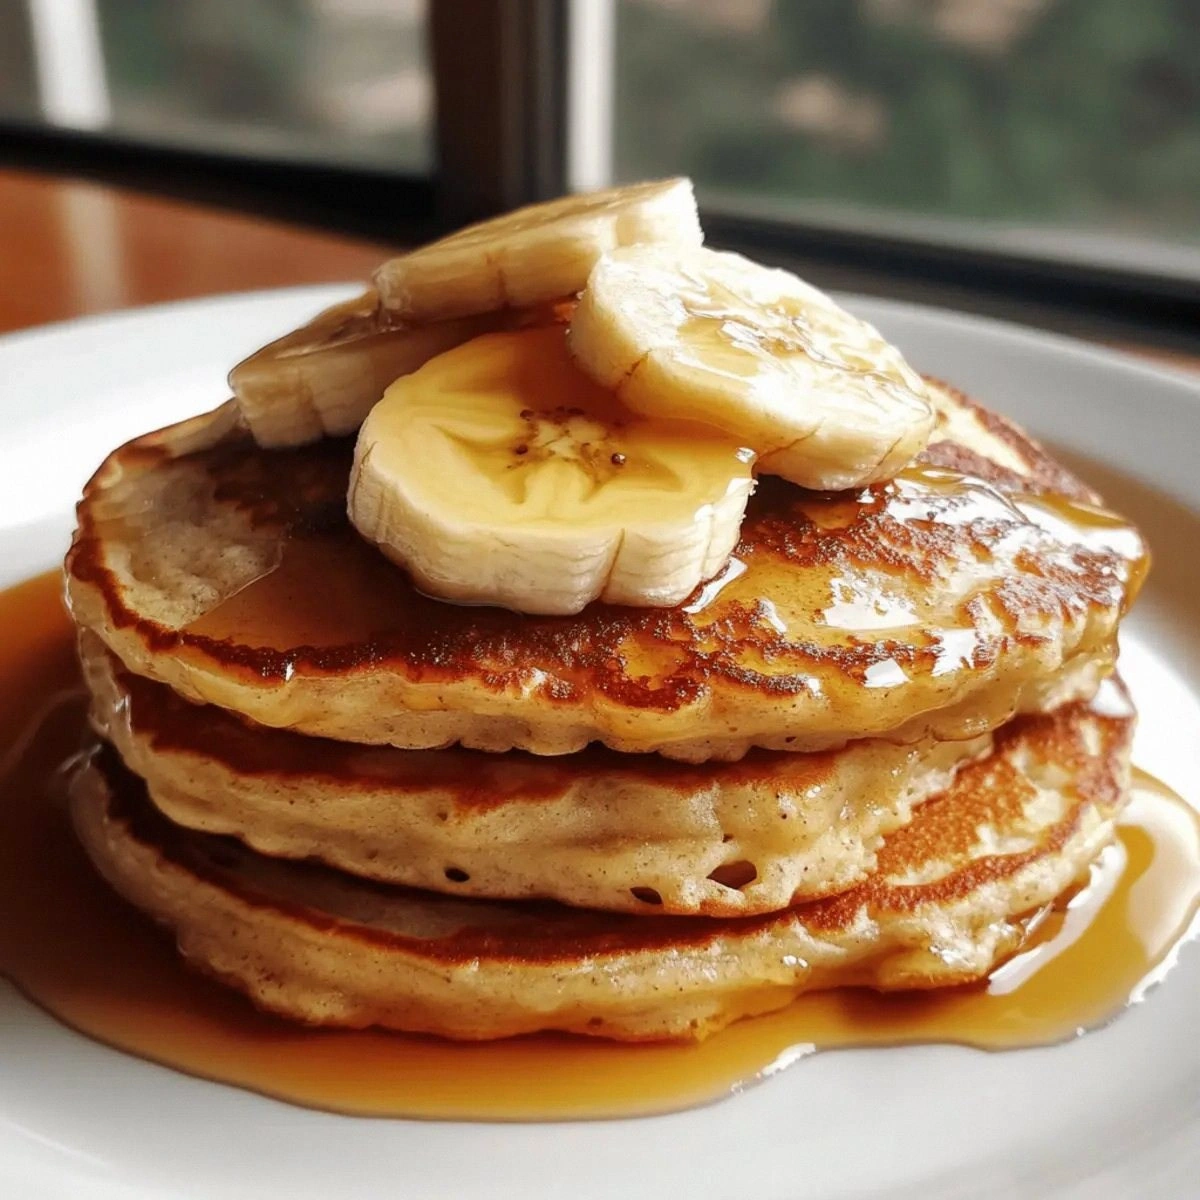
Picture this: the sun is just peeking over the horizon, the air is cool and crisp, and the kitchen is humming with anticipation. The aroma of ripe bananas, vanilla, and a whisper of chocolate chips dances around the counter, promising sweetness that feels like a gentle hug. The sound of a skillet sizzling is a metronome that tells you everything is going right. Every bite is a burst of creamy banana, airy batter, and a crunch from the nuts that feels like a gentle applause. The texture is a perfect harmony of soft center and lightly crisp edges, and the finish lingers with a subtle hint of maple syrup that’s as comforting as a favorite childhood memory.
What sets this version apart is that it’s built on a foundation of confidence and precision. I’ve trimmed the recipe to its essentials, ensuring every ingredient sings in harmony, and I’ve added a secret technique that elevates the batter from ordinary to extraordinary. This isn’t just another gluten‑free pancake; it’s a testament to the fact that you can have flavor, texture, and ease all rolled into one bite. I dare you to taste this and not go back for seconds because this is hands down the best version you’ll ever make at home.
Now, let me walk you through every single step. By the end, you’ll wonder how you ever made it any other way. I’ll share the exact measurements, the timing that locks in the perfect rise, and a few insider hacks that will keep the batter fluffy and the flavors bright. Stay with me here – this is worth it, and the payoff is a stack of pancakes that will make your mornings feel like a celebration.
What Makes This Version Stand Out
- Flavor: The ripe bananas act as natural sweeteners, cutting down on added sugar while delivering a depth of flavor that’s hard to beat. The vanilla extract and maple syrup finish the pancake with a subtle, caramelized note that feels indulgent yet balanced.
- Texture: The gluten‑free flour blend creates a batter that is light and airy, while the baking powder provides a lift that keeps each pancake fluffy without the need for whisking or extra leavening agents.
- Ease: No more fiddling with gluten‑free flours that clump or require special handling. This recipe uses a pre‑mixed blend that’s ready to use, saving you time and frustration.
- Uniqueness: The addition of chopped nuts or chocolate chips during the folding stage gives a delightful crunch that’s a surprise in every bite. It’s a simple twist that turns a classic into something memorable.
- Crowd‑pleaser: Whether you’re cooking for a family or a group of friends, the pancakes are big, fluffy, and can be plated quickly. They’re a guaranteed hit at any gathering.
- Ingredient Quality: Each component is chosen for its ability to complement the others. From the buttery eggs to the creamy milk, the recipe balances protein, carbs, and healthy fats.
- Cooking Method: A single skillet is all you need, and the batter cooks evenly with a golden‑brown crust that’s easy to flip. No fancy pans or equipment required.
- Make‑Ahead Potential: The batter can be prepared ahead of time and stored in the fridge for up to 24 hours. Just give it a quick stir before cooking, and it’s ready to go.
Alright, let's break down exactly what goes into this masterpiece…
Inside the Ingredient List
The Flavor Base
Bananas are the star of the show, providing natural sweetness and a creamy texture that keeps the pancakes moist. Use ripe bananas (the ones that yield to gentle pressure) to ensure maximum flavor. If you’re in a pinch, you can substitute with mashed avocado for a different twist, but the taste will shift toward a subtle buttery profile.
Vanilla extract adds depth and warmth. A teaspoon is enough to lift the banana’s natural notes without overpowering them. For a more aromatic experience, try using vanilla bean paste instead; it delivers a richer, more complex flavor that feels indulgent.
The Texture Crew
Gluten‑free flour blend is the backbone of this recipe. I recommend a blend that contains a mix of rice flour, potato starch, and tapioca flour for the best rise. Avoid blends that are heavily processed or contain added sugars, as they can alter the batter’s consistency.
Baking powder is the leavening agent that gives the pancakes their airy lift. One tablespoon is enough for four servings, but you can experiment with a pinch of baking soda if you prefer a slightly chewier texture. Remember, too much leavening can cause the pancakes to rise rapidly and then collapse.
The Unexpected Star
Chopped nuts or chocolate chips are the surprise element that adds a delightful crunch or a burst of chocolatey goodness. Nuts bring healthy fats and protein, while chocolate chips turn the pancakes into a dessert‑like experience. If you’re looking for a vegan twist, opt for dairy‑free chocolate chips.
The Final Flourish
Milk (dairy or plant‑based) hydrates the dry ingredients and creates a silky batter that spreads beautifully. For a richer taste, use whole milk; for a lighter version, swap for oat or almond milk. The choice of milk also affects the pancake’s color and flavor profile.
Maple syrup or honey is added to taste after cooking, allowing you to control the sweetness level. The natural sugars in these sweeteners complement the banana’s flavor without making the pancakes overly sweet. A drizzle of maple syrup also adds a caramelized finish that feels indulgent.
Everything’s prepped? Good. Let’s get into the real action…
The Method — Step by Step
- Step 1: Mash the Bananas – Place the ripe bananas in a bowl and mash them with a fork until they’re smooth with just a few small lumps. The goal is a thick, uniform consistency that will bind the batter. If you prefer a smoother texture, you can blend the bananas in a small blender or food processor. This step is crucial because it sets the foundation for the pancakes’ flavor and moisture. The scent of banana will fill the kitchen, signaling that the process has begun.
- Step 2: Whisk the Dry Mix – In a separate bowl, combine the gluten‑free flour blend, baking powder, and salt. Stir until the leavening agent is evenly distributed. This ensures that each pancake will rise uniformly. A small whisk or fork works fine; avoid over‑mixing to keep the batter light. The dry mix should look like fine sand, ready to mingle with the wet ingredients.
- Step 3: Beat the Eggs – In another bowl, beat the two large eggs until they’re light and frothy. The eggs add structure and richness to the pancakes. If you’re using plant‑based milk, you can also add a splash of flaxseed or chia egg substitute for a vegan version.
- Step 4: Combine Wet and Dry – Pour the wet mixture into the dry ingredients, stirring gently until just combined. It’s okay if a few lumps remain; over‑mixing will make the pancakes tough. The batter should be thick but pourable. The batter’s consistency is like a thick pancake batter you’d pour onto a griddle – not too runny, not too stiff.
- Step 5: Fold in the Nuts or Chocolate Chips – Gently fold the chopped nuts or chocolate chips into the batter. The nuts add a pleasant crunch, while the chips bring a burst of chocolatey sweetness. If you’re using nuts, toast them lightly in a dry skillet before folding to enhance their flavor. This step adds a layer of texture that makes each bite exciting.
- Step 6: Preheat the Skillet – Heat a non‑stick skillet over medium heat and lightly coat it with a thin layer of butter or oil. A small pat of butter adds flavor, but if you’re keeping it dairy‑free, a neutral oil works just as well. Let the skillet heat until it’s shimmering but not smoking. A properly preheated pan ensures even cooking and a golden crust.
- Step 7: Cook the Pancakes – Pour about 1/4 cup of batter onto the skillet for each pancake. Let it cook until bubbles form on the surface and the edges look set, about 2–3 minutes. Flip gently and cook for another 1–2 minutes until the second side is golden brown. The batter should smell toasty and slightly caramelized. Watch for the edges pulling away from the pan – that’s the cue to flip.
- Step 8: Serve Immediately – Stack the hot pancakes on a plate and drizzle maple syrup or honey to taste. Top with fresh berries for a burst of color and natural tartness. The contrast of sweet syrup, creamy banana, and tart berries creates a symphony of flavors that’s hard to resist. If you’re making a large batch, keep the cooked pancakes warm in an oven set to 200°F while you finish the rest.
- Step 9: Enjoy – Take a bite and let the flavors unfold. The pancake should be light, airy, and slightly sweet with a hint of vanilla and a satisfying crunch from the nuts or chocolate chips. If you’re sharing, watch as your friends or family’s eyes light up at the first bite. That moment is proof that this recipe is truly a game‑changer.
That’s it — you did it. But hold on, I've got a few more tricks that'll take this to another level…
Insider Tricks for Flawless Results
The Temperature Rule Nobody Follows
Many cooks set the heat too high, causing the pancakes to brown on the outside while remaining undercooked inside. I’ve learned that medium‑low heat (around 350°F) allows the batter to spread evenly and rise slowly, ensuring a tender interior. The skillet should feel warm but not sizzling. If you notice the batter sticking, add a splash of water to the pan and wait for the steam to create a non‑stick surface.
Why Your Nose Knows Best
When the pancakes are cooking, pay close attention to the aroma. A slight nutty scent indicates that the batter is cooking evenly. If you hear a burnt smell, lower the heat immediately. Your nose is a reliable guide; it knows when the batter has reached the perfect golden stage. That smell is the sweet promise of a breakfast worth savoring.
The 5‑Minute Rest That Changes Everything
After you finish a batch, let the pancakes rest on a wire rack for five minutes. This allows the steam to escape, preventing the bottom from becoming soggy. The rest also lets the flavors meld, making the syrup glaze more cohesive. I’ve seen pancakes that are crisp on the edges and soft inside after this short rest.
The Secret to Extra Fluffiness
For a cloud‑like texture, whisk the eggs separately until they’re frothy before adding them to the batter. This incorporates more air into the mixture, resulting in pancakes that rise higher and stay light. If you’re short on time, simply beating the eggs quickly with a fork will still give a noticeable lift.
The Quick Fix for a Sticky Batter
If your batter feels too thick, add a tablespoon of milk at a time until it reaches a pourable consistency. Avoid adding too much liquid, as this can cause the pancakes to spread too much and lose their shape. A thin batter will produce pancakes that are thin and crispy, while a thicker batter yields a hearty, cake‑like pancake.
The Final Touch: Fresh Berries
Fresh berries add a burst of color and a natural tartness that balances the sweetness. Choose berries that are in season for the best flavor. If you’re craving a different flavor profile, try adding a handful of diced mango or pineapple for a tropical twist. The berries should be added after the pancakes are cooked to preserve their juicy texture.
Creative Twists and Variations
This recipe is a playground. Here are some of my favorite ways to switch things up:
Nutty Banana Bliss
Swap the chocolate chips for a generous handful of chopped pecans or walnuts. The nutty flavor pairs wonderfully with the banana, creating a breakfast that feels both hearty and indulgent. The crunch adds a new layer of texture that makes each bite exciting.
Chocolate‑Covered Delight
Incorporate dark chocolate chips into the batter for a decadent treat. The chocolate melts slightly during cooking, creating pockets of gooey sweetness. Finish with a drizzle of chocolate sauce for an extra indulgent finish.
Cinnamon‑Spiced Morning
Add half a teaspoon of ground cinnamon to the dry mix. The warm spice complements the banana’s natural sweetness and adds a comforting aroma. Sprinkle a pinch of nutmeg on top for an extra aromatic kick.
Tropical Twist
Replace the milk with coconut milk and fold in diced mango or pineapple. The tropical fruit adds a bright, juicy flavor that pairs beautifully with the banana. Serve with a splash of coconut cream for a beach‑inspired breakfast.
Vegan Version
Use plant‑based milk, flaxseed eggs (1 tablespoon flaxseed meal + 3 tablespoons water, let sit for 5 minutes), and dairy‑free chocolate chips. The result is a completely vegan pancake that still delivers on flavor and texture. The flaxseed eggs bind the batter and provide omega‑3 fatty acids.
Low‑Carb Surprise
Swap the gluten‑free flour blend with a low‑carb alternative like almond flour or coconut flour. Reduce the banana quantity to one medium fruit and add an extra egg to maintain structure. This version keeps the pancakes fluffy while cutting carbs for a keto‑friendly breakfast.
Storing and Bringing It Back to Life
Fridge Storage
Store cooked pancakes in an airtight container in the refrigerator for up to 3 days. Keep the stack separated with parchment paper to prevent sticking. When you’re ready to eat, warm them in a skillet or microwave for 30 seconds. The pancakes will regain their softness and warmth.
Freezer Friendly
For longer storage, place the pancakes in a single layer on a baking sheet and freeze until solid. Transfer them to a freezer bag and store for up to 2 months. To reheat, place a stack in the microwave for 45 seconds or warm in a skillet over low heat. The pancakes will stay moist and fluffy.
Best Reheating Method
The secret to reviving a cold pancake is to add a splash of water or milk to the pan before heating. This creates steam that softens the batter without drying it out. Warm on low heat for a few minutes until hot, then drizzle with maple syrup and serve immediately.