Introduction
Picture this: I was in a cramped apartment kitchen, the last of my shrimp had just been shelled, and a friend dared me to whip up something that would make our midnight snack feel like a five‑star banquet. I stared at the shrimp, feeling the sting of the challenge, and decided that tonight’s dish would be nothing less than a triumph. I grabbed a whisk, a splash of soy sauce, and a whole lot of confidence, and the aroma of fresh ginger began to mingle with the faint scent of frying oil. The kitchen hummed with the soft clatter of pots, and the anticipation was almost as intoxicating as the sizzling sound that would soon follow. I’m not just telling you a story; I’m inviting you to step into the chaos with me, to feel the heat rise, and to taste the moment when everything clicks into place. Let me walk you through every single step — by the end, you’ll wonder how you ever made it any other way.
It’s easy to think shrimp cakes are just another take‑out item, but I’ve spent countless hours experimenting with textures and flavors until I discovered the secret to a cake that’s light on the inside yet caramelized on the edges. The first bite is a burst of briny shrimp, the second a subtle crunch that shatters like thin ice, and the third a sweet umami glaze that coats the palate like velvet. I dare you to taste this and not go back for seconds. Every component is chosen to harmonize, from the silky batter to the aromatic scallions, creating a dish that’s both comforting and daring. The technique I’ll reveal isn’t just a recipe; it’s a culinary revelation that will change the way you think about shrimp. I promise, this is hands down the best version you’ll ever make at home.
Imagine the kitchen smelling of toasted sesame and fresh garlic, the sound of a pan shimmering, and the sight of golden edges crisping to perfection. That’s the scene I set up, and the result is a shrimp cake that feels like a hug from a distant memory. I’ll keep the process simple, but the flavor depth is anything but ordinary. I’ll share a technique involving a touch of cornstarch that I learned from a grandmother in Guangzhou, a trick that transforms the batter from ordinary to extraordinary. I’ll also throw in a surprising ingredient that will make your taste buds dance, a detail you won’t expect but will love. Stay with me, because the next step is pure magic.
If you’ve ever struggled with shrimp cakes that turn out soggy or too dry, you’re not alone — and I’ve got the fix. I’ll walk you through each element, ensuring you master the balance between moisture and crispness. Picture yourself pulling this out of the oven, the whole kitchen smelling incredible, and the guests asking for the recipe before you even finish plating. And now, let’s break down exactly what goes into this masterpiece…
What Makes This Version Stand Out
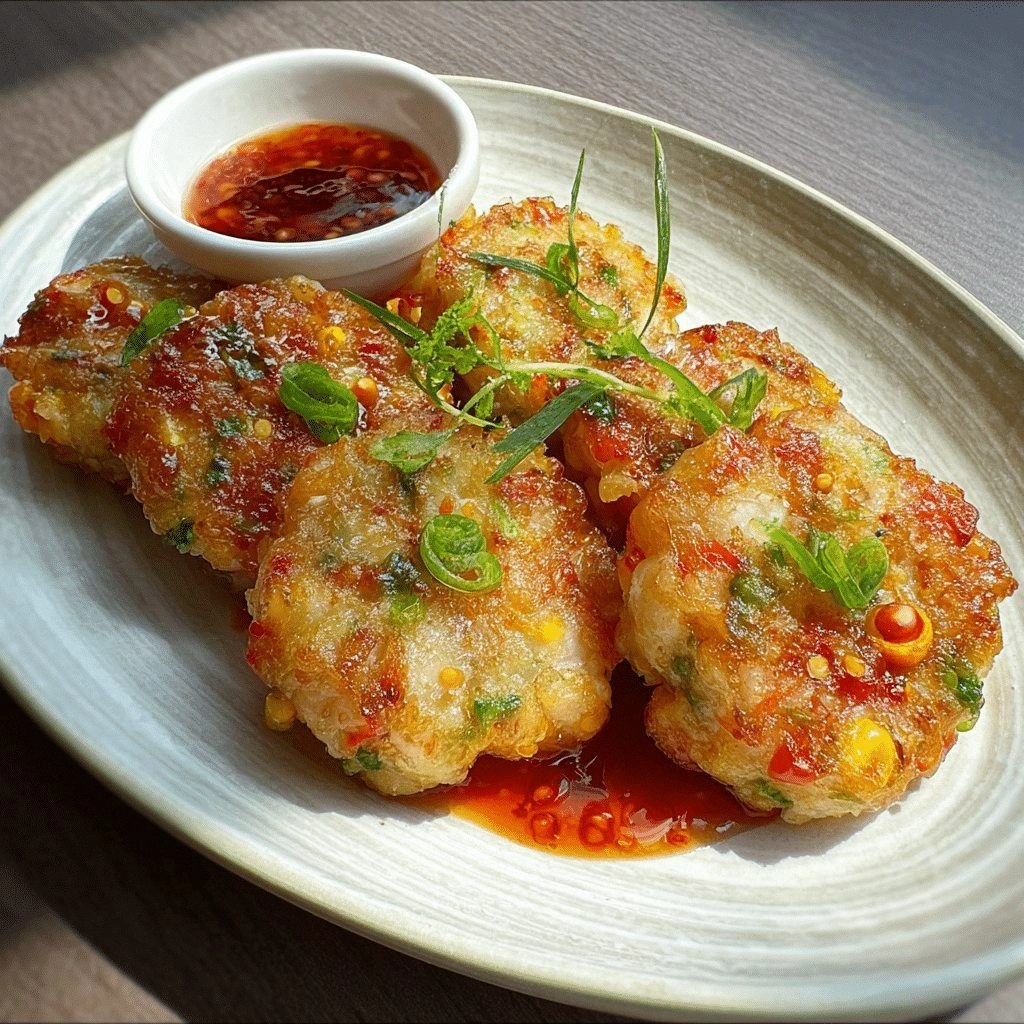
- Texture: The batter achieves a silky interior while the edges caramelize to a golden crunch, giving a satisfying contrast in every bite.
- Flavor Depth: A splash of sesame oil, a dash of soy sauce, and fresh ginger combine to create layers of umami that linger long after the first taste.
- Visual Appeal: The cake’s glossy sheen and speckled scallion garnish make it a showstopper on any plate.
- Ease of Prep: Every step is straightforward, and the recipe scales effortlessly for small or large gatherings.
- Make‑Ahead Friendly: The batter can be prepared a day in advance, letting you focus on the final frying when guests arrive.
- Versatility: Swap shrimp for scallops or add a dash of chili oil to tailor the dish to your taste buds.
Alright, let's break down exactly what goes into this masterpiece…
Inside the Ingredient List
The Flavor Base
At the heart of the cake lies a marriage of shrimp, soy sauce, and sesame oil. Shrimp provides a briny sweetness that balances the savory sauce, while sesame oil adds a nutty aroma that lingers in the finished dish. The soy sauce contributes depth and a slight saltiness that rounds out the flavor profile. If you skip the soy sauce, the cake will taste flat and lack the characteristic umami punch that makes it irresistible.
Choosing the right shrimp is essential; fresh or thawed shrimp that still has a firm texture will hold together better during cooking. If you’re on a budget, you can use frozen shrimp, but thaw them in cold water to avoid excess moisture. The key is to pat them dry before chopping, which prevents the batter from becoming watery. A quick swap is to use scallops for a sweeter, more delicate taste, but the texture will be slightly different.
When selecting soy sauce, opt for a low‑sodium version if you’re watching salt intake. A small splash of rice vinegar can also brighten the dish, but keep it minimal to avoid overpowering the shrimp. The sesame oil should be toasted slightly before adding it to the batter; this releases its nutty flavor and adds a subtle aroma that elevates the dish.
The Texture Crew
Flour and cornstarch form the backbone of the batter, giving it structure and the ability to hold the shrimp together. The flour ensures the cake doesn’t crumble, while the cornstarch provides a lightness that prevents the cake from becoming doughy. If you omit the cornstarch, the texture will be denser and less airy, which many people find less appealing.
Eggs act as a binder, holding the shrimp and flour together while adding richness. They also help the cake brown evenly, giving it a beautiful golden crust. You can substitute a single egg with a tablespoon of tofu milk for a vegan version, but the texture will change slightly. The water should be cold to keep the batter from cooking prematurely; using warm water can cause the batter to seize up.
Adding a teaspoon of white pepper and a pinch of salt gives the cake a subtle heat and depth. If you’re sensitive to sodium, use a reduced‑salt soy sauce and a dash of sea salt. These spices can be adjusted to taste, but the balance is crucial for the final flavor. A quick swap is to use black pepper for a different aroma profile, but the overall taste remains similar.
The Unexpected Star
Scallions and ginger are the unsung heroes that add brightness and a fresh bite to the cake. The scallions provide a mild onion flavor that cuts through the richness of the shrimp, while the ginger offers a zesty kick that awakens the palate. If you’re not a fan of ginger, you can use a small amount of garlic instead, but the dish will lose a bit of its traditional zing.
Fresh garlic, when minced finely, brings a subtle heat that enhances the overall flavor. It’s easy to overlook, but the garlic’s aroma during cooking creates an inviting scent that draws people in. If you’re allergic to garlic, simply omit it and add a pinch of onion powder to maintain the savory depth. A quick swap is to use leeks for a milder flavor, but the texture will remain largely unchanged.
Sesame seeds add a nutty crunch that contrasts with the soft interior. They’re optional but highly recommended for visual appeal and an extra layer of flavor. If you’re allergic to sesame, you can replace them with chopped walnuts or almonds for a different crunch. The seeds should be toasted lightly before adding them to the batter to bring out their natural oils.
The Final Flourish
Oil for frying is the final component that transforms the batter into a crispy masterpiece. A neutral oil with a high smoke point, such as canola or peanut oil, ensures the cake cooks evenly without imparting unwanted flavors. If you’re looking for a healthier option, you can use avocado oil, but it may alter the taste slightly.
The amount of oil matters; too little and the cake will stick to the pan, too much and it will become greasy. A good rule of thumb is to fill the pan about one inch deep to allow the cake to float and cook evenly. If you’re using a non‑stick pan, reduce the oil slightly, as the surface will already prevent sticking. A quick swap is to use a cast‑iron skillet for an even heat distribution, but the cooking time may need adjustment.
When the batter is ready, a splash of water can be added to keep it moist. However, avoid adding too much, as this can dilute the flavor and affect the texture. A tablespoon of water is enough to keep the batter from drying out during the resting period. This trick is especially useful if you’re preparing the batter a day ahead and storing it in the fridge.
Everything's prepped? Good. Let's get into the real action…
The Method — Step by Step
- Start by finely chopping the shrimp into bite‑sized pieces. Pat them dry with a paper towel to remove excess moisture, which could cause the batter to become watery. This step ensures the shrimp stays tender and doesn’t release too much liquid during cooking. I always keep a small bowl nearby for the shrimp; it’s a quick process that sets the foundation for the rest of the dish. Once the shrimp is ready, set it aside while you mix the dry ingredients.
- In a large mixing bowl, combine the all‑purpose flour and cornstarch, whisking them together to avoid clumps. Add the beaten eggs, cold water, soy sauce, sesame oil, salt, and white pepper. Stir until the batter is smooth and free of lumps. The batter should be slightly thick, but still pourable. If it feels too thick, add a teaspoon of water at a time until it reaches the right consistency. The goal is a silky mixture that coats the shrimp without dripping.
- Fold in the chopped shrimp, scallions, ginger, and minced garlic. Mix gently, ensuring the shrimp is evenly distributed throughout the batter. This ensures every bite contains shrimp, not just the center. The aroma of garlic and ginger should fill the kitchen, signaling that the dish is about to come alive. I like to let the mixture sit for 5 minutes; this allows the flavors to meld together beautifully.
- Heat a non‑stick skillet over medium heat and add enough oil to coat the bottom. Once the oil is shimmering, pour a ladleful of batter into the pan, spreading it into a thin, even layer. The batter should sizzle immediately, indicating the pan is at the right temperature. Watch closely; the edges will begin to lift as the batter sets. This is the moment of truth, where the batter’s thickness and heat interact to create a crisp crust.
- Let the cake cook undisturbed for 4 to 5 minutes, or until the edges are golden and the top begins to set. Flip the cake carefully using a spatula, and cook for another 3 to 4 minutes on the other side. The cake should develop a beautiful golden brown crust while staying moist inside. If you’re cooking multiple cakes, keep them warm in a low oven (around 200°F) to prevent them from drying out. The sizzle when flipping is a satisfying cue that the cake is nearly ready.
- Remove the cake from the skillet and place it on a paper towel to drain excess oil. Slice it into wedges while it’s still hot, ensuring each piece holds its shape. The steam will rise, creating a fragrant cloud that makes the kitchen smell like a seaside market. Serve immediately, garnishing with extra scallions and sesame seeds if desired. The contrast between the crispy edges and the tender center will wow your guests.
- If you prefer a slightly sweeter glaze, whisk together a tablespoon of honey, a splash of rice vinegar, and a pinch of chili flakes. Drizzle this over the cake before serving. The glaze will add a glossy sheen and a subtle heat that complements the shrimp’s natural sweetness. This step is optional but highly recommended for those who enjoy a touch of spice.
- For a crispy variation, you can coat the batter in a light dusting of panko breadcrumbs before frying. The breadcrumbs will give an extra crunch, while still allowing the shrimp to shine through. Just be careful not to overload the batter, as it may become too heavy and lose its delicate texture. This trick is perfect for those who love a crunchier bite.
- If you’re preparing the batter a day ahead, cover it tightly with plastic wrap and refrigerate. Bring it to room temperature before cooking to ensure even frying. The batter may thicken slightly after refrigeration; simply add a splash of cold water to loosen it. This makes the recipe even more convenient for busy evenings.
- Serve the shrimp cakes hot, accompanied by a small bowl of soy sauce or a spicy dipping sauce of your choice. The combination of savory, sweet, and slightly spicy flavors will create a harmonious experience. Pair it with a light cucumber salad or a bowl of jasmine rice for a complete meal. The dish’s versatility makes it suitable for any occasion, from casual gatherings to formal dinners.
- After the cake has cooled slightly, you can store leftovers in an airtight container in the refrigerator for up to 2 days. Reheat in a skillet over medium heat for a few minutes until crisp again. The cake’s texture remains excellent, and the flavors intensify when reheated. I’ve found that the reheated version is almost as good as the fresh one, making it a great option for meal prep.
That's it — you did it. But hold on, I've got a few more tricks that'll take this to another level…
Insider Tricks for Flawless Results
The Temperature Rule Nobody Follows
Many people fry shrimp cakes at high heat, resulting in a burnt exterior and a soggy interior. The trick is to maintain a steady medium heat, allowing the batter to set without scorching. I’ve found that a temperature of 350°F (175°C) is ideal for a golden crust. If your stove doesn’t have a thermometer, test the oil by dropping a small drop of batter; it should sizzle gently and rise to the surface. Keep the heat steady; any sudden spikes will ruin the texture.
Why Your Nose Knows Best
As soon as the batter hits the pan, a distinct aroma will emerge. This scent signals that the batter is cooking correctly. If the smell is too mild, the oil is too cool; if it’s too strong, the heat is too high. Trust your senses: the aroma should be savory, slightly nutty, and not burnt. A quick tip is to keep a small bowl of water nearby; if the water starts to steam, the heat is perfect.
The 5-Minute Rest That Changes Everything
After mixing the batter, let it rest for at least five minutes. This brief pause allows the flour to hydrate fully, resulting in a smoother batter. I’ve seen people skip this step and end up with a clumpy mixture that doesn’t coat the shrimp evenly. A simple way to remember is to set a timer for five minutes while you prep the skillet. The rest period also lets the flavors mingle, making the final dish more cohesive.
Don’t Skip the Oil Temperature Test
Before adding the batter, pour a single drop of water into the skillet. If it dances and evaporates instantly, the oil is ready. If it splatters and stays, the oil is too hot; if it drips slowly, the oil is too cool. This simple test saves you from ruined cakes and ensures a perfect first bite. I’ve used this trick for years, and it’s become a staple in every kitchen I visit.
Use a Light Dusting of Panko for Crunch
For those who love an extra crunch, lightly coat the batter with panko breadcrumbs before frying. The breadcrumbs give a delightful crunch that doesn’t overpower the shrimp’s delicate flavor. Just sprinkle a small amount; too much will make the cake heavy. This variation is especially popular in Taiwanese street food, where the crunch is a signature element.
Creative Twists and Variations
This recipe is a playground. Here are some of my favorite ways to switch things up:
Spicy Szechuan Shrimp Cake
Swap the sesame oil for Szechuan pepper oil and add a tablespoon of chili oil. The result is a fiery, numbing kick that pairs perfectly with the shrimp’s natural sweetness. Serve with a side of cool cucumber salad to balance the heat. This variation is ideal for those who love bold, spicy flavors.
Thai Coconut Shrimp Cake
Replace the water with coconut milk and add a splash of lime juice. The coconut milk gives the batter a creamy, tropical flavor, while the lime adds a bright citrus note. Garnish with fresh cilantro and a squeeze of lime. This version transports your taste buds straight to the beach.
Vegan Shrimp Cake
Use plant‑based shrimp or finely chopped tofu as a base. Replace the eggs with a tablespoon of flaxseed meal mixed with water, and use a vegan soy sauce. The result is a plant‑based cake that still delivers the umami punch. This is a great option for those who want a vegetarian take on a classic.
Seafood Mix‑Up
Combine shrimp with scallops or crab meat for a richer, more luxurious cake. The mix of textures creates a delightful bite, while the flavors blend harmoniously. Adjust the seasoning slightly to accommodate the additional seafood’s sweetness. This variation is perfect for a special occasion.
Herb‑Infused Shrimp Cake
Blend fresh herbs such as basil, mint, and cilantro into the batter. The herbs add a fresh, aromatic layer that complements the shrimp’s briny flavor. Serve with a light yogurt dip to enhance the herbaceous notes. This is a refreshing twist for warmer days.
Low‑Carb Shrimp Cake
Replace the all‑purpose flour with almond flour or coconut flour for a low‑carb option. Use a pinch of xanthan gum to help bind the batter. The texture will be slightly denser, but the flavor remains unchanged. This variation is ideal for those following a keto or low‑carb diet.
Storing and Bringing It Back to Life
Fridge Storage
Store leftover shrimp cakes in an airtight container in the refrigerator for up to 2 days. Keep them on a paper towel to absorb excess moisture. When reheating, place them in a preheated oven at 350°F for 10 minutes to restore crispness. This method ensures the cakes remain juicy inside while the crust stays crunchy.
Freezer Friendly
Wrap each cake individually in parchment paper and place them in a freezer bag. Freeze for up to 1 month. When ready to eat, thaw overnight in the fridge. Reheat in a skillet over medium heat until hot and crispy. The freezing process locks in flavor and texture, making it convenient for future meals.
Best Reheating Method
For the best results, use a skillet to reheat the cakes. Heat the skillet over medium heat, add a splash of oil, and place the cake in the pan. Flip after 2 minutes, then flip again after another 2 minutes. The quick, direct heat restores the golden crust without drying out the interior. Add a tiny splash of water before reheating; it steams back to perfection.