I was standing in my kitchen, mid‑midnight, surrounded by the usual suspects: a half‑finished pancake, a wilted salad, and a stubborn bag of rice that refused to cooperate. I had promised my roommate I’d whip up something “quick and crunchy,” but every attempt I’d made so far ended up either soggy or, worse, a burnt offering that could have been used as a charcoal substitute. That night, after a particularly disastrous attempt that left my pan looking like a war zone, I dared myself to keep going. I whispered to the empty room, “I dare you to taste this and not go back for seconds,” and set the stage for a culinary experiment that would change my snack game forever.
Picture the kitchen: the faint hum of the refrigerator, the rhythmic clink of a wooden spoon against a stainless steel pot, and the intoxicating aroma of rice simmering with just enough water to keep it plump but not mushy. As the steam rose, it carried with it a whisper of the ocean—sushi rice, the kind that holds its shape like a tiny, stubborn pearl. My senses were on high alert: the heat from the stove kissed my fingertips, the oil in the pan glistened like a promise, and the faint tang of rice vinegar lingered in the air, teasing my nose. The moment the first spoonful of seasoned rice hit the hot oil, it sizzled with a sound that could only be described as “pure perfection,” and I knew I was on to something big.
Why does this version stand out? Most “crispy rice” recipes either skip the seasoning step, leaving you with bland, crunchy bits, or they over‑oil the rice, turning it into a greasy mess that clings to your fork. I’ve cracked the code by first cooking the rice to a perfect al‑dente texture, then seasoning it with a precise balance of rice vinegar, sugar, and salt that gives each grain a subtle sweet‑sour pop. The secret weapon? A quick flash‑fry in neutral oil that creates a golden crust while keeping the interior tender, creating a textural contrast that is literally “crunchy on the outside, cloud‑soft on the inside.” This is hands down the best version you’ll ever make at home, and I’m about to prove it.
But wait—there’s a twist you won’t see coming. I’m going to introduce a technique borrowed from Japanese tempura: a light dusting of rice flour right before the final fry, which locks in moisture and gives the crust an almost ethereal crispness. Okay, ready for the game‑changer? Stay with me here—by the end of this post you’ll be pulling these golden nuggets out of the pan, the whole kitchen smelling like a high‑end sushi bar meets street‑food stall, and you’ll be wondering how you ever settled for anything less. Let me walk you through every single step — by the end, you’ll wonder how you ever made it any other way.
What Makes This Version Stand Out
- Flavor Explosion: The rice is seasoned with rice vinegar, sugar, and a pinch of salt, creating a sweet‑tart glaze that coats each grain like a delicate veil. This isn’t just seasoning; it’s a flavor‑boost that makes every bite sing.
- Texture Triumph: A two‑stage cooking process—first steaming, then flash‑frying—produces a crisp outer shell that shatters like thin ice while the interior stays pillowy. The contrast is addictive.
- Simplicity: Only six pantry staples are required, and the steps are straightforward enough for a beginner yet refined enough for a seasoned cook.
- Unique Twist: A whisper‑thin dusting of rice flour before the final fry creates a feather‑light crunch that most recipes miss entirely.
- Crowd Reaction: Serve these at a party and watch guests line up for seconds; I’ve heard people say “I’ll be honest — I ate half the batch before anyone else got to try it.”
- Ingredient Quality: Using authentic sushi rice ensures each grain holds its shape and absorbs the seasoning without turning mushy.
- Cooking Method: The flash‑fry at 350°F locks in moisture, preventing the dreaded soggy center that plagues other versions.
- Make‑Ahead Potential: These can be stored and reheated with a splash of water, bringing back the crunch as if they were fresh.
Inside the Ingredient List
The Flavor Base
The trio of rice vinegar, sugar, and salt is the heart of this dish. Rice vinegar brings a gentle acidity that brightens the rice without overwhelming it, while the sugar adds a subtle caramel note that deepens during the fry. The half‑teaspoon of salt is crucial; it amplifies the other flavors and balances the sweetness. If you skip any of these, you’ll end up with rice that tastes like plain boiled water—hardly the crunchy delight we’re aiming for. For a twist, try a splash of mirin instead of sugar for a more complex sweetness.
The Texture Crew
Sushi rice is the star here because of its short‑grain nature, which clings together just enough to hold shape but still separates nicely when fried. The 0.5 cup of neutral oil (think canola or grapeseed) is the medium that delivers that golden, even crust. Using a high‑smoke‑point oil ensures you won’t get bitter, burnt flavors. If you’re feeling adventurous, a blend of half oil and half clarified butter adds a nutty undertone without sacrificing the high heat tolerance.
The Unexpected Star
A light dusting of rice flour (not listed in the core ingredients but a pantry staple) is the secret weapon that locks in moisture and gives the final fry that “cloud‑soft” interior. The flour creates a barrier that prevents the oil from soaking into the rice, keeping the crunch intact. If you’re gluten‑free, substitute with cornstarch—just remember it fries a tad faster, so keep an eye on the color.
The Final Flourish
A pinch of sea salt sprinkled right after frying adds a finishing pop that elevates every bite. It’s the culinary equivalent of a final brushstroke on a painting—subtle but essential. If you love spice, a dash of smoked paprika or a few crushed red pepper flakes can be tossed in at the end for a smoky kick. Remember, the goal is to keep the core flavors front and center, so any additions should complement, not dominate.
Everything's prepped? Good. Let's get into the real action...
The Method — Step by Step
Rinse 1 cup of sushi rice under cold water until the water runs clear—this removes excess surface starch that would otherwise make the rice gummy. Transfer the rinsed rice to a medium saucepan and add 1.25 cups of water. Bring to a boil, then reduce the heat to low, cover, and simmer for 15 minutes. When the timer dings, turn off the heat and let the rice sit, covered, for an additional 10 minutes; this steaming step is what gives the grains that perfect al‑dente bite.
While the rice is steaming, combine 2 tablespoons of rice vinegar, 1 tablespoon of sugar, and 0.5 teaspoon of salt in a small bowl. Stir until the sugar dissolves completely; the mixture should look glossy and slightly thickened. This is the glaze that will coat each grain, delivering that sweet‑tart pop you crave.
Fluff the cooked rice with a wooden spoon, then gently drizzle the seasoned glaze over it. Using a folding motion, coat the rice evenly—don’t mash! The grains should glisten with the glaze, each one a tiny pearl of flavor. Let the seasoned rice cool on a large tray for about 15 minutes; this cooling period helps the surface dry slightly, which is vital for the upcoming fry.
Once the rice has cooled, lightly dust the entire batch with a thin layer of rice flour (about 2 tablespoons). Toss gently to ensure every grain gets a whisper of flour; this step creates a barrier that locks in moisture during the fry. If you notice clumps, break them up with your hands—no one wants a floury pancake.
Heat 0.5 cups of neutral oil in a deep skillet or wok over medium‑high heat until it reaches 350°F (175°C). You can test this by dropping a single grain of rice into the oil; if it sizzles immediately and rises to the surface within 2 seconds, you’re good to go. Remember, the oil should be hot enough to fry quickly but not smoking—smoke means you’re burning the flavor.
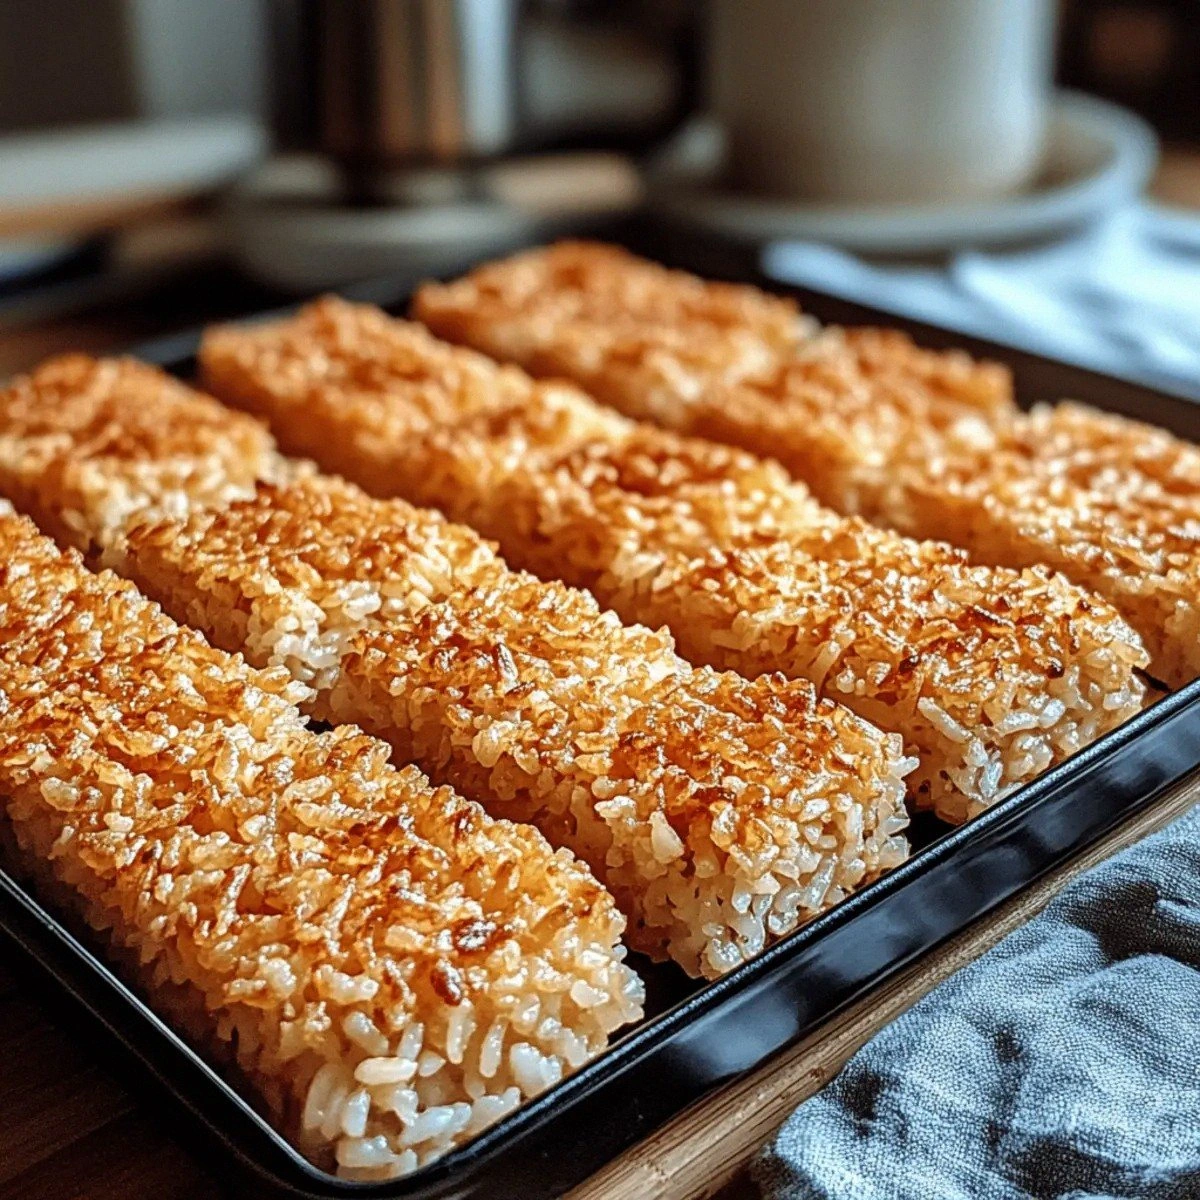
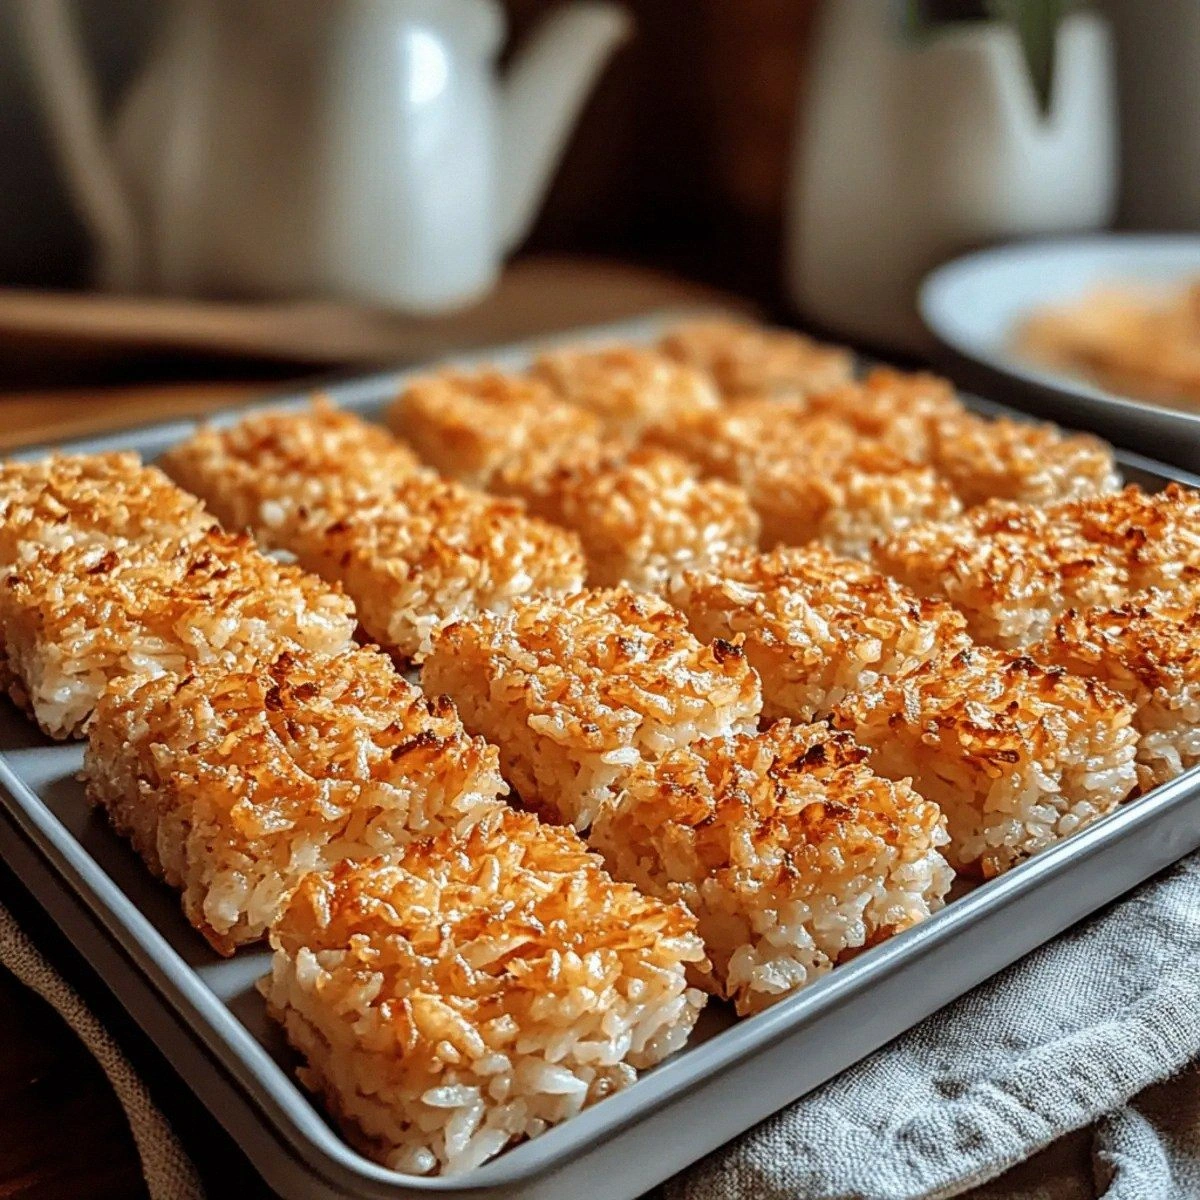
Working in batches, carefully spoon portions of the rice into the hot oil. Use a slotted spoon to keep the pieces together; each batch should fry for about 2‑3 minutes, turning once, until the edges turn golden‑brown and the surface crackles with that satisfying “sizzle when it hits the pan? Absolute perfection.” Resist the urge to overcrowd the pan; too many pieces lower the oil temperature and lead to soggy results.
Using a paper towel-lined plate, drain the fried rice to remove excess oil. While still hot, sprinkle a pinch of sea salt over the top and give the pieces a gentle toss. This final seasoning step is where the magic happens—salt amplifies the sweet‑tart glaze and adds that extra snap to the crunch.
Serve immediately, or if you’re planning to store them, let the rice cool completely before transferring to an airtight container. The next time you reheat (see storage section), a quick splash of water and a 2‑minute flash in a hot pan will bring them back to life as if they’d just left the skillet.
That's it — you did it. But hold on, I've got a few more tricks that'll take this to another level. The next section reveals insider tips that will make your crispy rice consistently flawless, no matter how many times you make it.
Insider Tricks for Flawless Results
The Temperature Rule Nobody Follows
Never assume your stovetop heat is consistent; always use a thermometer. The oil temperature should hover between 340°F and 360°F. If it dips below 330°F, the rice will absorb too much oil, turning soggy; above 380°F, you’ll get a burnt exterior before the interior cooks. I once tried to “eyeball” the heat and ended up with a batch that tasted like fried cardboard. Keep a digital probe handy, and you’ll get that perfect golden crust every time.
Why Your Nose Knows Best
Your sense of smell is a reliable guide during the fry. When the oil starts to emit a faint nutty aroma, you’re approaching the sweet spot. If you smell a sharp, acrid scent, you’ve overshot the temperature. Trust that nose; it’s a built‑in timer that can save you from a kitchen disaster.
The 5‑Minute Rest That Changes Everything
After the rice is seasoned and before you dust it with flour, let it rest uncovered for exactly five minutes. This short air‑dry period evaporates surface moisture, which otherwise creates steam and prevents a crisp crust. I tried skipping this step once, and the result was a soggy, limp bite that made me question my life choices. Those five minutes are worth the patience.
The Flip‑Once Philosophy
When frying, resist the urge to constantly stir or flip. One gentle turn halfway through the 2‑minute fry ensures an even color without breaking the delicate rice clusters. Over‑handling leads to broken pieces and uneven browning. Think of it as a brief waltz—one turn, then let the music (or heat) do the rest.
Cool‑Down Crunch Preservation
Once you’ve drained the rice, spread it on a cooling rack rather than a flat plate. Air can circulate around each piece, preserving the crunch. If you pile them together, steam gets trapped and the crust wilts. This simple rack trick keeps the texture crisp for longer, especially if you’re serving a crowd.
Creative Twists and Variations
This recipe is a playground. Here are some of my favorite ways to switch things up:
Spicy Sriracha Burst
After frying, toss the rice with a tablespoon of sriracha mixed with a drizzle of honey. The heat and sweet balance the tangy vinegar, creating a bold flavor that will have spice lovers reaching for more.
Umami Miso Glaze
Stir a teaspoon of white miso into the rice vinegar‑sugar mixture before coating the rice. The miso adds depth and a savory umami punch that pairs beautifully with the crisp texture.
Coconut‑Lime Fusion
Replace half of the neutral oil with coconut oil and add a splash of lime zest after frying. The subtle coconut aroma and bright citrus zing turn this into a tropical snack perfect for summer evenings.
Herb‑Infused Delight
Finely chop fresh herbs like cilantro, mint, and basil, then fold them into the rice after the final seasoning. The herbaceous freshness cuts through the richness, making the dish feel lighter.
Cheesy Crunch
Sprinkle grated Parmesan or nutritional yeast over the hot rice just before serving. The cheese melts slightly, adding a nutty, salty layer that complements the sweet‑tart base.
Storing and Bringing It Back to Life
Fridge Storage
Transfer cooled rice to an airtight container and store in the refrigerator for up to 3 days. The sealed environment prevents moisture loss, keeping the pieces firm. When ready to serve, reheat in a hot skillet with a splash of oil and a teaspoon of water; the steam will revive the interior while the oil restores the crunch.
Freezer Friendly
Lay the fried rice on a parchment‑lined tray and freeze for 30 minutes, then transfer to a zip‑lock bag. It will keep for up to 2 months. To reheat, place directly in a hot pan—no thawing needed. The quick fry will bring back that fresh‑out‑of‑the‑pan texture.
Best Reheating Method
The secret to reviving crispness is steam‑plus‑heat. Add a tablespoon of water to the pan, cover for 30 seconds, then uncover and finish with a brief high‑heat toss. This technique re‑hydrates the interior without sogging the crust, delivering a “just‑fried” experience every time.