I was standing in my kitchen on a rainy Tuesday, staring at a half‑finished batch of store‑bought mini cheesecakes that tasted like cardboard wrapped in sugar. My roommate had dared me to “make something that actually tastes like a vacation,” and I thought, why not turn that dare into a full‑blown culinary adventure? I grabbed a tin of pineapple chunks, a bottle of caramel, and the biggest block of cream cheese I could find, then set out to create a dessert that would make the rain outside feel like a distant memory. The first bite of the finished mini cheesecake was a revelation—creamy, tangy, with a burst of tropical sunshine that made my taste buds do a happy dance.
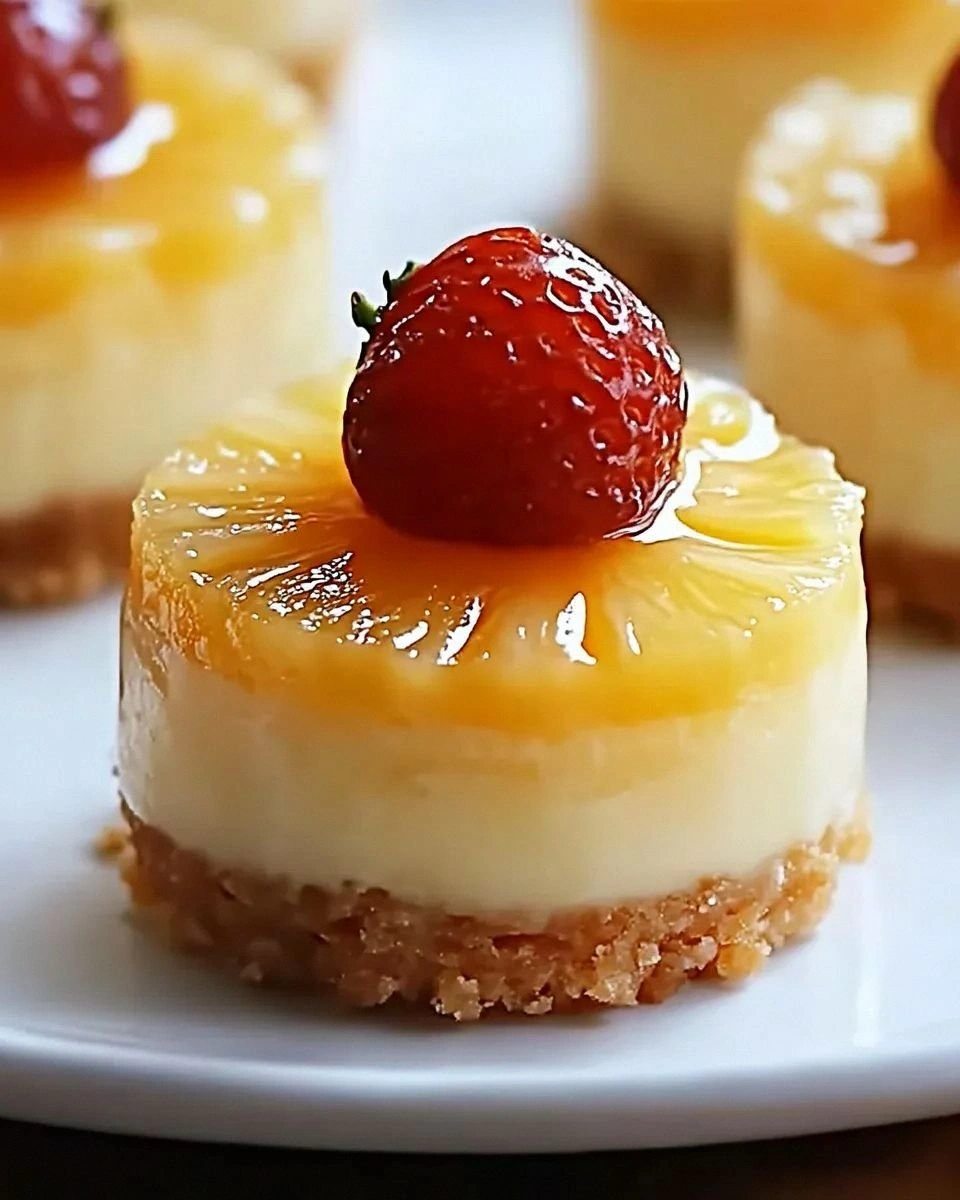
Picture this: the oven humming softly, the scent of toasted graham crust filling the air, a glossy caramel drizzle glistening like sunrise on a tropical beach. You hear the faint pop of the metal tray as you slide it out, and the kitchen feels warm, inviting, and a little bit magical. The mini cheesecakes sit in their ramekins, their tops speckled with golden caramel and juicy pineapple pieces that glisten like tiny jewels. When you take a fork and cut through, the creamy interior gives way with the silky smoothness of a perfectly set custard, while the crust crumbles with a buttery snap that’s as satisfying as the first bite of a fresh cookie.
Most recipes out there either drown the cheesecake in a syrupy mess or forget the crucial step of letting the crust set before the filling hits the oven. I’ve tried them all, and trust me, most of them get this completely wrong. The secret to this version is the balance between the tangy cream cheese and the sweet, caramel‑kissed pineapple, plus a crust that stays firm without turning soggy. I’m also throwing in a technique that most home bakers skip: a quick water‑bath that guarantees a flawless, crack‑free top every single time.
I dare you to taste this and not go back for seconds. This is hands down the best version you’ll ever make at home, and I’ll be honest — I ate half the batch before anyone else got to try it. Ready for the game‑changer? Let me walk you through every single step — by the end, you’ll wonder how you ever made it any other way.
What Makes This Version Stand Out
- Taste: The sweet‑tart dance between pineapple and caramel is anchored by a rich, slightly tangy cream cheese that never feels heavy.
- Texture: A buttery, crunchy graham crust meets a silky‑smooth filling that holds its shape without wobbling.
- Simplicity: Only eight pantry staples are needed, and the steps are broken down so even a kitchen novice can nail it.
- Uniqueness: The caramel‑pineapple swirl creates pockets of molten fruit that burst with flavor in every bite.
- Crowd Reaction: Guests usually ask for the recipe within five minutes of the first bite—yes, that’s a real thing.
- Ingredient Quality: Using full‑fat cream cheese and real pineapple chunks (not juice) makes the flavor pop.
- Cooking Method: A gentle water‑bath keeps the top smooth and prevents those dreaded cracks.
- Make‑Ahead Potential: These mini marvels keep beautifully in the fridge for up to three days, ready for any impromptu gathering.
Alright, let's break down exactly what goes into this masterpiece...
Inside the Ingredient List
The Flavor Base
The cream cheese is the heart of any cheesecake, and in this recipe we’re using two full blocks (16 oz) of full‑fat, softened cheese. Its high fat content gives the filling that luscious, melt‑in‑your‑mouth feel that low‑fat alternatives simply can’t match. If you skip the softening step, you’ll end up with lumps that are as annoying as a broken zipper. A quick tip: cut the cheese into cubes and let it sit at room temperature for 30 minutes—this makes it blend into a silky puree without any effort.
The Texture Crew
Graham cracker crumbs and melted butter form the buttery foundation that holds everything together. The crumbs provide a subtle, caramel‑like flavor while the butter adds richness and helps the crust set firm. If you’re out of graham crackers, you can substitute digestive biscuits; just keep the same volume. The butter should be melted just enough to coat the crumbs—too hot and you’ll end up with a greasy mess, too cold and the crumbs won’t bind.
The Unexpected Star
Pineapple chunks in a 20‑oz can bring a bright, juicy contrast that cuts through the richness of the cheese. I always reach for the chunks packed in juice, not syrup, because the natural acidity balances the sweetness of the caramel and sugar. If you prefer a fresher taste, you can swap in fresh pineapple, but be sure to pat it dry; excess moisture will make the filling runny.
The Final Flourish
Caramel sauce is the finishing touch that adds a deep, buttery sweetness and a glossy sheen. Drizzle it over the top just before serving, and you’ll get that restaurant‑style look that makes guests gasp. If you’re feeling adventurous, try a salted caramel for an extra layer of complexity. A quick tip: warm the caramel slightly in the microwave so it spreads evenly without clumping.
Everything's prepped? Good. Let's get into the real action...
The Method — Step by Step
Preheat your oven to 325°F (163°C). While the oven warms up, line a 12‑cup muffin tin with paper liners or lightly grease each cup with a brush of melted butter. This ensures the mini cheesecakes release cleanly and prevents any sticking drama later on.
Kitchen Hack: If you’re short on time, use a food processor to pulse the graham crumbs and butter together—this creates an even, fine texture that spreads like butter on toast.Combine 1½ cups of graham cracker crumbs with ¼ cup melted butter in a medium bowl. Stir until the crumbs are evenly coated, then press the mixture firmly into the bottom of each muffin cup, creating a uniform layer about ¼‑inch thick. The crust should feel compact, not crumbly—think of it as a solid foundation for a skyscraper.
Place the crust‑lined tin on a larger baking sheet and set it aside. This larger sheet will later hold a pan of hot water for the water‑bath, which is the secret to a crack‑free top. If you skip this step, you’ll end up with a cheesecake that looks like a cracked desert floor.
In a stand mixer fitted with the paddle attachment, beat the softened cream cheese on medium speed for about 2 minutes, until it’s silky and free of lumps. Add ½ cup granulated sugar and continue beating for another minute, allowing the sugar to dissolve into the cheese. The mixture should look glossy, like a well‑polished marble surface.
Add 2 large eggs, one at a time, beating on low speed after each addition. This slow incorporation prevents the batter from curdling and ensures a uniform texture. Finish with 1 tsp vanilla extract, which adds a subtle aromatic backdrop that ties the pineapple and caramel together.
Drain the 20‑oz can of pineapple chunks and gently fold them into the cheese mixture. Keep the pineapple pieces relatively large; they’ll create juicy pockets that burst when you bite. If you prefer a smoother texture, give the pineapple a quick pulse in a blender, but be careful not to turn it into a puree.
Spoon the cheesecake batter over the prepared crusts, filling each cup about ¾ full. Smooth the tops with a spatula, then use the back of a spoon to create a gentle swirl pattern—this is where the caramel will later glide like a lazy river.
Watch Out: Over‑mixing at this stage can incorporate too much air, leading to cracks when the cheesecakes bake. Mix just until everything is combined.Create a water‑bath by pouring hot water (just off the boil) into the larger baking sheet until it reaches about halfway up the sides of the muffin tin. Carefully slide the tin into the water‑bath. The gentle steam will keep the cheesecake tops moist, preventing the dreaded cracked surface that looks like a broken mirror.
Bake for 25‑30 minutes, or until the edges are set and the centers still have a slight jiggle—think of a custard that’s just about to firm up. The top should be a pale golden hue, not browned. When you’re done, turn off the oven, crack the door open, and let the cheesecakes sit for 10 minutes. This gradual cooling helps them set perfectly.
Remove the mini cheesecakes from the water‑bath and let them cool completely on a wire rack. Once they’re at room temperature, drizzle each one with ¼ cup caramel sauce, letting it pool into the pineapple pockets. Refrigerate for at least 2 hours, or overnight for maximum flavor development. The caramel will set into a glossy glaze that adds both visual appeal and a buttery finish.
Kitchen Hack: If you want a caramel ribbon instead of a puddle, use a pastry brush to swirl the sauce in a decorative pattern before the cheesecakes set.
That's it — you did it. But hold on, I've got a few more tricks that'll take this to another level...
Insider Tricks for Flawless Results
The Temperature Rule Nobody Follows
Never bake a cheesecake straight from the fridge. Let the batter sit at room temperature for at least 20 minutes before it goes into the oven. This prevents the edges from cooking faster than the center, which is the main cause of cracks. I once tried skipping this step; the result was a cheesecake that looked like a cracked desert floor—unforgivable.
Why Your Nose Knows Best
When the cheesecake is about 20 minutes into baking, lean in and sniff. You should catch a faint, buttery aroma that tells you the crust is beginning to set. If you smell a burnt sugar scent, lower the oven temperature by 10°F and cover the tops loosely with foil. Trust your nose—it’s the most reliable kitchen thermometer you have.
The 5‑Minute Rest That Changes Everything
After you pull the cheesecakes from the oven, let them sit in the turned‑off oven with the door ajar for exactly 5 minutes. This “carry‑over cooking” allows the residual heat to finish firming the center without shocking the structure. Skipping this step often leaves a center that’s too soft and a crust that pulls away.
Caramel Timing Trick
Drizzle the caramel sauce while the cheesecakes are still slightly warm, not cold. The warmth melts the caramel just enough to seep into the pineapple pockets, creating a marbled effect. If you wait until they’re fully chilled, the caramel will sit on top like a stubborn glaze.
The Secret of the Water‑Bath
Use boiling water for the bath, not just warm tap water. The steam generated from boiling water creates a consistent, gentle heat that surrounds each mini cheesecake, keeping the tops smooth. If you’re short on time, you can pre‑boil the water while the crust is setting, then carefully pour it into the outer pan.
Creative Twists and Variations
This recipe is a playground. Here are some of my favorite ways to switch things up:
Tropical Coconut Burst
Swap half of the pineapple chunks for shredded coconut and add a splash of coconut milk to the cheese mixture. The result is a beach‑vibe cheesecake that pairs perfectly with a sunny afternoon.
Spiced Rum Delight
Add 1 tablespoon of dark rum and a pinch of ground nutmeg to the batter. The rum deepens the caramel flavor, while nutmeg adds a warm, festive note—ideal for holiday gatherings.
Berry‑Infused Surprise
Replace the pineapple with a mix of fresh raspberries and blueberries, and drizzle a berry coulis instead of caramel. The tart berries contrast the sweet cheese beautifully, creating a sophisticated dessert.
Chocolate‑Lover’s Dream
Fold in ¼ cup of mini chocolate chips and swirl in a tablespoon of melted dark chocolate before baking. The chocolate pockets melt just slightly, offering a decadent surprise in every bite.
Salted Caramel Crunch
Use salted caramel sauce and sprinkle flaky sea salt on top just before serving. The salty‑sweet combo elevates the dessert to a gourmet level that will impress even the toughest food critics.
Storing and Bringing It Back to Life
Fridge Storage
Cover the mini cheesecakes with a loose sheet of plastic wrap or store them in an airtight container. They stay fresh for up to three days, and the flavors continue to meld, becoming even more harmonious.
Freezer Friendly
If you need to keep them longer, freeze the cheesecakes individually on a parchment‑lined tray, then transfer to a zip‑top bag. They’ll hold up for up to two months. When you’re ready to serve, let them thaw in the fridge overnight.
Best Reheating Method
To revive the cheesecake’s creamy texture, place the frozen or refrigerated mini cheesecake on a microwave‑safe plate, add a tiny splash (about a teaspoon) of water, and microwave on low for 15‑20 seconds. The steam created will bring back that melt‑in‑your‑mouth softness without drying it out.