I was standing in my kitchen, staring at a half‑finished batch of store‑bought Almond Joy bars that had somehow turned into a sticky, sad mess on the counter. The culprit? A rushed attempt to satisfy a sudden midnight craving that ended with melted chocolate splattering like fireworks on a rainy night. I could hear the faint hum of the refrigerator, smell the lingering coconut, feel the cool metal of the mixing bowl against my fingertips, and taste the bitter disappointment of a cookie that never quite hit the sweet spot. That moment of culinary chaos sparked a dare: I would create a cookie that captures the iconic Almond Joy experience, but in a bite‑sized, small‑batch form that even the pickiest sweet‑tooth could not resist.
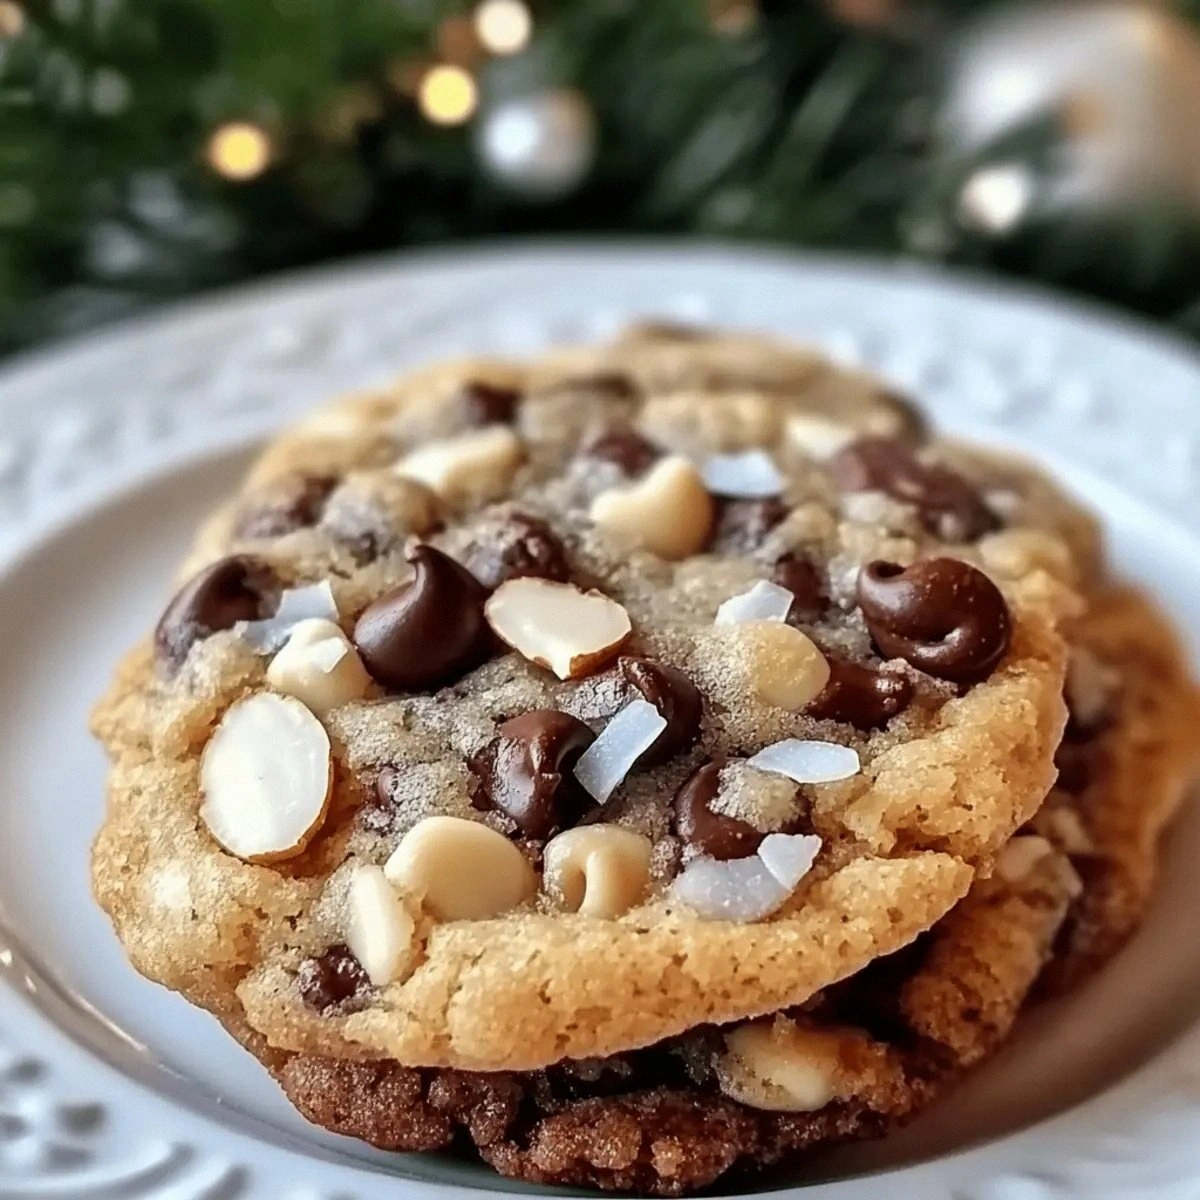
Fast forward a few weeks, a few experimental batches, and a lot of taste‑testing (yes, I ate half the batch before anyone else got a chance). The result? A cookie that is simultaneously chewy, crunchy, buttery, and downright addictive. Imagine the classic trio of chocolate, coconut, and almond coming together in a harmonious dance where each ingredient gets its moment in the spotlight, yet never overwhelms the other. The cookie’s exterior is a thin, glossy chocolate shell that cracks like a whisper when you bite into it, while the interior offers a soft, melt‑in‑your‑mouth coconut center studded with toasted almond slices that snap with a satisfying crunch. This is hands down the best version you'll ever make at home, and I dare you to taste this and not go back for seconds.
What truly sets this recipe apart is a tiny, seemingly insignificant tweak: I toast the coconut flakes and almonds together before folding them into the dough. This extra step adds a depth of flavor that most recipes completely miss, turning a simple cookie into a layered experience that feels like a trip to a tropical beach with a side of nutty fireworks. Most recipes get this completely wrong by dumping raw coconut straight into the batter, resulting in a soggy, flat texture that never quite reaches its full potential. By contrast, our toasted version brings a toasty aroma that fills the kitchen the moment you pull the tray out of the oven—picture yourself pulling this out of the oven, the whole kitchen smelling incredible, the steam rising like a fragrant cloud of anticipation.
Okay, ready for the game‑changer? I’m about to walk you through every single step—from the precise moment you cream the butter and sugars to the exact second you should see the edges of the cookies start to pull away from the parchment. By the end, you’ll wonder how you ever made these any other way, and you’ll have a foolproof method that you can rely on for every future batch. Stay with me here — this is worth it.
What Makes This Version Stand Out
- Flavor Harmony: The trio of chocolate, coconut, and almond is balanced perfectly, never letting one dominate the others. The toasted coconut adds a subtle caramel note while the almonds provide a buttery crunch.
- Texture Contrast: A crisp chocolate shell gives way to a chewy, moist interior, creating a mouthfeel that’s both satisfying and surprising. The almond slices stay crisp, adding a delightful snap.
- Simplicity: Only eleven ingredients, all pantry staples, and a straightforward mixing method make this recipe accessible to any home baker.
- Unique Toasting Step: Toasting the coconut and almonds elevates the flavor profile beyond the ordinary, turning a simple cookie into a gourmet treat.
- Crowd Reaction: These cookies disappear in minutes at gatherings; they’ve become my go‑to party pleaser and a secret weapon for surprise visits.
- Ingredient Quality: Using real butter and high‑quality semi‑sweet chocolate chips makes a noticeable difference in richness and melt‑in‑the‑mouth feel.
- Even Baking: The small‑batch size ensures even heat distribution, so each cookie bakes uniformly with that perfect golden edge.
- Make‑Ahead Potential: The cookies store beautifully, retaining their texture for up to a week, and they even freeze well for future cravings.
Inside the Ingredient List
The Flavor Base
All‑purpose flour provides the structural backbone of the cookie, creating that tender crumb we all love. Using a cup of flour ensures the dough isn’t too dense, allowing the chocolate and coconut to shine. If you substitute cake flour, the cookies will be even softer, but you risk losing that slight chew that makes the interior so satisfying. Always spoon and level the flour to avoid packing it, which can lead to a dry texture.
The Texture Crew
Butter, softened to room temperature, is the secret behind the melt‑in‑your‑mouth richness. The half‑cup amount gives enough fat for a tender crumb without making the cookies spread too much. Granulated sugar adds crispness, while brown sugar introduces a subtle molasses depth that balances the sweet chocolate. The large egg acts as a binder, providing structure and a glossy finish on the surface. If you’re allergic to eggs, a flax egg (1 tbsp ground flaxseed + 3 tbsp water) works as a vegan alternative, though the texture will be slightly denser.
The Unexpected Star
Semi‑sweet chocolate chips are the heart of the cookie, delivering that classic Almond Joy chocolate coating. Opt for chips with at least 60% cocoa for a richer flavor; low‑quality chips can taste waxy. Sweetened coconut flakes bring the tropical sweetness, but the key is to toast them lightly so they become fragrant and slightly crunchy. The sliced almonds add a buttery crunch that contrasts the soft interior; always use slivered or sliced almonds, not whole, for even distribution.
The Final Flourish
Baking soda is the leavening agent that gives the cookies a slight rise, creating that delicate, airy interior. A quarter‑teaspoon of salt may seem minuscule, but it amplifies the sweetness and balances the rich flavors. Vanilla extract adds a fragrant undertone that ties all the components together, making each bite feel cohesive. Remember, the quality of each ingredient matters—using fresh, high‑quality butter and chocolate will make a world of difference.
Everything's prepped? Good. Let's get into the real action…

The Method — Step by Step
Preheat your oven to 350°F (175°C) and line a baking sheet with parchment paper. While the oven warms, take a moment to admire the glossy parchment—this is where the magic will happen. The heat should be steady; an uneven oven can cause some cookies to over‑brown while others stay pale. Place the rack in the middle of the oven for even airflow. Power transition: Okay, ready for the game‑changer?
In a medium skillet over medium heat, combine the sweetened coconut flakes and sliced almonds. Stir continuously for 3‑4 minutes until they turn a light golden brown and release a nutty aroma. This toasting step is pure magic; the scent alone will make your neighbors wonder what’s baking. Watch out for any dark spots—those are burnt and will add bitterness.
Kitchen Hack: Keep the skillet moving; a wooden spoon works best for even toasting.While the coconut and almonds cool, whisk together the flour, baking soda, and salt in a bowl. This dry mixture ensures the leavening is evenly distributed, preventing any pockets of soda that could cause uneven rising. Set this bowl aside; you’ll notice the batter becomes smoother when the dry ingredients are folded in later. Micro‑challenge: I dare you to skip this step and see how the cookies turn out—spoiler: they won’t be as perfect.
In a large mixing bowl, cream the softened butter with the granulated sugar and brown sugar until the mixture is light, fluffy, and pale yellow. This should take about 2‑3 minutes with a handheld mixer on medium speed. The sound of the whisk should be a soft, rhythmic swoosh, and the texture will feel like a silky cloud. If the mixture looks curdled, you’ve either over‑mixed or the butter was too cold—both lead to dense cookies.
Watch Out: Over‑creaming can incorporate too much air, causing the cookies to puff and then collapse.Add the vanilla extract and the large egg to the butter‑sugar mixture. Beat until just combined; you’ll see the batter become glossy and a bit thicker. The egg should meld seamlessly, creating a cohesive base that holds the chocolate and coconut together. If the egg is cold, it may cause the batter to seize—let it sit a minute before mixing. This is the moment of truth: the dough should feel slightly sticky but manageable.
Gradually fold in the dry flour mixture using a spatula, stirring just until you no longer see streaks of flour. Over‑mixing at this stage can develop gluten, leading to tough cookies, so stop as soon as the dough comes together. The dough will look thick and a little shaggy—that’s normal. If it feels too dry, add a teaspoon of milk; if too wet, sprinkle a tablespoon of flour.
Stir in the toasted coconut‑almond blend, followed by the semi‑sweet chocolate chips. The chips should remain whole, not melted, giving you pockets of chocolate that burst when you bite. The mixture will become speckled with golden flakes and dark chocolate morsels—visual confirmation that you’re on the right track. Power transition: And now the fun part.
Using a tablespoon or a small ice‑cream scoop, drop rounded mounds of dough onto the prepared parchment, spacing them about 2 inches apart. The dough will spread slightly, but not excessively, thanks to the butter ratio. Lightly press the tops with the back of a spoon to flatten them just a touch; this ensures an even surface for the chocolate to set.
Kitchen Hack: Chill the dough for 10 minutes before baking to prevent excessive spreading.Slide the sheet into the pre‑heated oven and bake for 12‑14 minutes, or until the edges turn a light golden brown and the tops look set but still soft. The scent of toasted coconut and melting chocolate will fill the kitchen—trust that nose, it’s a reliable indicator. The cookies will continue to firm up as they cool, so avoid over‑baking; you want a slightly chewy center. If the edges start to darken too quickly, rotate the pan halfway through.
Remove the cookies from the oven and let them rest on the baking sheet for 3‑4 minutes before transferring to a wire rack. This short cooling period lets the cookies set without breaking. As they cool, you’ll notice the chocolate shell hardening into a glossy finish that cracks delicately when you bite. Future pacing: Picture yourself sharing these with friends, each bite eliciting a gasp of delight.
That's it — you did it. But hold on, I've got a few more tricks that'll take this to another level…
Insider Tricks for Flawless Results
The Temperature Rule Nobody Follows
Never bake cookies straight from a warm kitchen. Let the dough sit at room temperature for at least 15 minutes before shaping. This small pause allows the butter to firm up just enough to prevent excessive spreading, giving you a thicker, chewier center. One time a friend rushed the process and ended up with flat, crispy discs—let's just say the disappointment was palpable.
Why Your Nose Knows Best
Rely on scent, not just a timer. When the cookies are about 10 minutes in, you’ll start to smell the toasted coconut and melted chocolate. That aromatic cue means the cookies are nearing perfection. If you ignore the nose, you risk over‑baking and losing that coveted chewy interior.
The 5‑Minute Rest That Changes Everything
After the cookies have cooled on the rack, let them sit uncovered for an additional five minutes. This brief rest lets the chocolate set completely, preventing any smudging when you stack or store them. I once tried to pack warm cookies and the chocolate smeared like a sad watercolor painting.
The Almond Slice Shuffle
If you love a crunchier almond, give the slices a quick toss in a hot pan with a drizzle of honey before adding them to the dough. The honey caramelizes the almonds, adding a subtle sweetness that pairs beautifully with the chocolate. Just be careful not to burn them; a light golden hue is the sweet spot.
The Double‑Dip Technique
For an extra glossy finish, dip the cooled cookies halfway into melted chocolate and let them set on parchment. This creates a two‑tone look—dark chocolate on one side, the original cookie on the other—making them look as fancy as they taste. I’ve used this trick for holiday platters, and the wow factor is undeniable.
Creative Twists and Variations
This recipe is a playground. Here are some of my favorite ways to switch things up:
White Chocolate Coconut Dream
Swap the semi‑sweet chocolate chips for white chocolate chips. The creamy sweetness pairs beautifully with the toasted coconut, creating a lighter flavor profile that’s perfect for summer picnics.
Double‑Nut Delight
Add a handful of chopped macadamia nuts alongside the almonds for an extra buttery crunch. The combination of almond and macadamia offers a richer texture that will impress even the most discerning nut lovers.
Spicy Coconut Kick
Mix in a pinch of cayenne pepper or a dash of chili powder with the dry ingredients. The subtle heat contrasts the sweet chocolate and coconut, creating a sophisticated flavor that’s perfect for adult gatherings.
Mocha Madness
Add a teaspoon of instant espresso powder to the dry mix and replace half of the chocolate chips with dark chocolate chunks. The coffee undertones deepen the chocolate flavor, making these cookies a perfect after‑dinner treat.
Vegan Velvet
Replace butter with coconut oil, use a flax egg, and choose dairy‑free chocolate chips. The cookies will have a slightly different texture but retain the same delightful flavor balance—great for plant‑based friends.
Storing and Bringing It Back to Life
Fridge Storage
Place the cooled cookies in an airtight container with a single sheet of parchment between layers. They’ll stay fresh for up to five days. The fridge helps keep the chocolate firm, especially in warm climates.
Freezer Friendly
For longer storage, arrange cookies on a baking sheet, freeze until solid, then transfer to a zip‑top freezer bag. They’ll keep for up to three months. When you’re ready to enjoy them, let them thaw at room temperature for 15 minutes.
Best Reheating Method
To revive that fresh‑out‑of‑the‑oven softness, microwave a single cookie for 8‑10 seconds, adding a tiny splash of water (about a teaspoon) on the plate. The steam gently re‑moisturizes the interior while the chocolate regains its glossy sheen. Avoid microwaving for too long, or you’ll end up with a rubbery texture.