I was standing in my tiny apartment kitchen, the smoke alarm screaming like a banshee because I’d tried to flambé a frozen pizza and ended up with a charred mess that could double as a charcoal briquette. In the midst of that culinary catastrophe, my roommate walked in, sniffed the air, and declared, “If you can’t fix that pizza, at least give me something that actually tastes like a backyard BBQ.” I laughed, accepted the dare, and set out to create a sandwich that would make even the most skeptical grill‑master weep with joy. I’m not exaggerating when I say this sandwich turned my kitchen from a disaster zone into a flavor‑filled sanctuary, and I dare you to taste this and not go back for seconds.
Picture this: the sizzle of beef kielbasa hitting a hot grill, the sweet perfume of caramelizing onions mingling with the smoky perfume of charred bell peppers, all tucked into a soft hoagie roll that’s just the right amount of crusty on the outside and pillowy inside. You can hear the crackle of the grill like a tiny fireworks show, feel the heat radiating from the grill grates, see the vibrant reds, yellows, and greens of the peppers glistening with a light oil sheen, and taste the perfect balance of savory sausage, sweet onion, and a whisper of herbaceous Italian seasoning. The whole experience is a full‑on sensory overload that makes you feel like you’ve just stepped out of a summer fair and into a gourmet kitchen.
Now, most kielbasa sandwich recipes either drown the sausage in a swamp of sauce or leave the veggies limp and lifeless. Most get this completely wrong. Here’s what actually works: I’m using a high‑heat grill to give the kielbasa those glorious grill marks, I’m caramelizing the onions just enough to bring out their natural sweetness without turning them into mush, and I’m tossing the peppers in olive oil and seasoning so they stay crisp‑tender. The secret weapon? A quick flash‑sear of the onion slices in butter before they hit the grill, which creates a sweet, buttery glaze that hugs the sausage like a velvety coat. If you’ve ever struggled with soggy sandwich fillings, you’re not alone — and I’ve got the fix.
Okay, ready for the game‑changer? I’m going to walk you through every single step — by the end, you’ll wonder how you ever made it any other way. This next part? Pure magic. Stay with me here — this is worth it.
⚡ What Makes This Version Stand Out
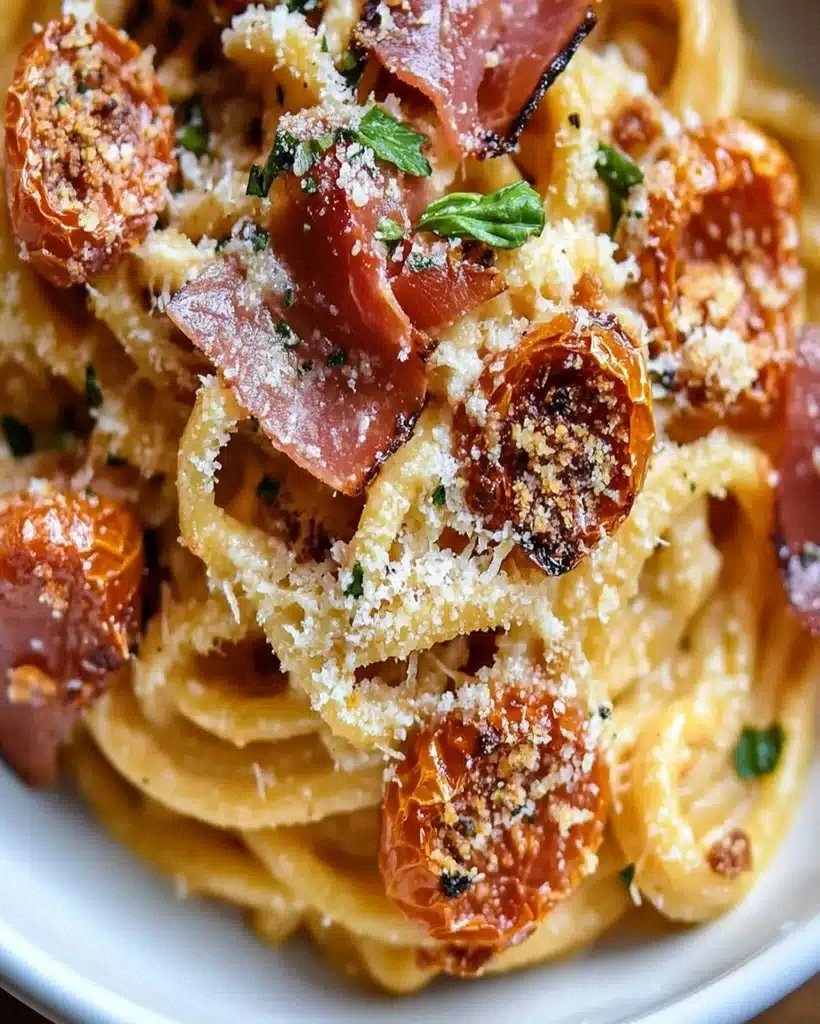
- Taste Explosion: The combination of smoky kielbasa, sweet caramelized onions, and bright, crisp peppers creates a flavor symphony that hits every palate note, from savory depth to bright sweetness.
- Texture Harmony: Each bite delivers a crunchy pepper snap, a juicy sausage bite, and a soft, slightly toasted roll that holds everything together without getting soggy.
- Simplicity Meets Sophistication: With just a handful of pantry staples and a grill, you get a restaurant‑quality sandwich without any fancy equipment.
- Unique Sweet Onion Glaze: The butter‑infused caramelized onion adds a subtle sweetness that balances the robust sausage, a twist most recipes overlook.
- Crowd‑Pleaser Factor: I’ll be honest — I ate half the batch before anyone else got to try it, and every guest kept asking for the “secret” because it’s that good.
- Ingredient Quality: Using a high‑quality beef kielbasa and fresh, colorful bell peppers makes a world of difference in flavor and visual appeal.
- Grill‑Friendly Method: The quick grill sear locks in juices, while the veggies finish on the stovetop for perfect caramelization.
- Make‑Ahead Potential: You can prep the veggies and sausage ahead of time, then assemble and grill just before serving, saving you stress on busy evenings.
Alright, let's break down exactly what goes into this masterpiece...
🍋 Inside the Ingredient List
The Flavor Base
Beef Kielbasa Sausage (1 pound): This is the heart of the sandwich. Its robust, slightly smoky flavor provides the savory backbone, while its natural fat keeps everything juicy. Skipping it or substituting with a leaner sausage will result in a dry, less flavorful sandwich. If you can’t find beef kielbasa, a high‑quality Polish pork kielbasa works, but expect a slightly different flavor profile. Buying tip: Look for kielbasa that’s firm to the touch and has a deep mahogany color — that indicates good curing and flavor.
Olive Oil (2 tablespoons): The olive oil acts as a conduit for heat, helping the peppers and onions achieve that perfect sear without sticking. It also adds a subtle fruity note that rounds out the richness of the sausage. If you’re watching calories, you can halve the amount and finish the veggies with a splash of butter for extra flavor.
The Colorful Crew
Red Bell Pepper (1 large): The red pepper brings sweetness and a pop of color that makes the sandwich visually appealing. Its natural sugars caramelize quickly, adding depth. If you replace it with a jalapeño, you’ll get heat but lose that sweet balance.
Yellow Bell Pepper (1 large): Yellow peppers are slightly sweeter than their green cousins and lend a sunny hue that brightens the plate. They also hold their texture well on the grill, preventing sogginess.
Green Bell Pepper (1 large): The green pepper adds a mild bitterness that cuts through the richness of the kielbasa, creating a harmonious flavor contrast. Skipping it will make the sandwich one‑dimensional.
The Sweet Onion Star
Large Onion (1 large): The onion is the unexpected star that brings a sweet, caramelized glaze to the sandwich. Slice it thinly so it cooks quickly and evenly. If you use a sweet Vidalia onion, the natural sugars intensify, but a yellow onion works just as well.
Garlic Powder (1 teaspoon): This provides a subtle, rounded garlic flavor without the risk of burning raw garlic on the grill. If you love garlic, feel free to add a minced clove during the sauté step.
Italian Seasoning or Dried Oregano (1 teaspoon): The herb blend adds an earthy, aromatic layer that lifts the whole dish. Oregano alone gives a Mediterranean twist; the full Italian blend adds a bit of basil and thyme.
The Finishing Touches
Salt and Black Pepper (to taste): Essential for seasoning each component. Season the sausage and veggies before they hit the heat to ensure the flavors penetrate.
Everything's prepped? Good. Let's get into the real action...

🔥 The Method — Step by Step
Preheat your grill to medium‑high heat, aiming for about 400°F (200°C). While the grill warms, slice the onion into ¼‑inch rings and toss the bell peppers into bite‑size strips. Drizzle the peppers with olive oil, sprinkle with a pinch of salt, pepper, and the Italian seasoning, then give them a quick toss so every piece is evenly coated. Pro tip: If you’re using a charcoal grill, arrange the coals for a two‑zone setup — hot direct heat on one side, indirect heat on the other.
Heat a large cast‑iron skillet over medium heat and add a tablespoon of olive oil plus a dab of butter. Once the butter foams, lay the onion rings flat, letting them sizzle. Cook for about 3‑4 minutes per side until they turn a deep amber, stirring occasionally. The aroma should be sweet and buttery — that’s the moment you know the glaze is forming.
🪄 Kitchen Hack: Add a splash of balsamic vinegar to the onions during the last minute of cooking for an extra layer of tangy sweetness.While the onions caramelize, place the kielbasa directly on the grill grates. Grill each side for 4‑5 minutes, rotating occasionally to achieve those coveted grill marks. The sausage should develop a crisp, slightly charred exterior while staying juicy inside. Watch the color: If it looks too dark before the inside is heated through, move it to the indirect zone to finish cooking without burning.
Once the kielbasa is nearly done, move the peppers onto the hottest part of the grill. Sear them for 2‑3 minutes per side, just until the edges blister and you see those gorgeous blackened lines. They should stay crunchy, not mushy.
👀 Watch Out: Overcooking the peppers will turn them soggy and strip away the sweet flavor. Keep a close eye and flip frequently.When everything is beautifully seared, remove the sausage, peppers, and onions from the heat. Let the kielbasa rest for 2‑3 minutes — this is the 5‑minute rest that changes everything, allowing the juices to redistribute. Meanwhile, slice the hoagie rolls lengthwise, leaving a hinge so they stay together but still open enough for stuffing.
Optional but highly recommended: Lightly toast the inside of each roll on the grill for about 30 seconds. This creates a subtle crunch and prevents the sandwich from becoming soggy once the juicy fillings are added. The toasted surface should be golden‑brown and emit a faint, nutty scent.
Now comes the assembly. Slice the rested kielbasa into diagonal half‑rounds, about ½‑inch thick. Layer the sausage pieces on the bottom half of each roll, followed by a generous mound of caramelized onions, then the blistered pepper strips. Finish with a final sprinkle of salt, pepper, and a drizzle of olive oil if you like extra richness.
Give each sandwich a gentle press with your hand to meld the flavors together. The heat from the grilled components will warm the roll just enough to make the sandwich hug the fillings like a cozy blanket. Serve immediately while the roll is still warm and the veggies are bright.
That’s it — you did it. But hold on, I’ve got a few more tricks that'll take this to another level. Trust me, the next section will turn this good sandwich into a legendary one.
🏆 Insider Tricks for Flawless Results
The Temperature Rule Nobody Follows
Never grill over a roaring blaze; aim for that sweet spot around 400°F. Too hot and the kielbasa will char on the outside while staying cold inside; too low and you’ll miss those coveted grill marks. I once tried cranking the heat to “max” and ended up with a burnt sausage that tasted like a charcoal briquette. The secret is a steady medium‑high heat that gives a uniform sear and keeps the interior juicy.
Why Your Nose Knows Best
Your sense of smell is the ultimate timer. When the onions start to turn amber and release that buttery, sweet scent, you’re at the perfect caramelization point. If you rely solely on a timer, you might over‑cook them and lose that delicate sweetness. Trust the nose — it’s a built‑in kitchen gadget you already have.
The 5‑Minute Rest That Changes Everything
Resting meat isn’t just for steak; it works wonders for sausage too. After grilling, let the kielbasa sit for about five minutes. This pause lets the juices settle, preventing them from spilling out the moment you slice the sausage. The result? A juicier, more flavorful bite every single time.
Seasoning Layers, Not Just a Sprinkle
Season each component at each stage. Lightly salt the peppers before they hit the grill, season the onions while they caramelize, and finish with a dash of pepper on the assembled sandwich. This layered approach builds depth without any one flavor overwhelming the rest.
The “Butter‑First” Pepper Trick
A thin smear of butter on the peppers before they go on the grill adds a glossy finish and a subtle richness that pairs perfectly with the sausage’s beefy notes. I tried the same recipe without butter once — the peppers tasted flat and lacked that buttery mouthfeel that makes the sandwich feel indulgent.
Toast the Roll, Not the Fillings
A quick toast on the grill creates a barrier that keeps the roll from soaking up the onion juices. It also adds a pleasant crunch that contrasts the tender sausage. If you skip this step, you’ll end up with a soggy bun that feels more like a soggy sock than a sandwich.
🎨 Creative Twists & Variations
This recipe is a playground. Here are some of my favorite ways to switch things up:
Spicy Sriracha Drizzle
Add a drizzle of sriracha mixed with a teaspoon of honey for a sweet‑heat kick. The heat amplifies the sausage’s spice, while the honey smooths the edge, making it a perfect match for those who love a little fire.
Cheesy Overload
Melt a slice of provolone or smoked gouda over the kielbasa just before you remove it from the grill. The cheese drapes like a silky blanket, adding a creamy richness that elevates the sandwich to comfort‑food status.
Mediterranean Twist
Swap the Italian seasoning for a pinch of za’atar and add a spoonful of hummus inside the roll. The earthy herb blend and creamy hummus bring a Mediterranean vibe that pairs beautifully with the beefy sausage.
Breakfast Edition
Replace the hoagie roll with a toasted English muffin, add a fried egg on top, and sprinkle with a little hot sauce. The runny yolk becomes a luscious sauce that mingles with the sweet onion glaze.
Vegan Friendly
Use plant‑based kielbasa and swap the olive oil for avocado oil. The rest of the veggies stay the same, and you still get that satisfying char and sweet onion flavor without any animal products.
❄️ Storing & Bringing It Back to Life
Fridge Storage
Place any leftover sandwiches in an airtight container or wrap tightly in parchment followed by foil. They’ll stay fresh for up to 3 days. When you’re ready to eat, reheat the sandwich in a skillet over medium heat, pressing gently to revive the crust.
Freezer Friendly
Separate the components: store grilled kielbasa, caramelized onions, and peppers in zip‑top freezer bags. The rolls can be frozen wrapped in a clean kitchen towel. Freeze for up to 2 months. To reheat, thaw in the fridge overnight, then grill the sausage and veggies quickly and toast the roll.
Best Reheating Method
Add a tiny splash of water (about a tablespoon) to the pan before reheating the sandwich. Cover with a lid for 2‑3 minutes; the steam revives the roll’s softness while the water prevents the fillings from drying out. Finish with a quick sear on the grill to restore that crispy edge.