Picture this: it's a rainy Tuesday afternoon, I'm supposed to be working on my taxes, and instead I'm daydreaming about cake. Not just any cake — I'm talking about a tropical vacation on a plate, a dessert so good it should come with a warning label. White chocolate and pineapple might sound like an odd couple, but trust me, they're the kind of couple that finishes each other's sentences and makes everyone else jealous of their perfect harmony. I first stumbled onto this combination after a spectacular kitchen failure where my pineapple upside-down cake collapsed into a sad, soggy mess, and in my desperation to salvage something — anything — I started drizzling melted white chocolate over the wreckage like some kind of dessert ambulance driver. That first bite was like watching the sunrise after a storm; suddenly everything made sense in the world.
Now, before you start thinking this is just another pineapple cake recipe, let me stop you right there. Most recipes get this completely wrong by dumping in canned pineapple swimming in syrup, which turns your beautiful cake into a wet sponge that tastes like regret and artificial flavoring. Here's what actually works: fresh pineapple that you cook down with just enough sugar to make it sing, white chocolate that you melt ever so gently so it doesn't seize up on you like an angry cat, and a technique for folding ingredients that keeps everything as light as island air. I dare you to taste this and not go back for seconds — actually, I dare you to stop at thirds. I'll be honest — I ate half the batch before anyone else got to try it, standing at my kitchen counter in my pajamas at midnight, telling myself I was just "quality testing" each slice.
What makes this cake absolutely irresistible is the way it manages to be both sophisticated and completely approachable, like wearing a silk dress with flip-flops. The white chocolate adds this luxurious creaminess that makes the pineapple taste like it spent a week at a spa getting pampered, while the fruit brings a bright acidity that cuts through the sweetness like a machete through a mango. Every bite is a study in contrasts: rich yet refreshing, dense yet somehow cloud-light, familiar yet completely surprising. Future pacing moment here — picture yourself pulling this out of the oven, the whole kitchen smelling like a tropical paradise, your neighbors knocking on your door asking if you're running some kind of illegal bakery operation.
The secret weapon in this recipe is a technique I learned from a pastry chef in Maui who swore me to secrecy — but I'm about to spill everything because good food should be shared like gossip at a family reunion. We're going to make a pineapple filling that's so good you'll want to eat it with a spoon, and then we're going to sandwich it between layers of the most tender, white chocolate-laced cake you've ever tasted. The frosting? Oh, the frosting is where things get really interesting — it's like silk and clouds had a baby and raised it on vanilla beans and dreams. Let me walk you through every single step — by the end, you'll wonder how you ever made it any other way.
What Makes This Version Stand Out
Taste Explosion: This isn't your grandmother's pineapple cake — we're talking about a perfect balance of tropical sweetness and rich creaminess that makes your taste buds do a happy dance. The white chocolate doesn't just add sweetness; it creates this luxurious backdrop that makes the pineapple taste like it was kissed by angels. Every forkful delivers layers of flavor that unfold like a story, starting bright and tangy and finishing with this smooth, buttery richness that lingers like a good memory.
Texture Paradise: Most pineapple cakes suffer from the sog factor — you know, when the fruit releases so much juice that your cake becomes a sad, wet mess that falls apart faster than my New Year's resolutions. Not here, my friend. We're cooking down the pineapple first to concentrate the flavor and eliminate excess moisture, creating these jammy pockets of fruit that burst with flavor while keeping the crumb tender and light. The result is a cake with structure that still melts in your mouth like a tropical snowflake.
Foolproof Technique: If you've ever struggled with white chocolate seizing up on you like a grumpy old man, you're not alone — and I've got the fix. The secret lies in patience and low heat, treating that white chocolate like the delicate diva it is. Room temperature ingredients aren't just a suggestion here; they're the difference between a smooth, velvety batter and a curdled mess that looks like cottage cheese gone wrong.
Unexpected Depth: Here's where things get interesting — we're adding a touch of lemon zest and juice to our pineapple filling, and before you start thinking this is just another citrus addition, let me explain why this is pure magic. The lemon doesn't make it taste lemony; instead, it acts like a spotlight, amplifying the pineapple's natural brightness and making the white chocolate taste even creamier by contrast. It's like adding a secret ingredient that nobody can identify but everyone knows makes everything better.
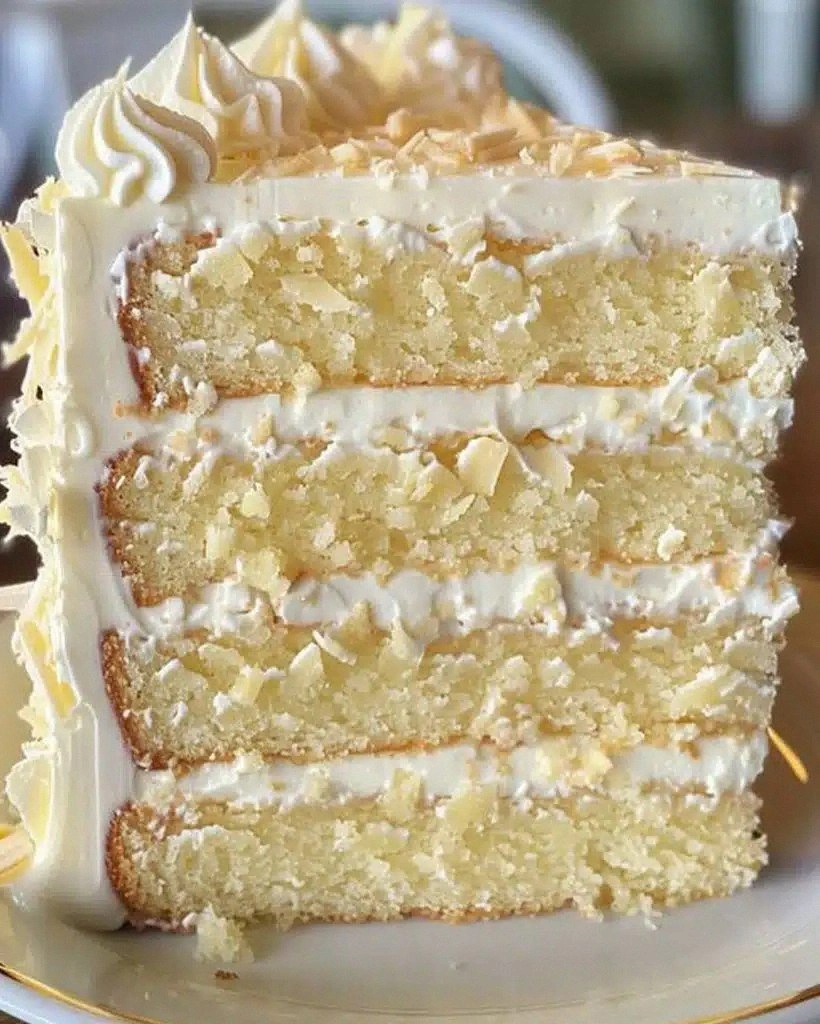
Crowd-Wowing Presentation: This cake doesn't just taste incredible — it looks like something you'd pay twenty dollars a slice for at a fancy resort. The pale golden crumb studded with jewel-like pieces of pineapple, all wrapped in billows of white chocolate frosting that you can swirl into dreamy peaks and valleys. When you set this on the table, conversations stop, phones come out, and suddenly everyone's your best friend asking for the recipe.
Make-Ahead Marvel: Unlike most fancy cakes that need to be served immediately or they start looking like they had a rough night, this beauty actually improves with time. The flavors meld and marry in the fridge overnight, creating something even more spectacular the next day. Plus, I'm sharing my freezer-friendly technique that lets you make this weeks ahead and still serve it like you just pulled it from the oven.
Inside the Ingredient List
The Flavor Base
Fresh pineapple is absolutely non-negotiable here — I know it's tempting to grab that can of pineapple chunks that's been sitting in your pantry since 2019, but trust me on this one. Fresh pineapple has this vibrant, almost electric flavor that canned fruit lost somewhere between the plantation and the processing plant. When you're selecting your pineapple, look for one that smells sweet at the base and has a slight give when you press it — if it feels like a rock, it's not ready yet. The fruit should be golden yellow rather than green, with leaves that are still perky and green, not brown and droopy like they've given up on life.
White chocolate gets a bad rap from chocolate snobs who think it's just cocoa butter and sugar, but quality white chocolate is like the unicorn of the baking world — rare and magical when you find the good stuff. Look for brands that list cocoa butter as the first ingredient, not sugar, and avoid anything that says "white baking chips" or "white confection" because those are imposters that will make your cake taste like disappointment and artificial vanilla. Good white chocolate should smell creamy and sweet, not like chemicals, and it should melt into a smooth, glossy puddle that makes you want to dive in face-first.
The Texture Crew
Cake flour might seem like an unnecessary fancy ingredient when you've got all-purpose flour sitting right there, but here's the thing — using cake flour is like the difference between wearing sneakers and stilettos to a wedding. Sure, both cover your feet, but one makes you look like you know what you're doing. Cake flour has less protein than all-purpose, which means less gluten development and a more tender crumb that practically dissolves on your tongue. If you absolutely can't find cake flour, you can make a substitute by removing two tablespoons of all-purpose flour per cup and replacing it with cornstarch, but honestly, just buy the cake flour — your taste buds will thank you.
Egg whites are the unsung heroes of this cake, providing structure and lift without the richness of yolks that would compete with our delicate white chocolate flavor. Room temperature egg whites whip up to greater volume than cold ones, creating tiny air pockets that expand in the oven heat and make your cake rise like it's trying to touch the sky. Separate your eggs while they're cold (it's easier that way), then let the whites sit on the counter for about 30 minutes while you prep everything else — this is the perfect time to dance around your kitchen to your favorite guilty pleasure music.
The Unexpected Star
Lemon might seem like the odd one out in this tropical party, but it's actually the ingredient that ties everything together like the friend who introduces people at parties and makes sure everyone gets along. The acidity in lemon juice balances the sweetness of the white chocolate and intensifies the pineapple's tropical notes without making the whole thing taste like a cleaning product. We're using both zest and juice because they contribute different things — the zest has essential oils that provide bright, aromatic top notes, while the juice adds clean acidity that makes all the other flavors pop like they've been doing yoga and drinking green smoothies.
Cornstarch might seem boring until you understand that it's the difference between a filling that runs all over your plate like a toddler at bedtime and one that sits up politely and stays where you put it. When you cook your pineapple with cornstarch, it transforms from fruit in juice into this glossy, jammy filling that holds together beautifully between cake layers. The trick is to mix the cornstarch with the sugar first before adding it to the fruit — this prevents lumps that would make your filling look like it has cottage cheese mixed in, which is definitely not the vibe we're going for.
The Final Flourish
Vanilla extract might seem like a background player, but using the good stuff — real vanilla, not the imitation that tastes like it was made in a lab — adds this warm, complex flavor that makes people ask "what's in this?" in the best possible way. Real vanilla has over 200 flavor compounds that create depth and dimension, while imitation vanilla has exactly one compound that shouts "HELLO I AM VANILLA" and then disappears. If you're feeling fancy, vanilla bean paste gives you those gorgeous little black specks that make everything look like it came from a French bakery, but extract works perfectly fine — just use the real deal, not the fake stuff that costs two dollars and tastes like it.
Heavy cream in the frosting isn't just there to make it richer — it's the secret to getting that perfectly pipeable consistency that holds peaks and swirls without being too stiff or too soft. The fat in the cream helps stabilize the frosting, while the liquid thins it to the perfect spreading consistency. Add it gradually because humidity, temperature, and the phase of the moon can all affect how much you need — okay, maybe not the moon, but sometimes it feels that way when you're trying to get frosting just right.
Everything's prepped? Good. Let's get into the real action...
The Method — Step by Step
- Start with the pineapple filling because it needs time to cool and thicken while you make everything else. Dice your fresh pineapple into small, even pieces — about the size of a blueberry — so they cook down evenly and create the perfect texture. In a medium saucepan, combine the pineapple with sugar, cornstarch, lemon zest, and lemon juice, stirring until the fruit is evenly coated and the cornstarch disappears. Cook over medium heat, stirring frequently, until the mixture bubbles and thickens into a glossy, jammy consistency that coats the back of a spoon like velvet. This should take about 8-10 minutes, and your kitchen will start smelling like a tropical paradise had a baby with a candy factory — resist the urge to eat it all with a spoon.
- While your pineapple filling cools, prep your cake pans like you're preparing a luxury hotel room for VIP guests. Grease two 9-inch round pans with butter, then line the bottoms with parchment paper rounds that you've cut to fit perfectly — this is not the time for wax paper or cooking spray and wishful thinking. Dust the sides with flour, tapping out the excess, because nothing ruins a beautiful cake faster than sticking to the pan like a toddler to their favorite toy. Preheat your oven to 350°F now so it has time to come to temperature while you mix your batter, because a properly preheated oven is the difference between a cake that rises proudly and one that sits there like a deflated balloon.
- The white chocolate melting moment is here, and this is where things can go sideways faster than a cat in a room full of rocking chairs. Chop your white chocolate into small, even pieces and place them in a heatproof bowl set over a pan of barely simmering water — the bowl should not touch the water, or you'll end up with scorched chocolate that tastes like disappointment. Stir constantly with a rubber spatula, scraping the sides and bottom, until it's about 80% melted, then remove from heat and keep stirring until smooth. The residual heat will finish melting the chocolate, and you'll end up with a silky, glossy pool that smells like heaven and makes you want to dive in face-first.
- Cream the butter and sugar together until the mixture becomes pale, fluffy, and increases in volume — this should take about 3-4 minutes with an electric mixer on medium speed. Don't rush this step because proper creaming incorporates air that helps your cake rise and creates that tender crumb we're after. The mixture should look like pale yellow clouds and feel like you're petting a particularly soft bunny when you rub a bit between your fingers. Add the melted white chocolate and beat until incorporated, scraping down the sides and bottom of the bowl to make sure everything is evenly mixed and no streaks remain.
- Beat in the egg whites one at a time, making sure each is fully incorporated before adding the next — this prevents the batter from curdling and keeps everything smooth and emulsified. The batter will look slightly curdled after adding the first egg white, but don't panic — it comes back together as you keep mixing. Add the vanilla extract and mix just until combined, because overmixing at this stage can make your cake tough, and nobody wants to serve cake that doubles as a doorstop. The batter should look smooth and slightly fluffy, like a cloud that decided to become dessert.
- Combine your dry ingredients in a separate bowl — the flour, baking powder, and salt — and whisk them together like you're trying to create a flour snowstorm. This distributes the leavening evenly so you don't end up with sad, flat sections and mountainous peaks in your finished cake. Alternate adding the dry ingredients and milk to the butter mixture, starting and ending with the flour mixture, mixing just until combined after each addition. The key here is to mix on low speed and stop as soon as you don't see streaks of flour, because overmixing develops gluten and creates a tough, chewy cake that nobody wants to eat.
- Divide the batter evenly between your prepared pans, using a kitchen scale if you're a perfectionist or just eyeballing it if you're more laid-back about these things. Smooth the tops with an offset spatula or the back of a spoon, creating a slight indent in the center because cakes tend to dome as they bake, and starting with a slight well helps them bake more evenly. Give each pan a gentle tap on the counter to release any large air bubbles that might create craters in your finished cake — think of it as burping the cake so it bakes up smooth and even.
- Bake for 25-30 minutes, rotating the pans halfway through if your oven has hot spots like mine does. The cakes are done when they're golden brown, spring back lightly when touched, and a toothpick inserted in the center comes out with just a few moist crumbs — not wet batter, but not completely dry either. That sizzle when you open the oven door? Absolute perfection. Let the cakes cool in their pans for 10 minutes before turning them out onto wire racks to cool completely, because trying to remove a hot cake is like trying to remove a contact lens from a moving target.
- While your cakes cool completely — and I mean completely, not just "lukewarm" — make the frosting that's going to change your life forever. Beat the butter until it's pale and fluffy, about 3 minutes, because this incorporates air that makes your frosting light and spreadable rather than dense and greasy. Add the melted white chocolate and beat until smooth and incorporated, scraping down the bowl as needed to make sure everything is evenly mixed and no streaks remain. Gradually add the powdered sugar, beating on low speed to prevent a sugar snowstorm in your kitchen, then add vanilla and enough cream to reach your desired consistency.
- Assembly time is where the magic happens, and this is the fun part — spread about 2/3 cup of the pineapple filling over the first cake layer, leaving a small border around the edge so it doesn't squish out when you add the second layer. Place the second cake layer on top and press down gently, like you're tucking it in for a nap. Spread the remaining pineapple filling over the top, creating pretty swirls and valleys that make everyone think you went to pastry school. Use the white chocolate frosting to pipe borders or rosettes around the top edge if you're feeling fancy, or just serve it rustic-style with a dusting of powdered sugar — either way, prepare for people to lose their minds over how good this tastes.
That's it — you did it. But hold on, I've got a few more tricks that'll take this to another level...
Insider Tricks for Flawless Results
The Temperature Rule Nobody Follows
Room temperature ingredients aren't just a suggestion from persnickety bakers who have too much time on their hands — they're the difference between a batter that comes together in a smooth, emulsified dream and one that looks like it got in a fight with itself and lost. When your eggs, milk, and butter are all the same temperature, they combine seamlessly without curdling or separating, creating a batter that bakes up evenly and tender. Take everything out of the fridge at least an hour before you start baking, or use the quick method: place eggs in warm water for 10 minutes, microwave milk for 30 seconds, and cut butter into small pieces to speed up softening. A friend tried skipping this step once — let's just say it didn't end well, and we had to serve her cake with a disclaimer about its "rustic texture."
Why Your Nose Knows Best
Your sense of smell is your most underrated baking tool, and I'm not just saying that because I once dated a baker who could tell when cookies were done by scent alone. When your cake is perfectly baked, your kitchen will fill with the most incredible aroma of butter, vanilla, and toasted white chocolate — it's like your nose is throwing a party and everyone's invited. If you start smelling something that reminds you of popcorn or toasted nuts, check your cake immediately because that's the signal that it's crossing the line from perfectly golden to tragically overbaked. Trust your nose over the timer — ovens vary, ingredients vary, but your sense of smell is calibrated to detect exactly when caramelization hits that sweet spot between flavor development and burnt disappointment.
The 5-Minute Rest That Changes Everything
After you turn your cakes out onto wire racks, resist the urge to immediately flip them right-side-up like an overeager puppy. Let them cool upside-down for exactly 5 minutes — this allows the steam to redistribute evenly throughout the cake, preventing the dreaded dome collapse that leaves you with a concave cake that looks like it got punched in the center. After 5 minutes, flip them over so they can cool completely without developing a soggy bottom from sitting in their own steam. This tiny rest period is the difference between a cake that looks professionally baked and one that looks like it had a rough night out on the town.
Creative Twists and Variations
This recipe is a playground. Here are some of my favorite ways to switch things up:
Coconut Dream Version
Replace half the milk in the cake with coconut milk, and fold 1/2 cup of toasted coconut flakes into the batter for a coconut-pineapple combo that tastes like a piña colada had a baby with a cloud. Top the finished cake with toasted coconut flakes that you scatter like confetti over the frosting, creating a tropical explosion that makes everyone think you just got back from vacation in the Caribbean. The coconut adds this nutty, buttery flavor that plays beautifully with the white chocolate and makes the pineapple taste even more tropical.
Mango Tango Variation
Swap out half the pineapple for ripe mango chunks in the filling, creating a two-tropical-fruit situation that's like a sunset in edible form. The mango adds this lush, almost creamy texture that complements the white chocolate like they were destined to be together. Add a pinch of cardamom to the cake batter — just 1/4 teaspoon — which makes the whole thing taste exotic and sophisticated, like something you'd eat at a fancy resort where they serve drinks in coconuts.
Rum-Spiked Adult Version
Add 2 tablespoons of dark rum to the pineapple filling and 1 tablespoon to the frosting for a grown-up version that tastes like vacation in the best possible way. The rum adds depth and complexity that makes the white chocolate taste even richer and the pineapple more intense — just don't serve this one at the kids' birthday party unless you want a very interesting afternoon. If you're feeling fancy, brush the cake layers with a rum simple syrup before adding the filling for an extra boozy kick that makes this taste like a tropical dessert cocktail.
Berry Bliss Twist
Add 1 cup of fresh raspberries to the pineapple filling during the last 2 minutes of cooking — they break down slightly and create these beautiful magenta streaks that look like edible art. The tartness of the raspberries cuts through the sweetness of the white chocolate and creates this perfect balance that makes people close their eyes when they take a bite. Reserve a few perfect raspberries to decorate the top, creating a crown of jewels that makes this look like a dessert fit for royalty.
Mini Cake Version
Turn these into individual mini cakes by baking the batter in a muffin tin lined with parchment paper — you'll get about 18 mini cakes that are perfect for parties where everyone wants their own personal dessert. Layer them with the pineapple filling and a dollop of frosting, creating tiny tropical towers that make everyone feel special. These are dangerous because they're so cute and small that people think it's okay to eat three or four, which is exactly what happens every time I make them.
Chocolate Lover's Compromise
For those who can't imagine dessert without actual chocolate, make a white chocolate-ganache filling by heating 1 cup of heavy cream and pouring it over 8 ounces of chopped white chocolate. Let it sit for 5 minutes, then whisk until smooth and chill until spreadable. This creates a truffle-like filling that's so rich and decadent, you'll want to serve tiny slices because it's so satisfying. Pipe this between the layers instead of the pineapple filling, and use the pineapple as a topping for the best of both worlds.
Storing and Bringing It Back to Life
Fridge Storage
This cake keeps beautifully in the refrigerator for up to 5 days — wrap it tightly in plastic wrap or store in an airtight container to prevent it from absorbing any weird fridge odors that might make it taste like last night's leftover pizza. The flavors actually meld and improve after the first day, creating something even more spectacular as the pineapple filling seeps slightly into the cake layers and everything becomes best friends. If you're storing a cut cake, press plastic wrap directly against the cut surfaces to prevent them from drying out and becoming sad and stale.
Freezer Friendly
This cake freezes like a dream for up to 3 months — wrap individual slices in plastic wrap, then aluminum foil, and store in a freezer bag with as much air removed as possible. Thaw overnight in the refrigerator, then let it come to room temperature for 30 minutes before serving for the best texture and flavor. The pineapple filling might weep slightly after freezing, but just blot it gently with a paper towel and it'll be as good as fresh. Pro tip: freeze slices on a baking sheet first, then wrap them — this prevents the filling from getting squished and maintains those pretty layers.
Best Reheating Method
While this cake is best served at room temperature, if your fridge runs cold and the frosting has firmed up too much, let slices sit at room temperature for 20-30 minutes before serving. For a truly transcendent experience, warm individual slices in the microwave for exactly 8 seconds — not 7, not 9, but 8 — which takes the chill off just enough to make the white chocolate flavors bloom without melting the frosting into a puddle. Add a tiny splash of water before reheating — it steams back to perfection and prevents the cake from drying out like a desert in August.