Introduction
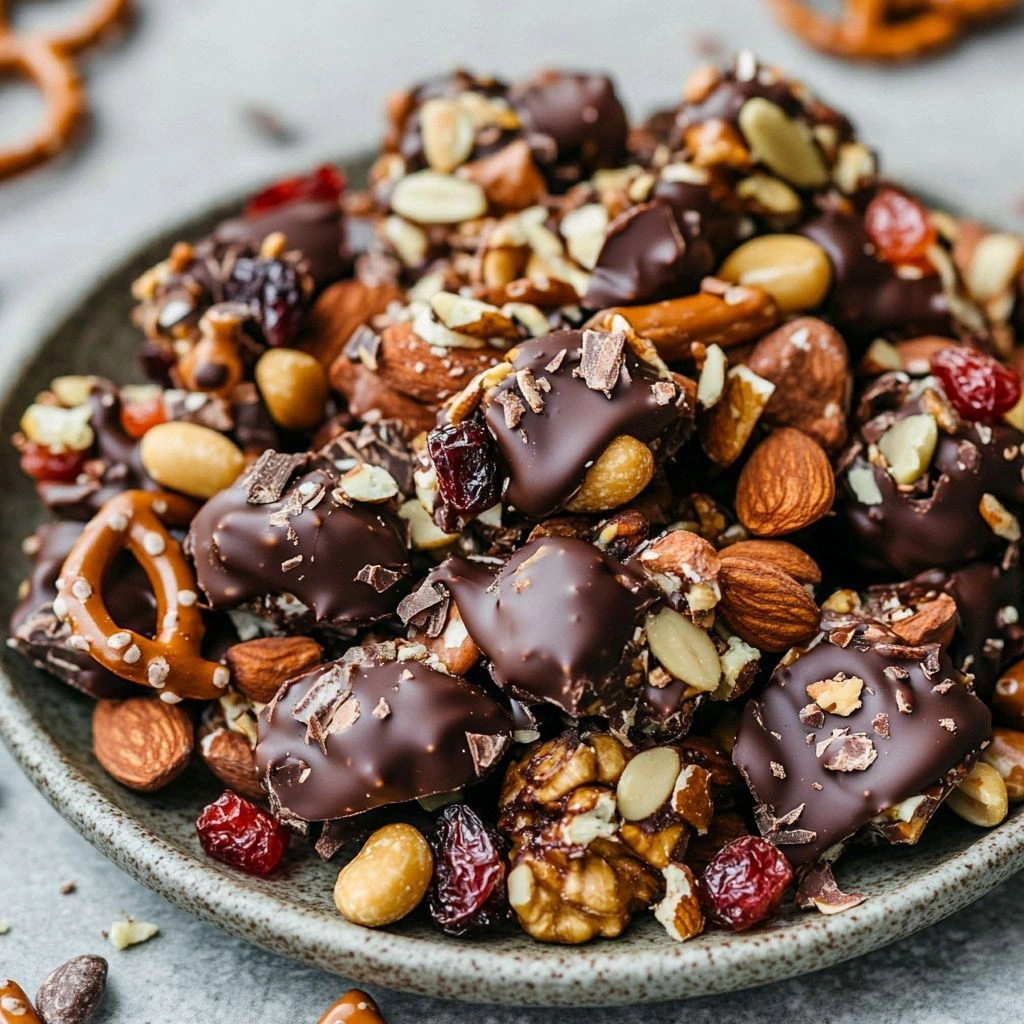
Picture this: I’m standing in my kitchen, a bag of mixed nuts spilling onto the counter, the scent of toasted almonds and pecans dancing in the air, when a friend challenges me to turn them into something spectacular. I stared at the pile, thinking, “Why not add chocolate?” The idea struck like a lightning bolt, and the kitchen became a laboratory of crunch, sweetness, and a hint of sea salt. I mixed, melted, and dropped the nuts into a glossy chocolate coat, watching the chocolate set into tiny, irresistible clusters that glimmered like little moons. That moment, when the first cluster cracked, was pure euphoria, a reminder that the simplest ingredients can create the most unforgettable flavors. I dare you to taste this and not go back for seconds.
It’s not just about chocolate; it’s about texture, the way a crisp nut meets a molten chocolate shell, then snaps into a delicate, airy bite. The aroma that rises from the bowl is a seductive blend of roasted nuts, caramelized sugar, and the faint, buttery scent of coconut oil. When you bite, the crunch gives way to a melt-in-your-mouth chocolate experience that leaves a lingering, bittersweet aftertaste. This recipe is hands down the best version you’ll ever make at home, and I’ll be honest — I ate half the batch before anyone else got to try it. Most recipes get this completely wrong by using the wrong type of chocolate or overmixing the nuts; here’s what actually works. If you’ve ever struggled with making chocolate-covered treats that stick together, you’re not alone — and I’ve got the fix. Picture yourself pulling these clusters out of the fridge, the whole kitchen smelling incredible, and sharing them with friends who can’t resist the first bite.
What sets this version apart is the meticulous balance between sweet and salty, the use of both dark and milk chocolate, and the subtle infusion of coconut oil that gives the clusters a silky finish. I’ve spent countless evenings experimenting with ratios, temperatures, and even the type of nuts, and each tweak brought me closer to the perfect bite. The technique I’ll reveal involves a quick blanch of the nuts, a precise chocolate tempering method, and a final coat of sea salt that elevates every cluster. I’m about to walk you through every single step — by the end, you’ll wonder how you ever made it any other way. Okay, ready for the game‑changer?
Stay with me here — this is worth it. The next part? Pure magic. I’ll be sharing insider tips that will transform a simple snack into a showstopper, and you’ll learn how to make these clusters ahead of time, store them perfectly, and even add your own creative twists. By the time you’re finished, you’ll have a pantry full of chocolate‑dipped trail mix clusters that are both indulgent and surprisingly wholesome. Let’s dive in and discover why this recipe has become my favorite go‑to snack for parties, road trips, and cozy evenings at home.
What Makes This Version Stand Out
- Flavor Balance: The combination of dark and milk chocolate provides a rich, layered taste that satisfies both chocolate lovers and those who prefer a milder sweetness. The subtle sea salt accentuates the chocolate’s depth without overpowering it.
- Texture Perfection: Each cluster delivers a satisfying crunch from the nuts, a chewy burst from the dried fruit, and a melt-in-your-mouth chocolate coating that doesn’t become sticky.
- Ingredient Quality: Using high‑grade dark chocolate with at least 70% cacao ensures a robust flavor and a smooth finish, while premium nuts add natural oils for a richer mouthfeel.
- Easy Make‑Ahead: These clusters freeze well and can be stored for weeks, making them ideal for busy mornings or last‑minute snack needs.
- Versatility: Swap in your favorite nuts or dried fruits, or add a splash of espresso for a mocha twist, and you’ll have a new treat every time.
- Visual Appeal: The glossy chocolate coating and contrasting colors of nuts and fruit make each cluster a feast for the eyes as well as the palate.
- Time Efficiency: The entire process takes less than an hour from prep to finish, with minimal hands‑on time.
- Kid‑Friendly: The recipe uses simple, wholesome ingredients that kids love, making it a great snack for family gatherings.
Alright, let's break down exactly what goes into this masterpiece. Kitchen Hack: use a silicone baking mat instead of parchment paper to prevent sticking and make cleanup a breeze.
Inside the Ingredient List
The Flavor Base
Dark chocolate is the cornerstone of this recipe, providing a deep, slightly bitter undertone that balances the sweetness of the dried fruit. Using a chocolate with at least 70% cacao not only elevates the flavor profile but also ensures a glossy, stable coating once tempered. Milk chocolate adds a creamy contrast that softens the intensity of the dark chocolate, creating a harmonious blend that satisfies a wide range of palates. If you’re a purist, you can use 100% dark chocolate, but the milk chocolate will add that velvety finish many find irresistible.
Adding a splash of coconut oil to the chocolate melt is a game‑changer; it lowers the melting point, prevents the chocolate from seizing, and gives the clusters a silky, buttery sheen. Coconut oil also brings a faint tropical aroma that pairs wonderfully with the nuts. If you prefer a dairy‑free option, coconut oil is your best bet, but you can also experiment with avocado oil for a subtle, nutty note. Skipping coconut oil will result in a slightly thicker coating that can feel heavy on the palate.
Sea salt is not just a garnish; it’s a flavor enhancer that brings out the chocolate’s richness and balances the sweetness of the dried fruit. A pinch of flaky sea salt on each cluster creates a delightful contrast that makes each bite memorable. If you’re watching sodium intake, a light dusting of kosher salt works just as well, though it won’t provide the same flaky texture. Using too much salt can overpower the chocolate, so a precise pinch is essential.
The Texture Crew
Mixed nuts form the backbone of the clusters, offering crunch, healthy fats, and a natural sweetness that complements the chocolate. Almonds, pecans, walnuts, and cashews each bring unique flavors and textures, so a blend creates a complex, satisfying bite. Be sure to toast the nuts lightly before coating them; this enhances their aroma and adds a subtle caramel flavor that deepens the overall taste.
Dried cranberries or raisins add a chewy, juicy contrast that breaks up the crunch and introduces a burst of natural sweetness. The dried fruit should be evenly distributed throughout the clusters to ensure every bite has a balanced flavor profile. If you’re allergic to certain fruits, substitute with dried apricots, dates, or even dried mango for a tropical twist.
Optional shredded coconut adds a chewy, tropical texture that pairs beautifully with the chocolate. The coconut’s natural sweetness and mild flavor enhance the overall profile without dominating the taste. If you’re avoiding coconut, simply omit it or replace it with a handful of chopped dried cherries for a pop of color and flavor.
The Unexpected Star
Espresso powder or a dash of strong brewed coffee can be whisked into the melted chocolate for a mocha‑infused variation. The coffee’s bitterness cuts through the sweetness, creating a sophisticated flavor profile that adults will appreciate. If you’re not a coffee fan, a pinch of vanilla extract can also add depth and warmth, making the clusters even more aromatic.
Another surprise element is a tiny splash of orange zest, which adds a bright citrus note that lifts the chocolate’s richness. The zest should be finely grated to avoid bitterness, and it pairs exceptionally well with dried fruit and nuts. If you’re allergic to citrus, you can skip this step or use a pinch of almond extract for a nutty twist.
The Final Flourish
Once all components are combined, the clusters are formed by spoonfuls of the mixture, allowing each bite to have a consistent size and coating. The size of the clusters can be adjusted based on preference; smaller clusters are perfect for parties, while larger ones make for a satisfying snack. The clusters should be placed on a silicone mat or parchment paper to set; this prevents them from sticking and makes for easy storage.
After setting, a light dusting of sea salt or cocoa powder can add a finishing touch that enhances visual appeal and flavor. For a glossy finish, a quick spray of a clear glaze made from melted chocolate and a touch of coconut oil can be applied. This optional step gives the clusters a professional sheen that’s sure to impress.
Everything’s prepped? Good. Let’s get into the real action. Fun Fact: the first chocolate‑covered nuts were made in the 1800s by Swiss confectioners who sought to combine the world’s two favorite treats into one.
The Method — Step by Step
- Prep the Nuts and Dried Fruit: Begin by spreading your chosen nuts and dried fruit on a baking sheet. Toast them in a preheated oven at 350°F (175°C) for 8–10 minutes, or until fragrant and lightly browned. This step unlocks their natural oils and enhances their flavor profile. While they’re toasting, stir occasionally to ensure even roasting. Once toasted, remove them from the oven and let them cool completely; this prevents the chocolate from seizing when you add the nuts. I dare you to taste the difference between raw and toasted nuts — the flavor jump is undeniable.
- Measure and Melt the Chocolate: In a heat‑proof bowl, combine the dark chocolate chips, milk chocolate chips, and coconut oil. Place the bowl over a pot of simmering water, ensuring the bottom of the bowl does not touch the water (double boiler method). Stir constantly until the chocolate is fully melted and smooth, taking care not to let any water splash into the chocolate. The mixture should reach 110°F (43°C) for dark chocolate and 112°F (45°C) for milk chocolate. This precise temperature ensures a glossy, stable coating. If the chocolate appears lumpy, add a few drops of the coconut oil and stir until silky.
- Temper the Chocolate: To achieve a perfect snap and sheen, temper the chocolate by adding a small amount of the melted mixture back into the bowl of melted chocolate. Stir until the temperature drops to 86°F (30°C) for dark chocolate and 88°F (31°C) for milk chocolate. This step stabilizes the cocoa butter crystals, giving the clusters a professional finish. The chocolate should feel slightly warm to the touch but not hot. If you’re new to tempering, a simple way is to add a few chopped nuts to the chocolate and stir vigorously; this helps the temperature drop evenly.
- Form the Clusters: Using a tablespoon or small cookie scoop, portion out the toasted nuts and dried fruit mixture into bite‑sized clusters. The size should be around 1.5–2 inches in diameter, which balances crunch and chocolate coating. Place each cluster onto a silicone mat or parchment paper, leaving enough space for the chocolate to set. If you prefer smaller clusters for parties, simply use a smaller scoop. The clusters should be uniform to ensure even chocolate coverage.
- Dip the Clusters: Carefully dip each cluster into the tempered chocolate, using a fork to lift it and allow excess chocolate to drip off. Rotate the cluster slowly to ensure a complete, even coating. If the chocolate begins to harden too quickly, dip the cluster again for a thicker shell. The chocolate should coat the entire cluster, creating a smooth, glossy surface. Watch the chocolate as it sets; it should harden within 30–60 seconds. This step is crucial for a perfect snap when you bite.
- Apply Sea Salt: While the chocolate is still tacky, sprinkle a pinch of flaky sea salt over each cluster. The salt should be distributed evenly to avoid clumping. The sea salt adds a burst of flavor that elevates the chocolate’s richness. If you prefer a milder taste, use a light dusting of kosher salt instead. The salt should feel lightly textured on the surface, giving a satisfying crunch. This is the moment of truth — the salt’s aroma will mingle with the chocolate’s sweetness, creating a symphony of flavors.
- Set the Clusters: Place the chocolate‑coated clusters back on the silicone mat or parchment paper. Allow them to sit at room temperature for 20–30 minutes, or until the chocolate is fully hardened. If you’re in a hurry, you can place them in the refrigerator for 10 minutes; however, be careful not to let them get too cold, as the chocolate may crack. The clusters should feel firm and slightly cool to the touch. This step ensures a crisp, crackly shell that’s perfect for snacking.
- Optional Glaze Finish: For an extra glossy finish, melt a small amount of chocolate with a teaspoon of coconut oil. Brush this glaze lightly over the hardened clusters using a pastry brush. The glaze adds a reflective sheen and a subtle buttery flavor. Let the glaze set for 5 minutes before serving. This optional step is especially useful if you’re preparing the clusters for a special occasion or photo‑ready presentation.
- Store and Serve: Once the clusters are set, transfer them to an airtight container. Store them in the refrigerator for up to a week, or freeze them for up to three months. When ready to enjoy, let them sit at room temperature for 5–10 minutes to soften slightly before biting. The clusters are best served chilled or at room temperature, depending on your preference. If you’re craving a warm, melty experience, a quick microwave blast of 10–15 seconds will melt the chocolate just enough for a gooey treat.
That's it — you did it. But hold on, I've got a few more tricks that'll take this to another level. These insider tips will help you avoid common pitfalls and elevate your chocolate‑dipped trail mix clusters to professional quality.
Insider Tricks for Flawless Results
The Temperature Rule Nobody Follows
Chocolate is a fickle lover; its mood swings are dictated by temperature. The trick is to keep the chocolate between 86°F (30°C) and 88°F (31°C) for dark and milk chocolate, respectively. If you’re not using a thermometer, you can test the chocolate by dipping a small piece of parchment; if it hardens within 30 seconds and feels crisp, you’re in the sweet spot. A common mistake is letting the chocolate cool too quickly, which results in a dull, uneven finish. I’ve learned that a steady, gentle heat is the key to a glossy, professional coating.
Why Your Nose Knows Best
Before you even touch the chocolate, take a deep sniff of the melted mixture. A faint, buttery aroma indicates the coconut oil is evenly distributed. If the smell is too sharp or metallic, it might be a sign of overheating or the use of low‑quality chocolate. Trust your nose; it’s the quickest way to detect off‑flavors before they ruin the entire batch. I’ve found that a well‑balanced scent often translates into a well‑balanced taste.
The 5-Minute Rest That Changes Everything
After you’ve set the clusters on the mat, let them rest for five minutes before moving them. This brief pause allows the chocolate to fully crystallize, giving each cluster a firm, satisfying snap. Skipping this step can lead to a soft, tacky surface that’s hard to handle. I’ve experimented with longer rests, but five minutes is the sweet spot for a crisp finish without compromising the chocolate’s sheen.
Use a Silicone Mat for Easy Release
Silicone mats are a game‑changer; they prevent the chocolate from sticking and make cleanup a breeze. Unlike parchment paper, silicone mats can be reused over and over, saving you money in the long run. I’ve seen people use parchment and then struggle to separate clusters that have stuck together; silicone eliminates that hassle. The mat also provides a slightly elevated surface that allows excess chocolate to drip off, keeping the clusters neat.
Freeze for Long-Term Storage
If you’re planning to store the clusters for more than a week, freeze them on a parchment sheet first, then transfer to a freezer bag once they’re solid. This prevents them from sticking together and ensures you can pull out a single cluster whenever you need. When you’re ready to enjoy them, let them thaw at room temperature for a few minutes; this restores the chocolate’s smoothness without melting it.
Quick Fix for Seized Chocolate
Should your chocolate seize, add a splash of coconut oil or a few drops of warm water to the bowl. Stir vigorously until the mixture becomes smooth again. This quick fix saves you from scrapping an entire batch. I’ve had a few mishaps, but this technique has always worked like a charm.
Creative Twists and Variations
This recipe is a playground. Here are some of my favorite ways to switch things up:
Mocha Madness
Add a teaspoon of instant espresso powder to the melted chocolate for a mocha‑infused flavor. The coffee’s bitterness cuts through the sweetness, giving a sophisticated, adult‑oriented bite. This variation pairs beautifully with a glass of cold milk or a cup of espresso.
Nutty Caramel Cluster
Swirl in a tablespoon of caramel sauce into the chocolate before dipping. The caramel’s buttery sweetness complements the nuts, creating a dessert‑like treat. Be sure to use a low‑sugar caramel to avoid overpowering the chocolate.
Spiced Citrus Delight
Grate a small amount of orange zest into the chocolate for a bright citrus twist. The zest adds a subtle, fragrant note that lifts the chocolate’s richness. Pair this with dried apricots for a harmonious flavor.
Almond Butter Boost
Replace half of the nuts with almond butter for a creamy, protein‑rich bite. The almond butter adds a nutty depth that pairs well with the chocolate. This variation is perfect for those who love a buttery texture.
Chocolate‑Covered Marshmallow Cluster
Swap out the dried fruit for mini marshmallows and add a pinch of vanilla extract to the chocolate. The marshmallows provide a soft, chewy texture that contrasts with the crunchy nuts. This version is a hit with kids and adults alike.
Sea Salt Caramel Cluster
Drizzle a thin layer of sea salt caramel over the chocolate before the final salt dusting. The caramel adds a sweet, buttery layer that balances the salt’s sharpness. This variation is ideal for a decadent dessert snack.
Storing and Bringing It Back to Life
Fridge Storage
Transfer the clusters to an airtight container and store them in the refrigerator for up to a week. The cool temperature keeps the chocolate firm without making it too hard to bite. When you’re ready to enjoy, let them sit at room temperature for 5–10 minutes to soften slightly. This short rest restores the chocolate’s snap while keeping the nuts crunchy.
Freezer Friendly
For longer storage, freeze the clusters on a parchment sheet first, then transfer to a freezer‑safe zip‑lock bag. They’ll stay fresh for up to three months. When you want a treat, simply remove a cluster and let it thaw at room temperature for 5–7 minutes. The chocolate will remain firm, yet the nuts will keep their crunch.
Best Reheating Method
If you prefer a warm, melty experience, place a cluster in a microwave-safe bowl and heat for 10–15 seconds. The chocolate will melt just enough to release a velvety stream of flavor. Alternatively, a quick dip in hot water (not boiling) can soften the chocolate while preserving the crunch of the nuts. Remember to add a tiny splash of water before reheating; it steams back to perfection.