Picture this: I’m in the middle of a Sunday brunch, a pot of coffee steaming, and a sudden craving for something sweet that feels both indulgent and comforting. I glance at the pantry, see a box of store‑bought cannoli shells, a tub of ricotta, and a handful of pistachios, and I think, “Why not turn this into a masterpiece?” The kitchen becomes a stage, the doughless shells the curtain, and the creamy filling the spotlight. The air fills with the nutty scent of pistachios, the sweet perfume of powdered sugar, and a faint hint of vanilla. I’m not just making dessert; I’m creating a memory, a moment of pure joy that I can share with friends who will taste it and say, “I dare you to not go back for seconds.”
I’ve spent years tinkering with cannoli, trying to nail that perfect balance between a crisp shell and a silky filling. Most recipes I’ve seen either over‑whip the ricotta, resulting in a watery texture, or under‑season the pistachios, leaving a bland finish. What makes this version stand out is the intentional layering of flavors and textures—crunchy pistachios, a whisper of cinnamon, and a light, airy whipped cream folded into ricotta. The result is a cannoli that feels like a delicate cloud wrapped in a nutty shell, with a finish that lingers on the palate like a sweet after‑taste of summer. I’m confident when I say, this is hands down the best version you’ll ever make at home.
I’ll walk you through every single step, from selecting the freshest ingredients to the final plating. By the end, you’ll wonder how you ever made it any other way. And trust me, the process is so satisfying that you’ll want to do it again, maybe even tweak it to suit your taste. So grab your apron, let’s dive into the world of pistachio cannoli, and transform an ordinary kitchen into a sweet, nutty haven.
What Makes This Version Stand Out
- Texture: The cannoli shells are baked to a crisp perfection that shatters like thin ice, while the filling remains light and airy, thanks to folded whipped cream.
- Flavor: The pistachios are finely chopped, creating a subtle crunch that contrasts beautifully with the smooth ricotta.
- Simplicity: No complicated dough or long fermentation times—just store‑bought shells and a few pantry staples.
- Nutty Highlight: Pistachios bring a distinct, earthy sweetness that elevates the classic cannoli experience.
- Optional Indulgence: Mini chocolate chips add a burst of richness without overpowering the nutty profile.
- Make‑Ahead Friendly: The filling can be prepared up to 24 hours ahead and refrigerated, making this a perfect batch‑cook dessert.
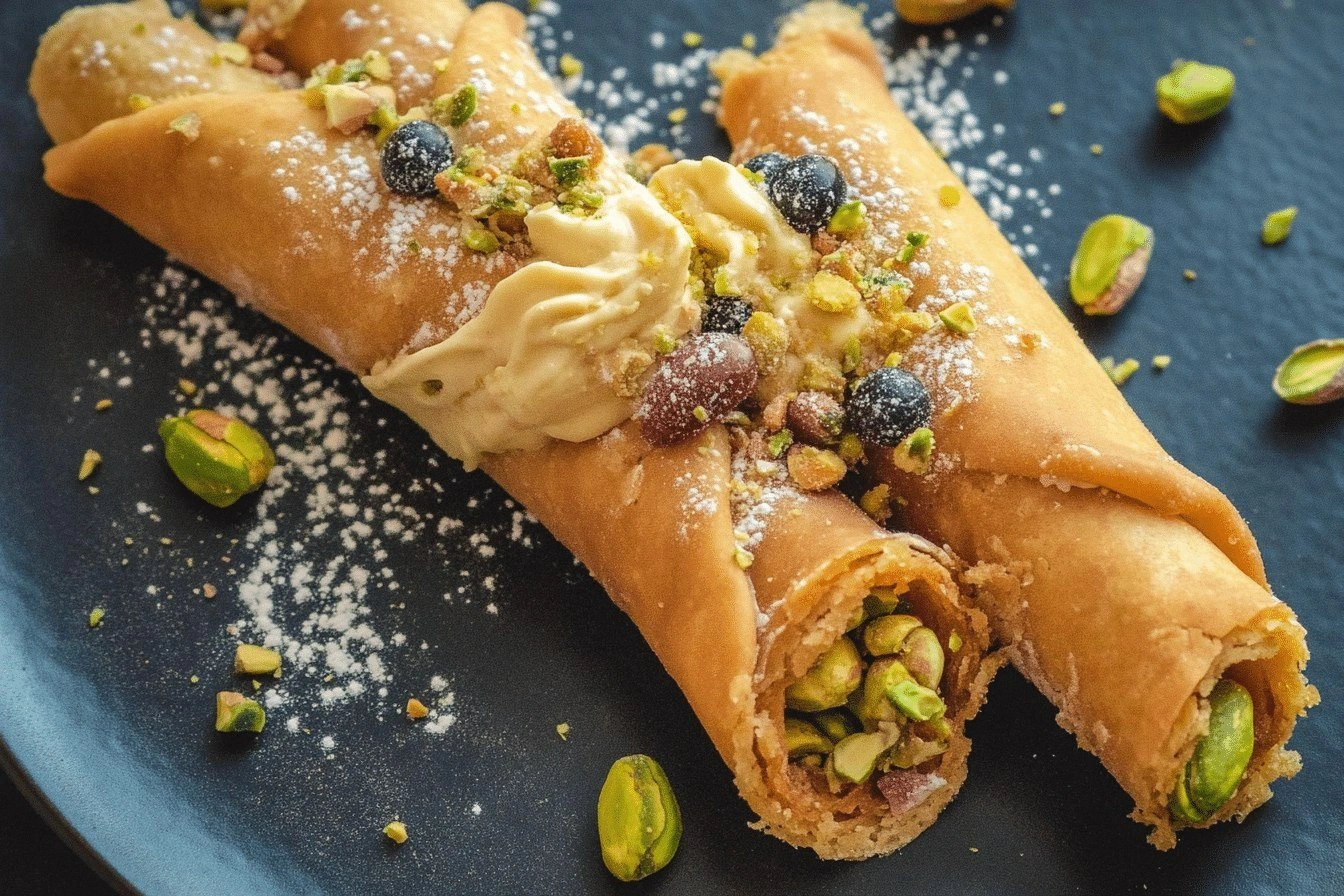
- Visual Appeal: The bright green pistachios against the golden shells make for Instagram‑worthy presentations.
- Balanced Sweetness: Powdered sugar and vanilla are measured to sweeten just enough, allowing the natural flavors to shine.
Alright, let’s break down exactly what goes into this masterpiece…
Inside the Ingredient List
The Flavor Base
Ricotta cheese is the heart of this filling. It provides a creamy, slightly tangy foundation that balances the sweetness of the powdered sugar. Choosing whole‑milk ricotta ensures a richer mouthfeel; skim ricotta will leave the filling too dry. If you’re short on time, a pre‑whisked ricotta works, but fresh whisking gives you a silkier texture.
The Texture Crew
Heavy cream is whipped until soft peaks form and then folded into the ricotta. This technique introduces air, turning the filling into a light cloud that contrasts with the crunchy pistachios. The pistachios themselves can be finely chopped or ground; a finer grind releases more flavor, while coarser pieces add a pleasant crunch. If you prefer a smoother finish, pulse the pistachios in a food processor for a few seconds.
The Unexpected Star
Chocolate chips are optional, but when added, they create a subtle chocolate undertone that pairs wonderfully with pistachio. Use dark chocolate chips for a richer, slightly bitter contrast, or milk chocolate for a sweeter twist. The chips melt slightly into the ricotta, adding depth without overwhelming the nutty flavor.
The Final Flourish
A pinch of ground cinnamon adds a warm, aromatic note that complements both pistachios and ricotta. It’s a small touch that elevates the entire dish. If you’re adventurous, sprinkle a dash of sea salt on top before serving to highlight the sweetness and add a savory counterpoint.
Everything’s prepped? Good. Let’s get into the real action…
The Method — Step by Step
- Start by whisking the ricotta in a medium bowl until it’s smooth and free of lumps. The smoother the base, the silkier the final filling. If you notice any clumps, give it a quick blend with a hand mixer.
- Sift the powdered sugar over the ricotta and fold gently with a spatula. This ensures an even sweetness that doesn’t clump. The mixture should look like a light, fluffy paste.
- Whip the heavy cream in a separate bowl until soft peaks form. Be careful not to over‑whip; you want airy peaks, not stiff peaks that will collapse when folded.
- Fold the whipped cream into the ricotta mixture. This step is crucial for achieving that cloud‑like texture. Use a gentle folding motion—think of a delicate dance—so you don’t deflate the air bubbles.
- Add the finely chopped pistachios, vanilla extract, and ground cinnamon. Stir until the pistachios are evenly distributed. The pistachios should look like tiny specks of green, adding visual contrast.
- If you’re using chocolate chips, fold them in now. They’ll add a subtle burst of chocolate that pairs beautifully with the nutty flavor.
- Transfer the filling to a piping bag fitted with a large round tip. The piping bag allows for a uniform, generous filling that will fill the shells evenly. If you don’t have a piping bag, a plastic sandwich bag with a small slit works as a makeshift option.
- Take each cannoli shell and pipe the filling into the center, leaving a small gap at the end so it doesn’t spill. The filling should fill the shell almost to the brim, creating a luscious, creamy core.
- Once all shells are filled, gently press the ends together to seal. The edges should look neat and the shell should hold its shape. If the filling leaks, re‑seal the shell with a quick pinch.
- Serve immediately, or if you’re making ahead, cover the filled cannoli with plastic wrap and refrigerate. The filling will stay firm, and the shells will remain crisp.
That’s it— you did it. But hold on, I’ve got a few more tricks that will take this to another level. Let’s explore some insider knowledge that will make every cannoli a showstopper.
Insider Tricks for Flawless Results
The Temperature Rule Nobody Follows
Keep the ricotta and cream at room temperature before mixing. Cold dairy creates a grainy texture, while warm dairy melts the sugar and creates a smoother filling. I once tried a recipe with chilled ingredients and the result was a gritty mess—don’t let that be you.
Why Your Nose Knows Best
Before you start piping, sniff the mixture. If it smells slightly sweet and nutty, you’re on the right track. A faint vanilla scent should be present; if not, add a splash more vanilla. Your nose is the ultimate judge of flavor balance.
The 5‑Minute Rest That Changes Everything
After filling the shells, let them rest on a clean surface for five minutes before serving. This brief pause allows the filling to settle and the shells to firm up, preventing leaks. It’s a simple step that dramatically improves the final texture.
Seal with a Quick Pinch
When sealing the ends, a gentle pinch with your fingers works best. Too much pressure can crush the filling; too little may leave a gap. Practice a few times to find the sweet spot.
Use a Silicone Baking Mat
If you’re baking your own shells, line the baking sheet with a silicone mat. This prevents the shells from sticking and gives them an even, crisp edge. It also makes cleanup a breeze.
Creative Twists and Variations
This recipe is a playground. Here are some of my favorite ways to switch things up:
Almond‑Infused Cannoli
Swap pistachios for finely chopped almonds and add a pinch of almond extract. The nutty profile changes subtly, giving a richer, buttery flavor that pairs well with dark chocolate chips.
Citrus Zest Surprise
Add a tablespoon of finely grated lemon or orange zest to the filling. The citrus brightens the dessert, cutting through the richness and adding a fresh, lively note.
Chocolate‑Loaded Delight
Increase the chocolate chips to a full cup and add a tablespoon of cocoa powder to the ricotta mixture. This transforms the cannoli into a chocolate‑pistachio fusion, perfect for chocolate lovers.
Salted Caramel Touch
Drizzle a light salted caramel sauce over the finished cannoli before serving. The caramel adds sweetness, the salt amplifies flavor, and the visual contrast is stunning.
Miniature Cannoli Bites
Use mini phyllo cups or small biscuit shells for bite‑size cannoli. These are great for parties or as a sweet snack, and they’re easier to eat on the go.
Vegan Version
Replace ricotta with coconut yogurt and use aquafaba instead of heavy cream. This vegan take keeps the creamy texture while cutting out dairy, making it suitable for plant‑based diets.
Storing and Bringing It Back to Life
Fridge Storage
Store filled cannoli in an airtight container in the refrigerator for up to 24 hours. The shells will stay crisp, and the filling will remain fresh. Keep them away from strong odors, as the ricotta can absorb them quickly.
Freezer Friendly
If you need to keep them longer, freeze the filled cannoli in a single layer on a parchment‑lined tray. Once frozen, transfer them to a freezer bag. They’ll keep for up to two weeks. Thaw in the refrigerator overnight before serving.
Best Reheating Method
To revive frozen cannoli, preheat your oven to 350°F (175°C). Place them on a baking sheet and bake for 10–12 minutes. The heat will crisp the shells again while warming the filling. For a quick fix, microwave on low power for 15–20 seconds, but be careful not to melt the filling.