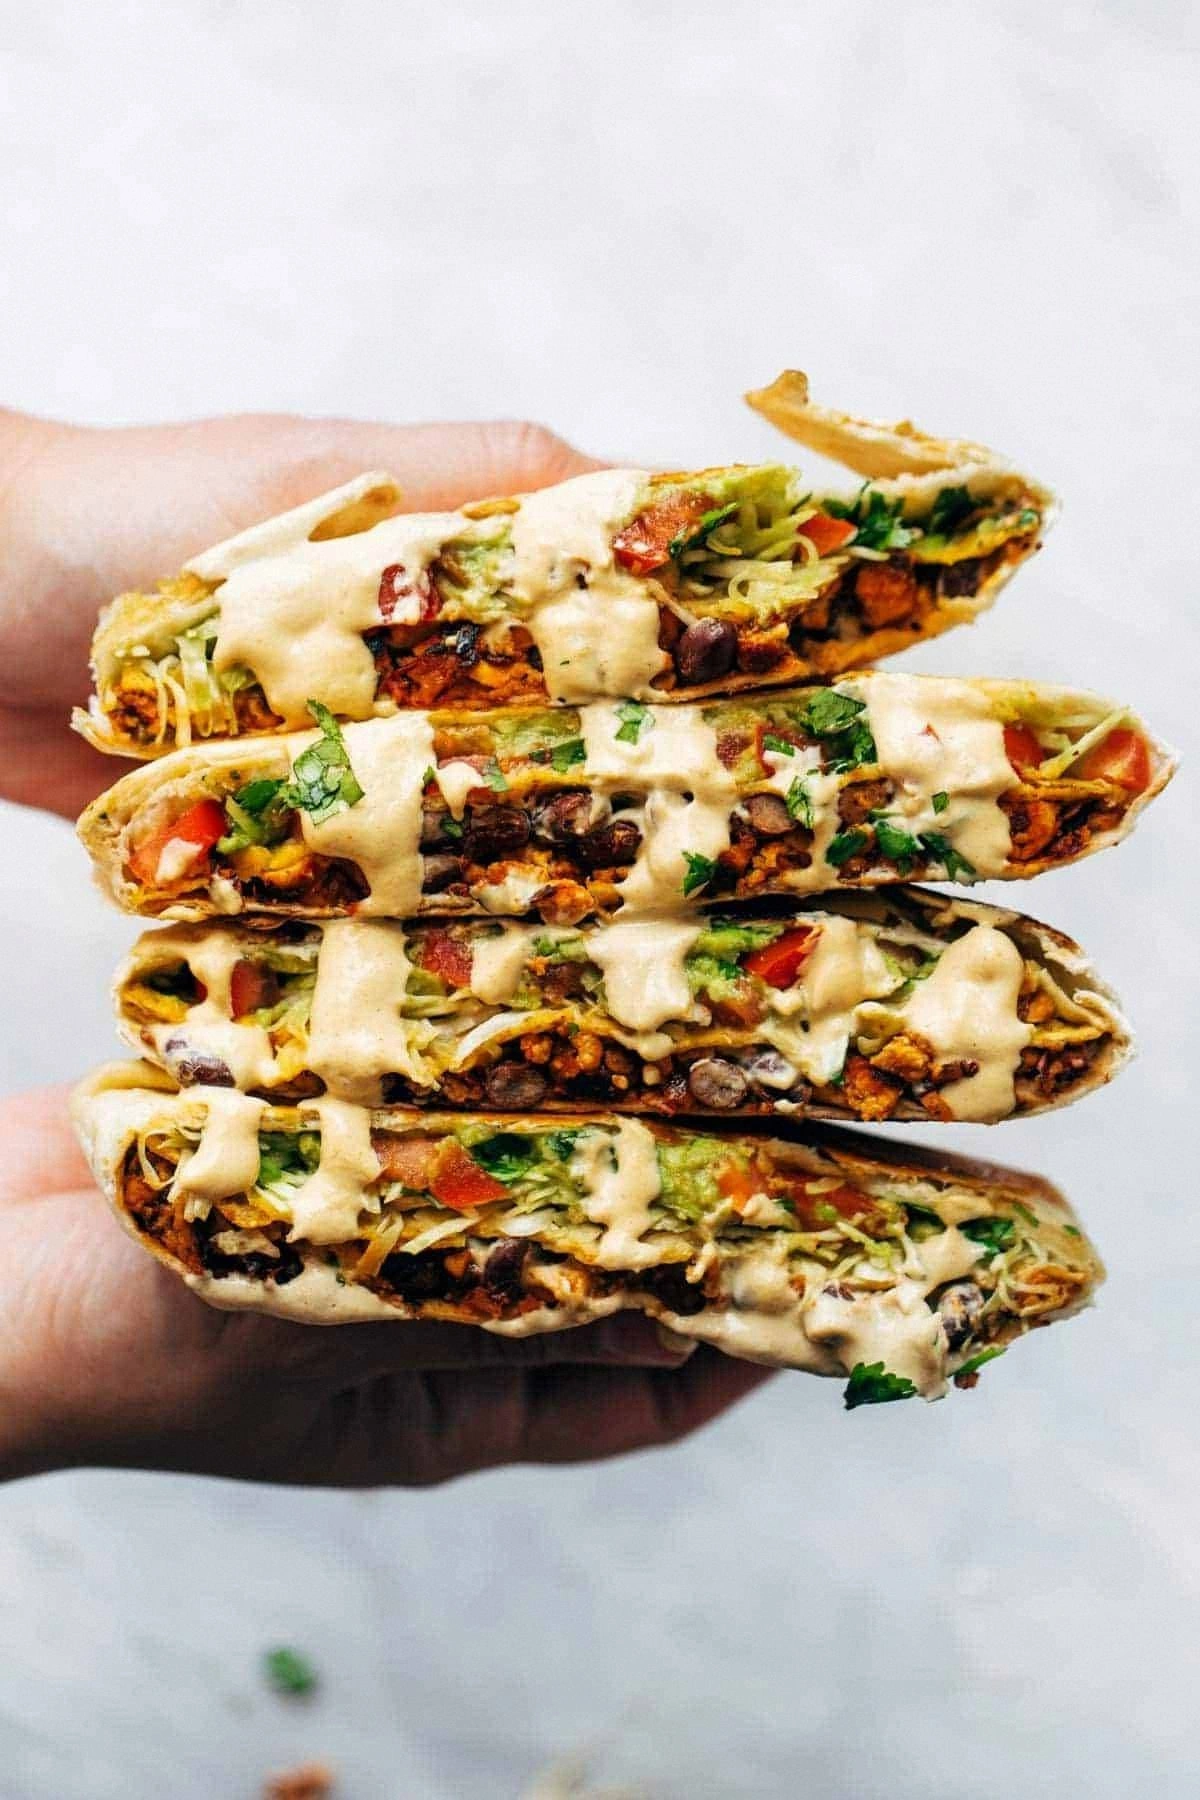
Picture this: a golden‑brown tortilla that gives way to a molten layer of seasoned soy crumbles, creamy refried beans, and a gooey melt of vegan cheese, all hidden beneath a second tortilla that fries to a perfect, crackly edge. When you bite in, the first thing you notice is the satisfying crunch that shatters like thin ice, followed by a cascade of textures—soft lettuce, juicy tomato, and a cool dollop of guacamole that slides across your tongue like silk. The aroma? A smoky, earthy perfume that makes the whole kitchen feel like a street‑food market at sunset.
Most vegan crunchwrap recipes either skip the essential crunch or drown the flavor in bland sauces. This version stands out because I’ve layered the sauce, spices, and textures in a way that respects each component while amplifying the whole. I’m using a secret weapon—a quick‑sear technique for the soy crumbles that locks in moisture and creates a caramelized crust, plus a double‑tortilla method that guarantees that once‑in‑a‑lifetime crunch you’ve been dreaming about. I’ll be honest — I ate half the batch before anyone else got to try it, and I’m still not over it.
And here’s the kicker: the key ingredient that most recipes overlook is a splash of lime‑infused water added to the bean layer. It brightens the whole bite and prevents the beans from turning gummy. I dare you to taste this and not go back for seconds. Let me walk you through every single step — by the end, you’ll wonder how you ever made it any other way.
What Makes This Version Stand Out
- Texture: The double‑tortilla system creates a crunchy outer shell that shatters with each bite, while the inner tortilla stays soft and pliable, delivering a contrast that most recipes miss.
- Flavor Depth: A taco‑seasoned soy crumble paired with lime‑brightened refried beans adds layers of umami, citrus, and earthiness that dance on the palate.
- Simplicity: All ingredients are pantry‑friendly; you won’t need a fancy sous‑vide or a spiralizer to pull this off.
- Uniqueness: The secret splash of lime water in the bean layer prevents sogginess and adds a zing that feels like a hidden treasure.
- Crowd Reaction: Even the most skeptical meat‑eaters rave about the “real‑meat” feel, making it the perfect party pleaser.
- Ingredient Quality: Using high‑quality vegan cheese that melts perfectly ensures a creamy pull that rivals dairy.
- Cooking Method: The pan‑sear before assembly builds a caramelized crust on the soy crumbles, a step most recipes skip.
- Make‑Ahead Potential: You can prep the fillings up to a day ahead, storing them separately, and still achieve that fresh‑out‑of‑the‑pan crunch.
Inside the Ingredient List
The Flavor Base
Soy crumbles are the heart of this dish; they provide that meaty bite without any animal products. I season them with a homemade taco blend—cumin, smoked paprika, garlic powder, and a dash of chipotle for heat. If you skip the seasoning, you’ll end up with bland, mushy crumbles that feel out of place. For a gluten‑free version, swap the soy crumbles for lentil “meat” and add a tablespoon of nutritional yeast for that savory depth.
The Texture Crew
The tortillas are the structural heroes, but not just any tortilla will do. I use large, 10‑inch flour tortillas because they can hold the generous fillings without tearing. If you find them too thick, give them a quick 10‑second steam in the microwave before assembling. The vegan cheese adds a stretchy, melty layer; choose a brand that lists coconut oil as the first ingredient for the best melt. Skipping the cheese makes the wrap feel dry, and you’ll lose that oozy pull that makes every bite unforgettable.
The Unexpected Star
Lime‑infused water might sound odd, but a splash added to the refried beans lifts the whole flavor profile. The acidity cuts through the richness of the beans and keeps the wrap from becoming soggy. If you don’t have fresh lime, a teaspoon of apple cider vinegar works in a pinch, though the citrus note will be milder. This tiny trick is why most recipes get the texture wrong—my version never gets soggy.
The Final Flourish
Fresh lettuce, diced tomato, and a dollop of guacamole provide brightness and moisture that balance the rich fillings. The lettuce should be shredded thinly; thicker shreds will wilt under the heat and become soggy. Tomatoes add juicy bursts, but be sure to pat them dry—excess water will ruin the crispness. Finally, a swirl of vegan sour cream adds a tangy coolness that rounds out each bite.
Everything's prepped? Good. Let's get into the real action...
The Method — Step by Step
First, rehydrate the soy crumbles. Bring 1 cup of vegetable broth to a simmer, pour it over the 1 cup of dry soy crumbles, and let it sit for 5 minutes. After it absorbs the liquid, squeeze out any excess moisture with a clean kitchen towel. This step ensures the crumbles stay firm when we sear them later. Power transition: Okay, ready for the game‑changer?
Heat 2 tablespoons of olive oil in a large skillet over medium‑high heat. Once shimmering, add the rehydrated crumbles, sprinkle the ½ cup taco seasoning, and stir continuously for 6‑8 minutes. You’ll hear a faint sizzle as the crumbles caramelize, and the edges will start pulling away—this is the moment of truth.
While the crumbles are cooking, combine the refried beans with ¼ cup lime‑infused water in a small saucepan. Warm gently over low heat, stirring until the mixture is smooth and glossy. The lime water prevents the beans from thickening too much, keeping them spreadable but not runny.
Watch Out: If you let the beans boil, they’ll dry out and become pasty, ruining the texture.Now assemble the first layer. Lay a flour tortilla on a clean surface, spread a generous ¼ cup of the lime‑brightened beans in the center, then layer ½ cup of the seasoned soy crumbles on top. Sprinkle ½ cup of vegan shredded cheese over the crumbles, letting it begin to melt from the residual heat.
Add the fresh components: 1 cup shredded lettuce, ½ cup diced tomatoes, ¼ cup diced red onion, and a spoonful of guacamole. Finish with a drizzle of vegan sour cream. The colors should look vibrant—a visual promise of the flavor explosion to come.
Place a second flour tortilla on top, then fold the edges inward, creating a sealed hexagonal packet. Press gently to seal any gaps; this prevents the fillings from spilling out during cooking.
Kitchen Hack: Use a small rolling pin to lightly roll the edges inward—this creates a tighter seal without crushing the fillings.Heat a clean non‑stick skillet over medium heat and add a thin drizzle of olive oil. Carefully place the assembled wrap seam‑side down. Cook for 3‑4 minutes, watching for the bottom tortilla to turn a deep golden brown. You’ll hear a satisfying sizzle; that’s the crisp forming. Flip gently using a spatula and cook the other side another 3‑4 minutes until both sides are golden and the cheese is fully melted.
Once cooked, transfer the crunchwrap to a cutting board and let it rest for 2 minutes. This short rest lets the interior steam settle, preventing the outer crust from becoming soggy when you cut into it. Slice diagonally into two halves—each half should reveal the layered fillings like a work of art.
Serve immediately while the crust is still hot and crunchy. Pair with a side of fresh salsa or a drizzle of extra guacamole for an extra punch. That sizzle when it hits the pan? Absolute perfection. That first bite? Hands down the best version you’ll ever make at home.
That's it — you did it. But hold on, I've got a few more tricks that'll take this to another level...
Insider Tricks for Flawless Results
The Temperature Rule Nobody Follows
Never cook the wrap on high heat; you’ll scorch the outer tortilla while the interior stays lukewarm. Keep the skillet at medium‑high, aiming for a surface temperature of about 350°F (175°C). You can test this by flicking a drop of water onto the pan; if it dances and evaporates in 2‑3 seconds, you’re at the sweet spot. A friend once cranked the heat to “max” and ended up with a blackened shell and raw beans—let's just say it didn't end well.
Why Your Nose Knows Best
Your sense of smell is the ultimate doneness gauge. When the tortilla starts to release a buttery, toasted aroma, you’re close to the perfect crunch. If you smell a faint burnt scent, lower the heat immediately. Trust that nose; it’s more reliable than a timer because every stove behaves a little differently.
The 5‑Minute Rest That Changes Everything
After pan‑searing, let the crunchwrap rest for exactly five minutes before cutting. This short pause allows the cheese to firm up just enough to avoid oozing everywhere, and the steam inside redistributes, keeping the lettuce crisp. Skipping this rest results in a soggy interior and a cheese spill that looks like a kitchen crime scene.
Layering Order—A Secret Symphony
Start with beans, then crumbles, then cheese, and finally the fresh veggies. This order ensures the cheese melts over the warm crumbles, acting as a glue that holds the fresh layers in place. If you place lettuce before cheese, the lettuce will wilt and sink into the bean layer, losing its crunch.
The Flip‑And‑Press Technique
When you flip the wrap, press down gently with a spatula for about 10 seconds. This extra pressure seals the edges tighter and promotes an even golden crust on both sides. I used to flip without pressing and ended up with a slightly open seam that let the fillings escape.
Creative Twists and Variations
This recipe is a playground. Here are some of my favorite ways to switch things up:
Spicy Chipotle Inferno
Swap the standard taco seasoning for a chipotle‑adobo blend, and add a tablespoon of chipotle sauce to the bean layer. The smoky heat will make even the boldest spice lovers cheer, while the lime water still provides balance.
Mediterranean Delight
Replace the soy crumbles with seasoned chickpeas, add kalamata olives, and use a dollop of vegan tzatziki instead of sour cream. The tangy cucumber notes bring a fresh Mediterranean vibe that pairs perfectly with the crunchy tortilla.
Breakfast Crunchwrap
Swap the crumbles for seasoned tofu scramble, add a scoop of vegan cheddar, and top with avocado slices and a drizzle of maple‑syrup‑infused hot sauce. This version turns the classic into a hearty morning treat that will keep you fueled for hours.
BBQ Pulled Jackfruit
Use shredded BBQ jackfruit in place of soy crumbles, add a tablespoon of coleslaw mix, and finish with a drizzle of vegan ranch. The sweet‑smoky flavor profile makes it feel like a backyard BBQ in a handheld form.
Cheesy Nacho Overload
Add a layer of nacho cheese sauce under the vegan cheese, sprinkle pickled jalapeños, and serve with a side of salsa verde. This version leans into indulgence and is perfect for game‑day gatherings.
Storing and Bringing It Back to Life
Fridge Storage
Place cooled, fully assembled crunchwraps in an airtight container. They keep for up to 3 days. When ready to eat, reheat in a skillet over medium heat for 3‑4 minutes per side. Add a tiny splash of water to the pan before reheating; the steam revives the tortilla’s crispness.
Freezer Friendly
Wrap each uncooked, assembled crunchwrap tightly in parchment, then foil, and freeze. They’ll stay fresh for up to 2 months. To cook, thaw overnight in the fridge, then pan‑sear as usual. The extra moisture from thawing actually helps the tortilla stay soft inside while the exterior crisps.
Best Reheating Method
For ultimate crunch, reheat in a preheated oven at 375°F (190°C) for 8‑10 minutes, flipping halfway. This method restores the golden crust without making the interior soggy. If you’re in a hurry, a quick skillet reheat with a lid on for 2 minutes helps melt the cheese without losing the crunch.