I was standing in my kitchen, staring at a half‑baked batch of brownies that had turned out flatter than a pancake and somehow managed to taste like cardboard. The culprit? A rushed recipe that tried to be everything at once—chewy, fudgy, and perfectly bite‑sized—yet delivered none of those promises. I stared at the sad, crumb‑laden slab and thought, “If I’m going to spend my weekend in the oven, I might as well make something that makes people actually gasp.” That moment of culinary desperation birthed the ultimate version of brownie petit fours, a tiny treat that packs enough chocolate punch to make a grown‑up weep with joy. This is the recipe that turned my kitchen disaster into a parade of delighted guests, and I’m about to spill every secret that makes these bites truly irresistible.
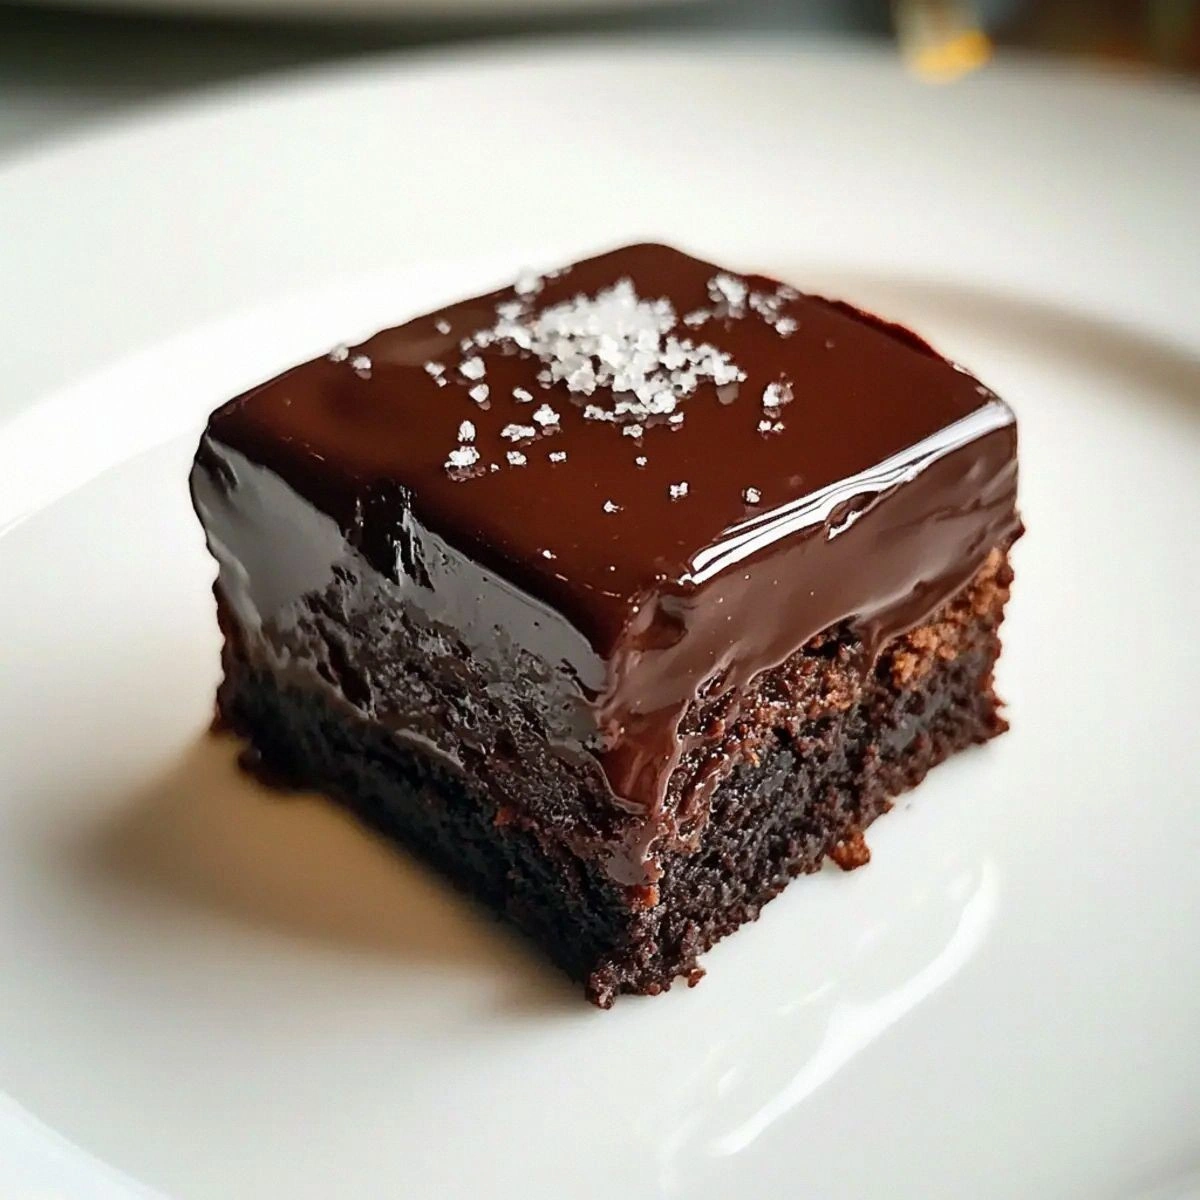
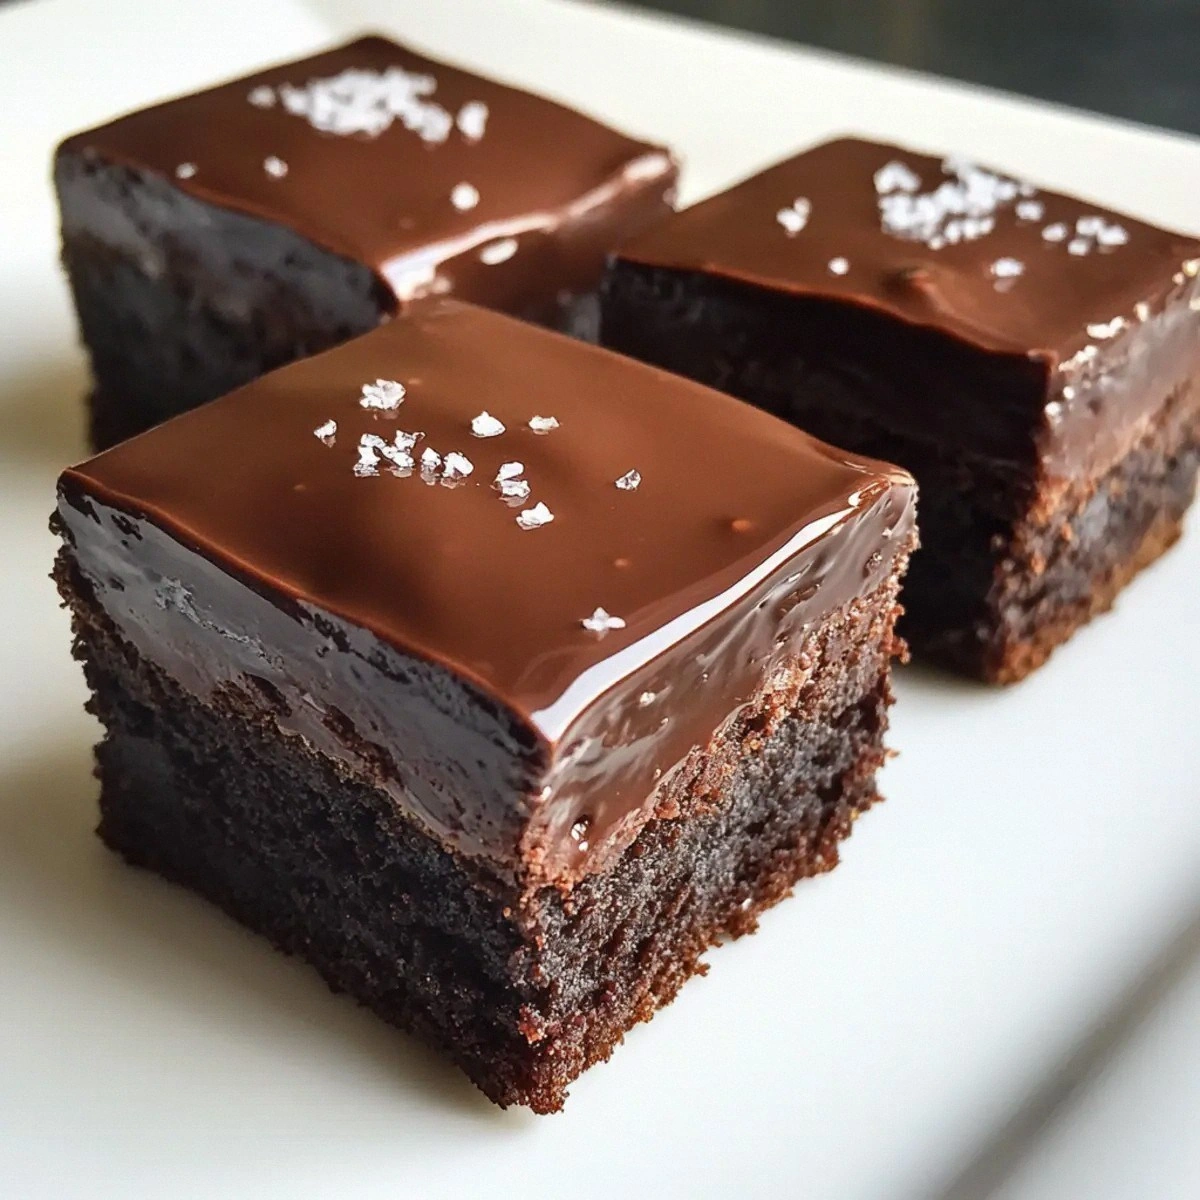
Picture this: the oven door swings open and a wave of deep, earthy cocoa rolls out, mingling with the buttery aroma of melted chocolate that hugs the air like a warm blanket. The batter, glossy and thick, slides into a parchment‑lined pan and spreads itself into a perfect, glossy sheet that looks like a dark, velvety lake. As the timer dings, the edges pull away from the pan with a gentle sigh, revealing a crackly crust that snaps just enough to give way to a soft, melt‑in‑your‑mouth center. When you cut the brownies into petite squares, each piece glistens with a thin sheen of ganache, and a whisper of fleur de sel on top catches the light like tiny edible stars. The first bite is an orchestra of textures—crackly, fudgy, silky—while the flavor sings a deep, bittersweet chorus that lingers just long enough to make you reach for another.
Most brownie recipes either drown you in sugar or leave you with a dry, crumbly mess that feels like chewing on a chocolate brick. Most attempts at petit fours end up either too soft, losing their shape, or too hard, turning into chocolate rocks that crack your teeth. I’ve tested every shortcut you can imagine—microwave melts, pre‑made mixes, even “no‑bake” tricks—only to end up with disappointment. What makes this version stand out is the marriage of classic French technique (a glossy ganache glaze) with the comforting familiarity of a brownie, all while keeping the process simple enough for a weekday after‑work bake. The secret weapon? A splash of heavy cream in the ganache and a pinch of fleur de sel that elevates the chocolate from ordinary to unforgettable.
Now, I’m not just going to hand you a list of ingredients and hope for the best; I’ll walk you through every single step—down to the exact moment you should start humming your favorite tune. By the end, you’ll have a batch of brownie petit fours that not only look like they belong on a patisserie shelf but also taste like a hug from a chocolate‑loving grandma. I dare you to taste this and not go back for seconds. Okay, ready for the game‑changer? Let me walk you through every single step — by the end, you’ll wonder how you ever made it any other way.
What Makes This Version Stand Out
- Texture: The outer crust is crisp enough to snap, while the interior stays fudgy and melt‑in‑your‑mouth, creating a delightful contrast that keeps you reaching for more.
- Flavor: A deep, bittersweet chocolate base is balanced by a silky ganache and a whisper of fleur de sel, delivering a sophisticated flavor profile that feels both classic and luxurious.
- Simplicity: Despite sounding fancy, the recipe uses only pantry staples and a handful of steps—no fancy equipment or hard‑to‑find ingredients.
- Visual Appeal: The glossy ganache glaze gives each petit four a professional shine, and the dusting of fleur de sel adds a speckled, gourmet finish that’s Instagram‑ready.
- Crowd Reaction: These bites disappear faster than you can say “chocolate,” making them the perfect party‑starter, dessert, or even a corporate gift that will have everyone asking for the recipe.
- Ingredient Quality: Using high‑quality semisweet chocolate and real butter ensures a rich, buttery mouthfeel that cheap substitutes simply can’t replicate.
- Cooking Method: Baking at a moderate temperature creates a gentle, even bake that avoids the dreaded “dry edge” many brownie recipes suffer from.
- Make‑Ahead Potential: Once glazed, the petit fours keep beautifully for up to a week, and they even freeze well, so you can prep ahead for any event.
Alright, let's break down exactly what goes into this masterpiece...
Inside the Ingredient List
The Flavor Base
Semisweet chocolate is the heart and soul of these petit fours. The cocoa solids provide the deep, resonant flavor that defines a true chocolate experience, while the cocoa butter contributes that silky melt you crave. If you skimp on quality, the finished brownies will taste flat and waxy—so opt for a bar with at least 60% cacao. I recommend a brand that snaps cleanly when broken; that snap is a good sign of proper cocoa butter content.
Unsalted butter adds richness and helps create that coveted glossy ganache. Because it’s unsalted, you have full control over the final seasoning—especially important when you finish with fleur de sel. If you’re dairy‑free, you can substitute with a high‑quality plant‑based butter, but expect a slightly different mouthfeel.
The Texture Crew
All‑purpose flour provides structure without making the brownies cakey. The modest 1/2 cup keeps the crumb tender, while the 1/3 cup cocoa powder deepens the chocolate flavor and adds a subtle dry‑feel that balances the moist batter. Salt, though used sparingly, amplifies the chocolate’s natural sweetness and rounds out the flavor.
Granulated sugar and light brown sugar work together to create a complex sweetness; the brown sugar’s molasses notes add a faint caramel undertone that pairs beautifully with the fleur de sel. If you prefer a less sweet bite, you can reduce the granulated sugar by a quarter cup, but the texture will stay the same.
The Unexpected Star
Heavy whipping cream is the secret behind the glossy ganache that coats each petit four like a mirror. When heated gently with chocolate, it creates an emulsion that stays glossy even after cooling, giving the brownies a professional finish. The fleur de sel, a delicate sea salt crystal, is sprinkled just before the ganache sets; its tiny bursts of salty crunch cut through the sweetness and make the flavor pop.
Eggs act as the binder, adding lift and a tender crumb. The combination of four large eggs with the butter creates a batter that’s thick enough to hold its shape yet fluid enough to spread evenly. If you’re allergic to eggs, a blend of flaxseed meal and water (1 tbsp flaxseed + 3 tbsp water per egg) works as a vegan binder, though the texture will be slightly different.
Everything's prepped? Good. Let's get into the real action...
The Method — Step by Step
Preheat your oven to 350°F (175°C) and line a 9×13‑inch baking pan with parchment paper, letting the paper overhang the edges for an easy lift‑out later. While the oven warms, melt the first 8 oz of semisweet chocolate with the stick of butter in a heat‑proof bowl over a simmering pot of water, stirring until the mixture is glossy and completely combined. This bain‑marie method ensures the chocolate doesn’t scorch, preserving that silky texture. Once melted, set the bowl aside to cool slightly—this is the moment you should hear the faint sizzle as steam escapes the pot, a sign of perfect heat control.
In a separate large mixing bowl, whisk together the granulated sugar, light brown sugar, and the four eggs until the mixture becomes pale and thick, about 2–3 minutes. The sugars should dissolve partially, creating a ribbon that falls slowly back into the bowl—a visual cue that the eggs have incorporated enough air. Add the vanilla extract and whisk once more, letting the aroma of vanilla fill your kitchen like a sweet perfume.
Now, gently fold the melted chocolate‑butter mixture into the egg‑sugar blend. Use a rubber spatula and a gentle hand; you’re looking for a smooth, uniform batter that has a deep, chocolatey sheen. At this stage, the batter should be thick enough to hold a spoonful without immediately spreading—if it looks too runny, give it a minute; the residual heat will thicken it slightly.
In a small bowl, sift together the all‑purpose flour, cocoa powder, and salt. Sifting aerates the dry ingredients and prevents lumps, which is crucial for that final, velvety crumb. Gradually fold the dry mixture into the wet batter, being careful not to over‑mix. Over‑mixing would develop gluten and turn your brownies into a cake, ruining that coveted fudgy interior.
Spread the batter evenly in the prepared pan, smoothing the top with an offset spatula. The batter should be about ½‑inch thick; if it’s thinner, the brownies will bake too quickly and lose that fudgy center. Place the pan in the preheated oven and bake for 25‑30 minutes, or until the edges pull away from the parchment and a toothpick inserted into the center comes out with a few moist crumbs. The aroma at this point should be intoxicating—deep chocolate, buttery notes, and a faint hint of caramel from the brown sugar.
While the brownies bake, prepare the ganache. In a small saucepan, bring the heavy whipping cream to a gentle simmer—watch for tiny bubbles forming at the edges, not a rolling boil. Remove from heat and pour the hot cream over the second 8 oz of semisweet chocolate in a heat‑proof bowl. Let it sit for a minute, then stir until the mixture is glossy and completely smooth. This is the moment of pure magic; the ganache should coat the back of a spoon in a thick ribbon that holds its shape.
When the brownies are done, remove them from the oven and let them cool in the pan for 10 minutes. Then, using the parchment overhang, lift the entire slab onto a cooling rack. While still warm (but not hot), pour the ganache over the top, using a spatula to spread it evenly. The ganache will cascade over the edges, creating a glossy waterfall effect that looks like it was poured by a pastry chef.
Before the ganache sets, sprinkle the fleur de sel evenly across the surface. The tiny crystals will settle into the glossy coating, creating pockets of salty crunch that contrast beautifully with the sweet chocolate. Allow the ganache to set completely—about 20‑30 minutes at room temperature or 10 minutes in the fridge if you’re in a hurry.
Finally, use the parchment overhang to lift the cooled slab onto a cutting board. With a sharp, hot knife (dip the blade in hot water and wipe dry between cuts), slice the brownies into 2‑inch squares. The heat prevents the ganache from cracking and ensures clean, professional edges. Arrange the petit fours on a serving platter, and watch your guests’ eyes widen with anticipation.
That's it — you did it. But hold on, I've got a few more tricks that'll take this to another level...
Insider Tricks for Flawless Results
The Temperature Rule Nobody Follows
Never bake brownies on a cold oven. Always give your oven at least 10 minutes to fully preheat; the initial burst of heat creates that coveted “crackly” top while keeping the interior fudgy. I once tried to slide the pan in as soon as the dial hit 350°F, and the result was a flat, gummy mess. Trust the thermostat, and you’ll get that perfect contrast every time.
Why Your Nose Knows Best
The moment the brownies start to smell like toasted almonds is your cue to start checking for doneness. The scent is a reliable indicator that the interior has set just enough without over‑baking. If you rely solely on a timer, you risk drying out the center. So keep that nose open and trust your senses—they’re more accurate than any digital readout.
The 5‑Minute Rest That Changes Everything
Allow the baked slab to rest for exactly five minutes before pouring the ganache. This short pause lets the crumb firm up just enough to support the heavy ganache without breaking. Skipping this step leads to a soggy base that can’t hold the glaze, resulting in a messier presentation.
Ganache Temperature is Everything
When the cream is just shy of boiling, the ganache will stay fluid enough to spread but will also set with a beautiful sheen. If the ganache cools too quickly, it will thicken and become difficult to spread, leaving streaks. Keep the ganache warm (around 120°F) while glazing for a flawless coat.
Salt Placement Perfection
Instead of mixing fleur de sel into the ganache, sprinkle it on top just before the glaze sets. This technique preserves the delicate crystal structure, giving you those satisfying little pops of salty crunch in every bite. If you blend it in, the salt dissolves, and you lose that textural surprise.
Creative Twists and Variations
This recipe is a playground. Here are some of my favorite ways to switch things up:
Espresso‑Infused Fudge
Replace 1 tablespoon of the heavy cream with a shot of strong espresso. The coffee amplifies the chocolate’s depth, creating a mocha‑like experience that’s perfect for brunch or an after‑dinner pick‑me‑up.
White Chocolate & Raspberry
Swap the semisweet chocolate for white chocolate in both the batter and ganache, then fold in a handful of freeze‑dried raspberry powder into the batter. Finish with a drizzle of raspberry coulis on top for a bright, fruity contrast.
Spicy Chili Kick
Add a pinch of cayenne pepper to the dry ingredients and a dash of chipotle powder to the ganache. The subtle heat pairs surprisingly well with the sweet chocolate, delivering a lingering warmth that’s perfect for cooler evenings.
Nutty Crunch
Stir in ½ cup of toasted, chopped hazelnuts or almonds into the batter before baking. The nuts add a buttery crunch that complements the smooth ganache, and they also make the petit fours look extra elegant.
Minty Fresh
Incorporate ½ teaspoon of peppermint extract into the ganache and garnish each piece with a tiny mint leaf. The cool mint cuts through the richness, offering a refreshing bite that’s great for holiday parties.
Gluten‑Free Version
Replace the all‑purpose flour with a 1:1 gluten‑free flour blend, and add a tablespoon of cornstarch to maintain structure. The texture remains just as fudgy, and the flavor stays true to the original.
Storing and Bringing It Back to Life
Fridge Storage
Place the cooled petit fours in an airtight container, layering parchment between layers to prevent sticking. They’ll stay fresh for up to 7 days, and the ganache will retain its shine. If the ganache looks a little dull after a few days, a quick microwave‑second (5 seconds) will revive the gloss.
Freezer Friendly
Wrap each petit four individually in plastic wrap, then place them in a zip‑top freezer bag. They freeze beautifully for up to 3 months. When you’re ready to serve, let them thaw in the refrigerator for an hour, then bring them to room temperature for that perfect bite.
Best Reheating Method
To bring them back to life, preheat your oven to 300°F (150°C) and place the petit fours on a parchment‑lined tray for 5‑7 minutes. Add a tiny splash of water (just a teaspoon) to the tray before heating; the steam gently revives the ganache, restoring its glossy finish without drying out the interior.