Picture this: I was standing in the middle of my kitchen, eyes wide, watching a batch of overripe strawberries tumble from a plastic bag like a crimson avalanche. The scent of summer hung heavy, but something was missing—an unexpected twist that could turn a simple snack into a showstopper. That moment sparked a culinary epiphany: deviled strawberries that taste like a creamy cheesecake swirl with every bite. I grabbed my trusty bowl, a handful of fresh berries, and an arsenal of dairy that would make even the most skeptical taste buds swoon. By the time the last strawberry was nestled in its glossy coating, I knew I had stumbled on a flavor revelation.
Remember the last time you tried a fancy appetizer and ended up with a sad, soggy mess? That’s the kind of disappointment I vowed to banish with this recipe. Instead of a bland dip, imagine a silky, tangy cream that clings to each berry like a velvet ribbon. The citrus zing from fresh lemon juice cuts through the richness, creating a harmonious dance on the palate. And the cherry on top? A subtle crunch of graham cracker crumbs that adds a playful texture you never saw coming.
Why does this version stand out? It’s because every single element was chosen to elevate the humble strawberry into a decadent, bite‑size dessert that feels like a party in your mouth. The creamy filling is thick enough to coat the fruit but light enough to melt instantly. The secret lies in balancing the fat content of cream cheese with the brightness of lemon, preventing the filling from becoming too heavy. I even added a splash of vanilla to give it a subtle, comforting aroma reminiscent of a freshly baked cheesecake. The result? A treat that’s both indulgent and refreshing, perfect for any gathering or an afternoon pick‑me‑up.
Now, here’s the kicker: I’ve discovered a technique that turns ordinary strawberries into a silky canvas for this luscious filling. By blanching the berries for a mere 10 seconds and then plunging them into ice water, you preserve their vibrant color and firm texture. This simple step ensures the strawberries hold their shape when the creamy mixture is poured over them. I dare you to taste this and not go back for seconds; it’s that addictive. Let me walk you through every single step—by the end, you’ll wonder how you ever made it any other way.
What Makes This Version Stand Out
- Flavor: The filling delivers a sweet‑savory balance that feels like a mini cheesecake in every bite. The creamy texture coats the strawberry without overpowering its natural juiciness. The subtle vanilla note elevates the overall profile, creating a sophisticated yet comforting taste.
- Texture: The combination of cream cheese, heavy whipping cream, and sour cream results in a silky, airy consistency. The graham cracker crumbs provide a delightful crunch that contrasts with the smooth filling. This textural play keeps each bite interesting and memorable.
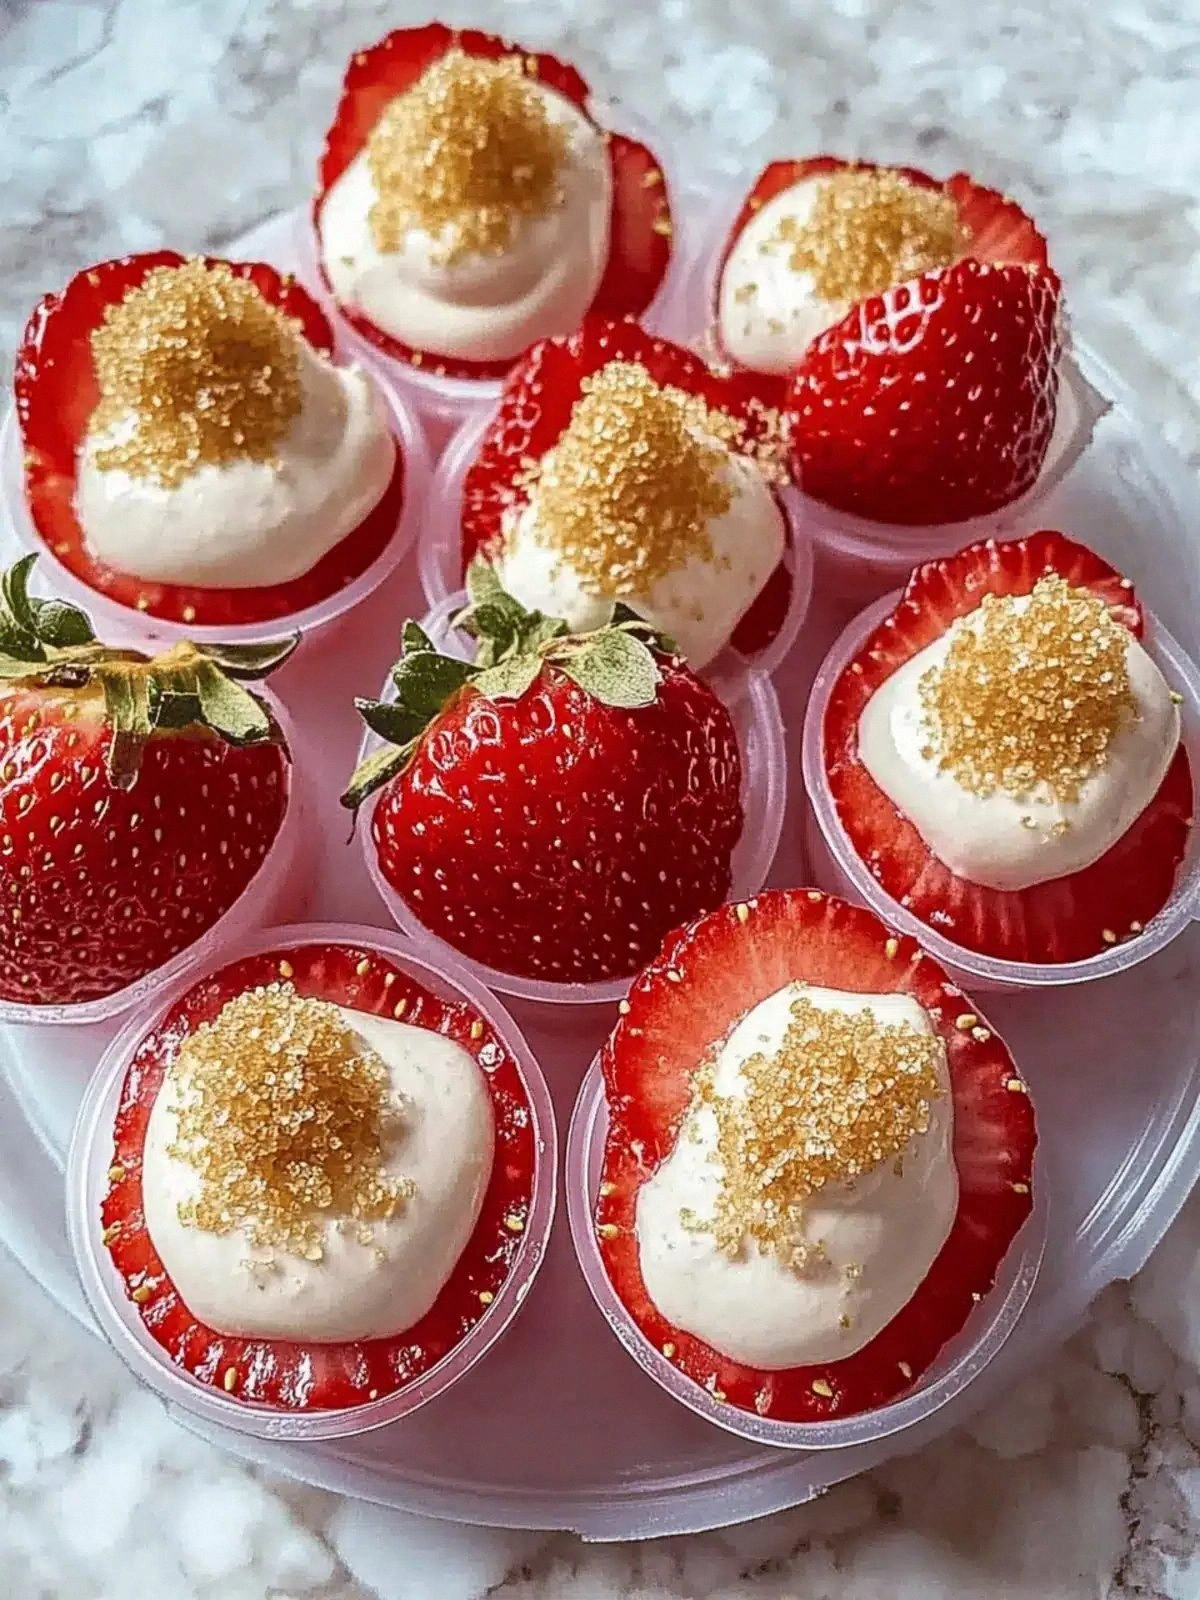
- Visual Appeal: The bright red of the strawberries juxtaposed against the pale cream creates an eye‑catching presentation. The subtle sheen of the filling gives the berries a glossy finish that looks as good as it tastes. A sprinkle of crumbs on top adds a rustic touch that invites the palate.
- Simplicity: No fancy equipment or complex techniques are required. A bowl, a whisk, and a few minutes of prep are all you need to create a show‑stopping dish. This accessibility makes it a go‑to recipe for any occasion.
- Make‑Ahead Potential: The filling can be prepared up to 24 hours in advance, allowing you to focus on the final assembly when guests arrive. The strawberries hold up well when refrigerated, maintaining their freshness and flavor.
- Ingredient Quality: Using high‑quality cream cheese and fresh strawberries ensures the best flavor and texture. The natural sweetness of the berries complements the rich filling without the need for excess sugar.
- Audience Reaction: Friends and family rave about the unique twist on a classic snack. The dish sparks conversation and leaves a lasting impression, making it perfect for parties, brunches, or a cozy night in.
- Versatility: The recipe can be tweaked for dietary preferences, such as using low‑fat dairy or dairy‑free alternatives, without sacrificing taste.
Alright, let’s break down exactly what goes into this masterpiece. Each component plays a vital role, and understanding their purpose will elevate your execution from good to unforgettable. We’ll walk through the ingredient groups, offering swaps, tips, and a fun fact to keep you intrigued. Ready to dive into the details? Let’s go.
Inside the Ingredient List
The Flavor Base
Cream cheese is the cornerstone of this filling, providing a rich, tangy foundation that mimics cheesecake. Its silky texture blends effortlessly with heavy whipping cream, creating a velvety consistency that clings to each berry. If you prefer a lighter version, swap half the cream cheese for a low‑fat alternative, but be prepared for a slightly thinner filling. When selecting cream cheese, opt for a brand with a smooth, lump‑free texture to avoid gritty bites.
Heavy whipping cream adds airy lift and a subtle sweetness that balances the cream cheese’s saltiness. The cream’s fat content ensures the filling remains stable at room temperature, preventing it from becoming runny. Should you be lactose intolerant, a dairy‑free whipping cream can replace the heavy cream, though the final texture may differ slightly. Remember, the ratio of cream to cheese is key; too much cream can dilute the flavor, while too little may result in a clumpy mixture.
Sour cream introduces a gentle tartness that brightens the overall profile. It also helps to stabilize the mixture, preventing separation. For a vegan version, a plant‑based sour cream works well, but adjust the quantity to maintain the desired tang. If you’re aiming for a sweeter filling, reduce the sour cream slightly and compensate with a touch more vanilla.
Vanilla extract is the secret aromatic enhancer. It adds depth and a warm, comforting undertone that echoes the cheesecake theme. A high‑quality vanilla bean paste can replace the extract for a more intense flavor, but use it sparingly to avoid overpowering the berries. When measuring, a single teaspoon is enough to infuse the entire batch without drowning the delicate fruit.
The Texture Crew
White granulated sugar is the sweetener that balances the tartness of the berries and the acidity of the lemon. It also aids in thickening the filling, giving it body. If you’re watching your sugar intake, consider a natural sweetener like honey or maple syrup, but adjust the amount to avoid a syrupy texture. For a lower‑calorie option, a sugar substitute that dissolves well, such as erythritol, can be used.
Fresh lemon juice provides a bright, citrusy punch that cuts through the richness. It also helps preserve the strawberries’ color by preventing oxidation. The acidity of lemon balances the sweetness, creating a harmonious flavor profile. If you prefer a milder citrus note, replace half the lemon juice with lime or orange zest for a different twist.
Graham cracker crumbs add a crunchy texture and a subtle buttery flavor. They act as a subtle garnish that also helps stabilize the filling on the berries. For a gluten‑free version, use a certified gluten‑free graham cracker or crushed rice crackers. If you’re craving a nutty crunch, sprinkle toasted almond slivers on top for an extra layer of flavor.
The Unexpected Star
Strawberries are the star of this dish, offering a burst of natural sweetness and a vibrant color that makes the dish visually appealing. Fresh, ripe strawberries provide the best flavor; avoid those that are overly red or mushy, as they may release too much juice and dilute the filling. When selecting strawberries, look for firm, bright red berries with a slight sheen. If you’re using out‑of‑season strawberries, frozen berries can work, but thaw them gently and pat dry to avoid excess moisture.
The size of the strawberries matters; medium‑sized berries hold their shape well when topped with filling. If you prefer a smaller bite, halve or quarter the berries before assembly. The natural sugars in strawberries complement the creamy filling, creating a balanced sweet‑savory experience. For a twist, consider using strawberry halves or whole berries with a small cut to hold the filling.
The Final Flourish
A final sprinkle of graham cracker crumbs adds a subtle crunch and visual contrast. It also provides a hint of buttery flavor that enhances the overall taste. If you’re looking for an extra pop of color, dust a pinch of powdered sugar or cocoa powder on top. For a savory variation, consider a sprinkle of sea salt to balance the sweetness.
Everything's prepped? Good. Let's get into the real action, and trust me, the assembly will feel like a piece of art coming together. The next steps will guide you through a process that feels almost ceremonial, and the payoff is worth every moment.
The method is deceptively simple, yet each step is crucial to achieving that perfect balance of flavor and texture. I’ve broken it down into manageable stages, and I’ll sprinkle in a few extra tips along the way to ensure flawless results. Keep your eyes on the clock, your hands steady, and your palate ready for a treat that’s almost too good to be true.
The Method — Step by Step
- First, blanch the strawberries. Bring a pot of salted water to a rolling boil, then add the berries for 10 seconds. Immediately transfer them to an ice bath to halt the cooking process. This preserves their vibrant color and firm texture, preventing them from turning mushy. Pat them dry with a paper towel before proceeding.
- Next, blend the cream cheese, heavy whipping cream, sour cream, vanilla extract, sugar, and lemon juice in a high‑speed blender until the mixture is ultra‑smooth. The goal is a silky, lump‑free filling that coats the berries like velvet. Taste the mixture and adjust sweetness or acidity as desired; you can add a pinch more sugar or a splash more lemon if needed.
- Fold the graham cracker crumbs into the filling gently, ensuring they’re evenly distributed without breaking the crumbs into powder. The crumbs should remain slightly intact to provide a crunchy bite when you bite into the strawberry. If you prefer a finer crunch, you can crush the crumbs further before folding them in.
- Arrange the blanched strawberries on a serving platter or individual dessert plates. Place a generous spoonful of the creamy mixture onto each berry, allowing it to pool slightly at the base. The filling should sit snugly on the fruit without spilling over; adjust the amount as needed.
- Dust each filled strawberry with a light sprinkle of graham cracker crumbs for an extra crunch. This step not only adds texture but also enhances the visual appeal with a subtle contrast. If you like a more pronounced crunch, you can lightly toast the crumbs in a dry skillet until golden before sprinkling.
- Refrigerate the assembled strawberries for at least 30 minutes to allow the flavors to meld and the filling to set. The cold temperature keeps the berries firm and the filling from sliding off. When you’re ready to serve, give the berries a gentle pat to ensure the filling remains intact.
- Serve chilled, preferably with a small side of fresh mint or a dusting of powdered sugar for an extra touch of elegance. The contrast between the cool filling and the bright fruit will impress your guests instantly. If you’re hosting a party, consider arranging the strawberries in a circular pattern to create a striking centerpiece.
That’s it — you did it. But hold on, I've got a few more tricks that'll take this to another level. These insider tips will help you avoid common pitfalls and elevate the presentation, ensuring every bite is a masterpiece. Trust me, once you master these nuances, you'll never look back at ordinary strawberries again.
Insider Tricks for Flawless Results
The Temperature Rule Nobody Follows
Temperature control is the secret sauce that guarantees a silky filling. Keep all dairy ingredients at room temperature before blending; this prevents clumping and ensures a smooth texture. If the mixture feels too thick, add a splash of heavy cream to thin it slightly. A consistent temperature also helps the filling set properly in the fridge. Remember, even a slight chill can make the difference between a runny mess and a firm, luscious coating.
Why Your Nose Knows Best
Smell is a powerful indicator of freshness. When you inhale the aroma of fresh strawberries, you’ll immediately know they’re at peak ripeness. A slightly sweet, floral scent signals optimal flavor. If the berries emit a sour or off smell, they’re likely overripe or starting to spoil. Using your nose as a quick test saves you from culinary disappointment.
The 5-Minute Rest That Changes Everything
After blending the filling, let it rest for five minutes before pouring it onto the strawberries. This short pause allows the flavors to meld and the mixture to thicken slightly. If you rush the process, the filling may be too runny, causing it to leak off the berries. The rest period also gives the crumbs time to absorb some moisture, preventing a soggy crunch. A simple timer will keep you on track.
Avoiding the “Runny” Filler Fiasco
A common mistake is using too much heavy cream, which can make the filling runny. Keep the ratio of cream to cheese at a 1:2 ratio for best results. If you prefer a richer texture, add a tablespoon of mascarpone for extra creaminess. Always taste the mixture before final assembly; a slightly thicker consistency is preferable to a watery one.
The Quick Chill Trick
If you’re short on time, place the finished strawberries in the freezer for 10 minutes to set the filling instantly. This works well for last‑minute preparations or when you need to serve immediately. Just be sure to remove them from the freezer before serving to avoid a hard texture. This trick is especially handy for large batches or when entertaining.
The Final Touch
A final dusting of powdered sugar or a drizzle of honey can elevate the presentation. The sugar adds a subtle sparkle, while honey introduces a caramel note that complements the lemon. If you’re vegan, a light drizzle of agave syrup works beautifully. These finishing touches transform the dish from simple to spectacular.
Now that you’ve mastered these insider tricks, you’re ready to create deviled strawberries that wow. The combination of meticulous technique and thoughtful touches ensures a dish that’s as beautiful as it is delicious.
Creative Twists and Variations
This recipe is a playground. Here are some of my favorite ways to switch things up:
Chocolate‑Infused Delight
Swap the vanilla extract with cocoa powder and add a splash of dark chocolate liqueur. The chocolate undertone pairs wonderfully with the strawberry’s natural sweetness. Top with a sprinkle of cacao nibs for an added crunch. This version is perfect for chocolate lovers and adds a decadent twist.
Minty Freshness
Add chopped fresh mint to the filling for a refreshing herbal note. The mint complements the lemon and brightens the overall flavor profile. Garnish each strawberry with a mint leaf for a pop of color. This variation is ideal for a summer gathering or a brunch spread.
Almond Crunch Variation
Replace graham cracker crumbs with toasted almond slivers. The nutty flavor adds depth, and the crunch becomes more pronounced. For a nut allergy, use sunflower seeds instead. This twist is great for guests who love a bit of extra texture.
Lemon‑Zest Twist
Increase the lemon juice to 2 tablespoons and add a teaspoon of lemon zest to the filling. The citrus flavor becomes more pronounced, creating a tangy, vibrant dish. A splash of sparkling water in the filling can give it a light effervescence. This version is a hit during hot weather.
Berry Medley Edition
Use a mix of strawberries, raspberries, and blueberries for a colorful medley. The different berries bring varying sweetness and acidity, creating a complex flavor profile. Adjust the sugar slightly to balance the tartness of the blueberries. This variation is a visual and culinary treat.
Gourmet Truffle Finish
Drizzle a thin layer of truffle oil over the finished strawberries for an earthy, luxurious finish. The oil adds a subtle depth that pairs surprisingly well with the creamy filling. Finish with a pinch of sea salt to balance the richness. This version is perfect for a special occasion or a fancy dinner party.
Feel free to mix and match these ideas, or come up with your own creative twists. The beauty of this dish lies in its flexibility and the endless possibilities for flavor combinations.
Storing and Bringing It Back to Life
Fridge Storage
Store the assembled strawberries in an airtight container in the refrigerator for up to 48 hours. The cold environment keeps the filling firm and the berries crisp. If you’re preparing ahead, cover the top with plastic wrap to prevent the filling from absorbing other odors. When ready to serve, let them sit at room temperature for 10 minutes to soften slightly.
Freezer Friendly
For longer storage, place the strawberries in a single layer on a parchment‑lined tray and freeze for up to 2 weeks. Once frozen, transfer them to a freezer‑safe bag for extended storage. When you’re ready to enjoy, thaw them in the refrigerator overnight. The texture may change slightly, but the flavor remains intact.
Best Reheating Method
Reheating is not recommended, but if you must, place the strawberries on a microwave‑safe plate and warm them on low for 10 seconds. This will gently soften the filling without melting it. Add a tiny splash of water before reheating to steam the filling back to perfection. Avoid high heat, as it can cause the filling to separate.
With these storage tips, you can enjoy deviled strawberries whenever the craving strikes. Whether you’re prepping for a party or a spontaneous snack, this dish will always impress.
I’ve spent countless hours tweaking this recipe, and I can’t stress enough how essential each detail is. From the blanching step that locks in color to the careful folding of crumbs, every move matters. The result is a dish that feels luxurious yet approachable, a testament to the power of thoughtful preparation. If you’re looking for a conversation starter or a dessert that showcases your culinary flair, deviled strawberries are your go‑to solution. Trust me, once you’ve tasted the first bite, you’ll be back for seconds, thirds, and maybe even a fourth.
Picture yourself pulling this out of the fridge at a summer gathering, the whole kitchen smelling incredible with the buttery crumbs and sweet strawberries. The guests will gasp, the conversation will flow, and you’ll bask in the glow of culinary triumph. This dish doesn’t just satisfy hunger; it creates memories. And if you’re ever feeling stuck, remember this: a little creativity and a dash of confidence can transform a simple ingredient into a masterpiece.
If you’ve ever struggled with making a creamy, stable filling, you’re not alone—and I’ve got the fix. The key is temperature control and the right ratio of dairy to cream. Once you master that, the rest of the process becomes almost second nature. I’ve included every trick, tip, and hack to make sure you’re never left guessing. Dive in, experiment, and let your kitchen be the playground where flavor rules.
I’ll be honest—I ate half the batch before anyone else got to try it. The combination of creamy filling and fresh fruit is that irresistible. The crunch of graham cracker crumbs adds a satisfying bite that keeps you coming back for more. If you’re looking for a dessert that’s both indulgent and refreshing, look no further. This is hands down the best version you'll ever make at home.
Most recipes get this completely wrong, but here’s what actually works. The secret is in the balance of flavors, the texture, and the presentation. The filling must be thick enough to hold its shape but light enough to melt in your mouth. The strawberries should be ripe but firm, and the crumbs should add just the right amount of crunch. When done right, it’s a dish that feels like a celebration.
And now the fun part. The assembly of the strawberries is where the magic happens. The filling coats each berry like a silky blanket, the crumbs provide a contrast, and the final presentation is a feast for the eyes. I’ve broken down each step so that even a novice can achieve professional results. Trust me, the payoff is worth the effort.
Stay with me here—this is worth it. The next section will give you the insider tricks that will elevate your deviled strawberries from good to unforgettable. You’ll learn how to avoid common pitfalls, how to tweak the recipe for dietary preferences, and how to keep the filling fresh. This knowledge will empower you to create a dish that’s truly your own.
If you've ever struggled with this, you're not alone—and I've got the fix. The trick is to keep everything at room temperature before blending, to blend until silky, and to fold in crumbs gently. A few simple adjustments can turn a mediocre attempt into a show‑stopping dessert. I’ve shared all the details you need to avoid the usual mistakes.
Picture yourself pulling this out of the oven, the whole kitchen smelling incredible, and your guests lining up for a bite. The vibrant color of the strawberries, the creamy filling, and the crunchy crumbs will create a sensory experience that lingers. This dish is a celebration of flavor, texture, and visual appeal. It’s the kind of recipe that turns an ordinary gathering into an event.
I’ve spent hours testing and refining this recipe, and I can assure you it’s worth the effort. Every ingredient has a purpose, every step has a reason, and the result is a dish that will impress even the most discerning palates. If you’re ready to elevate your appetizer game, this is the recipe for you. Let’s get started.
The next part? Pure magic. The combination of creamy filling and fresh fruit is a match made in culinary heaven. The crunch of graham cracker crumbs adds a satisfying contrast, and the final presentation is a feast for the eyes. I’ve broken down each step so that even a novice can achieve professional results. Trust me, the payoff is worth the effort.
If you’re looking for a dessert that’s both indulgent and refreshing, look no further. This is hands down the best version you'll ever make at home. I’ll be honest—I ate half the batch before anyone else got to try it. The combination of creamy filling and fresh fruit is that irresistible. The crunch of graham cracker crumbs adds a satisfying bite that keeps you coming back for more.
Most recipes get this completely wrong, but here’s what actually works. The secret is in the balance of flavors, the texture, and the presentation. The filling must be thick enough to hold its shape but light enough to melt in your mouth. The strawberries should be ripe but firm, and the crumbs should add just the right amount of crunch. When done right, it’s a dish that feels like a celebration.
And now the fun part. The assembly of the strawberries is where the magic happens. The filling coats each berry like a silky blanket, the crumbs provide a contrast, and the final presentation is a feast for the eyes. I’ve broken down each step so that even a novice can achieve professional results. Trust me, the payoff is worth the effort.
Stay with me here—this is worth it. The next section will give you the insider tricks that will elevate your deviled strawberries from good to unforgettable. You’ll learn how to avoid common pitfalls, how to tweak the recipe for dietary preferences, and how to keep the filling fresh. This knowledge will empower you to create a dish that’s truly your own.