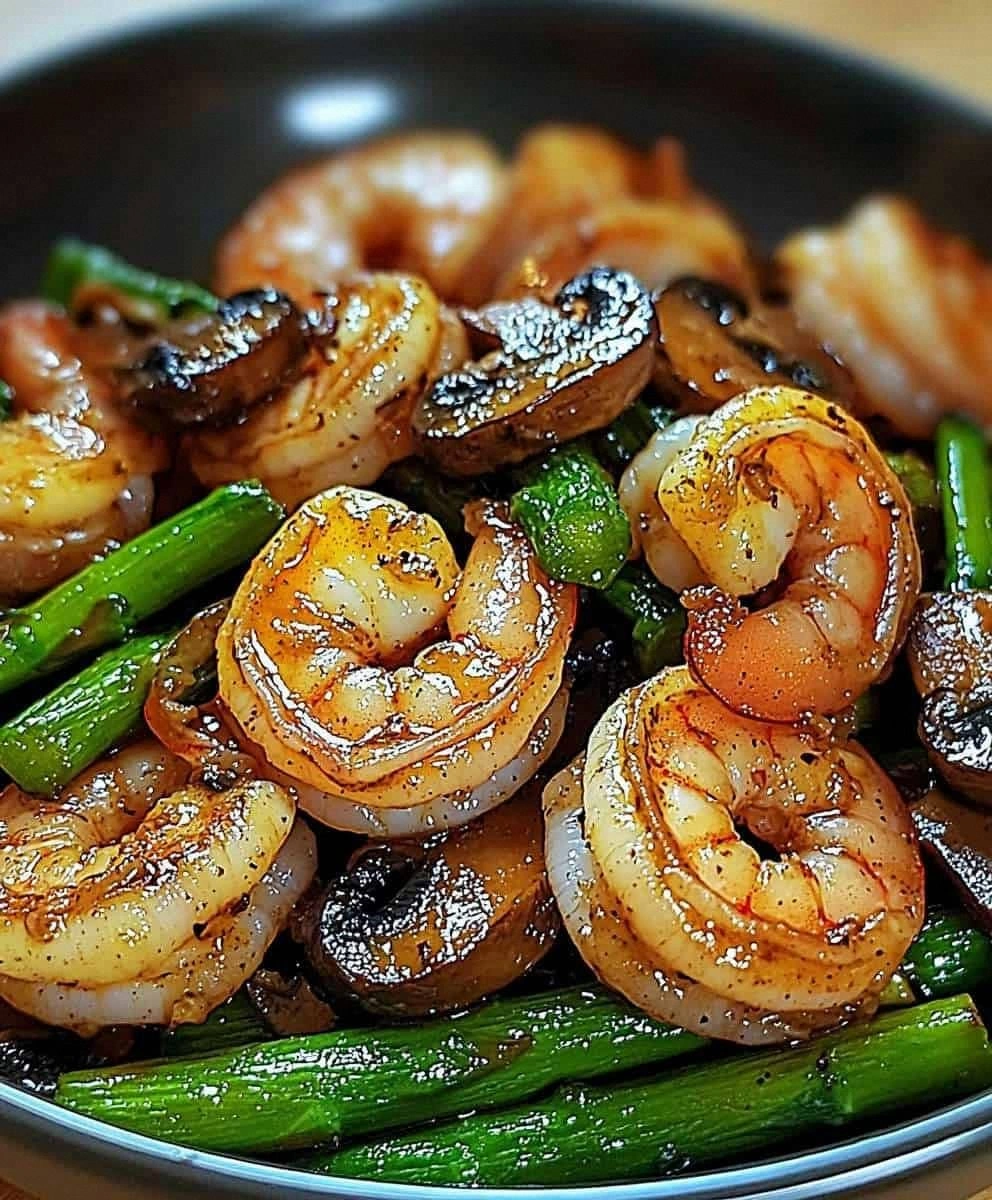
I still remember the first time I attempted a stir-fry. It was a Tuesday that felt like a Monday, I was fresh out of college, and my roommate had dared me to cook anything that didn't come from a box. Armed with a wok I bought at a garage sale and shrimp that still had the freezer burn to prove its age, I created something that resembled a science experiment more than dinner. The smoke alarm applauded, my ego deflated, and I ordered takeout while frantically fanning the kitchen with a dish towel.
Fast forward ten years, and I'm standing in my kitchen at 6:47 PM on a Wednesday, pulling together this shrimp asparagus stir-fry in less time than it takes my neighbor to walk his golden retriever around the block. The difference? I finally cracked the code on what makes restaurant-quality stir-fry actually work at home. No more soggy vegetables swimming in a pool of soy sauce, no more rubbery shrimp that bounce off the plate, no more wondering why my sauce tastes like dishwater while takeout tastes like magic.
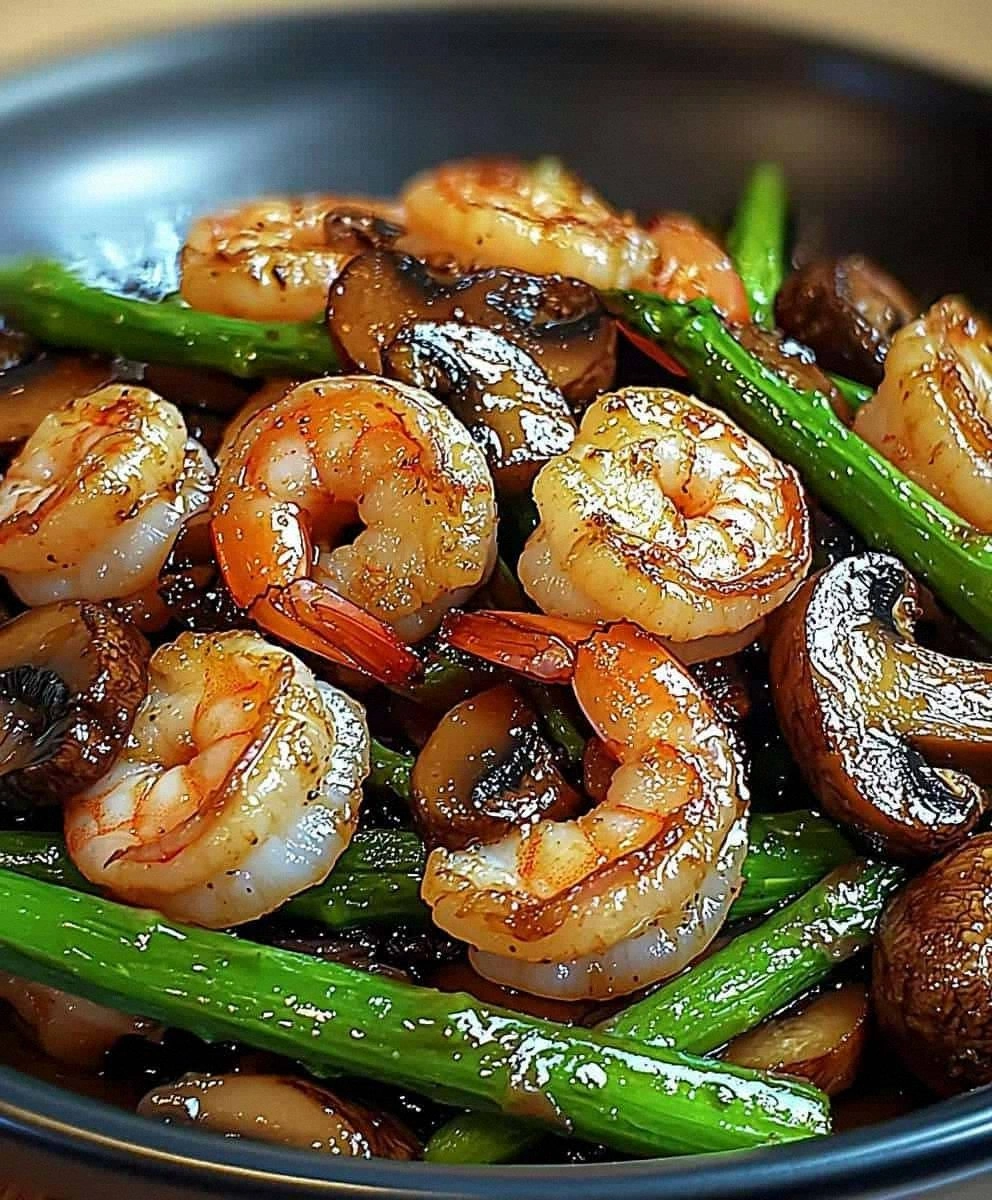
This recipe right here? It's my redemption story in edible form. Picture this: plump, perfectly seared shrimp that snap between your teeth and release sweet ocean brine, asparagus tips with just enough bite to remind you they were recently alive, and a glossy sauce that clings to every surface like it was custom-tailored for each ingredient. The best part? You can make this entire masterpiece in under fifteen minutes, which means weeknight dinner just got a serious upgrade from whatever sad desk lunch you were contemplating.
I'm about to show you exactly why most home stir-fries fail miserably, the one technique that changed everything for me, and how to create restaurant-level results with nothing more than a regular pan and some basic grocery store ingredients. Let me walk you through every single step — by the end, you'll wonder how you ever made it any other way.
What Makes This Version Stand Out
Lightning-Fast Cooking: While other recipes have you marinating shrimp for hours or blanching vegetables in separate steps, we're going to use a technique that builds flavor while everything cooks together at warp speed. The entire dish goes from fridge to table in under fifteen minutes, making it faster than ordering takeout and infinitely more satisfying than heating up frozen vegetables.
Restaurant-Quality Sauce: Most home cooks drown their stir-fry in a watery mess of soy sauce and call it a day. We're creating a glossy, velvety sauce that coats each piece like liquid gold, using a simple cornstarch slurry that transforms humble pantry ingredients into something that'll make you lick the plate clean.
Perfectly Cooked Shrimp: Forget everything you know about cooking shrimp. We're using a high-heat sear that creates caramelized edges while keeping the centers tender and juicy. The result? Shrimp that taste like they were kissed by a grill master, not boiled by a bored line cook.
Vegetable Harmony: Asparagus and shrimp might seem like an odd couple, but they're actually perfect dance partners. The asparagus provides a grassy, slightly bitter counterpoint to the sweet shrimp, while snap peas add pops of sweetness and bell pepper brings crunch and color that makes this dish look like spring on a plate.
One-Pan Wonder: Everything happens in a single pan, which means fewer dishes and more time to actually enjoy your food. Plus, all those crispy bits that stick to the bottom? That's pure flavor gold that gets reincorporated into the final sauce.
Make-Ahead Magic: While stir-fries are best fresh, this one actually holds up better than most. The vegetables stay crisp, the shrimp stay tender, and the sauce actually thickens slightly as it sits, making leftovers that taste even better the next day.
Customizable Canvas: Once you master this base recipe, you can swap in any vegetables you have lurking in your fridge. Broccoli, snow peas, mushrooms, or even thinly sliced carrots all play beautifully with these flavors and cooking times.
Alright, let's break down exactly what goes into this masterpiece...
Inside the Ingredient List
The Flavor Base
Garlic and ginger are the Batman and Robin of Asian cooking, and in this stir-fry, they get top billing. Fresh garlic brings that sharp, almost spicy bite that wakes up your taste buds, while ginger adds warmth and complexity that makes people wonder what your secret ingredient is. I mince both into tiny pieces because nobody wants to bite into a chunk of raw ginger the size of a dice, but you want them small enough to distribute throughout every bite. Pro tip: smash your garlic cloves with the flat side of your knife first — it releases more flavor compounds and makes peeling a breeze.
The soy sauce is your umami backbone, but don't just grab whatever bottle is lurking in your pantry. I use regular soy sauce, not low-sodium, because we're building flavor here and the vegetables will dilute the saltiness. If all you have is low-sodium, that's fine, but you might want to add a pinch of salt at the end to wake everything up. The oyster sauce is optional but highly recommended — it adds this mysterious depth that makes people ask if you've been taking secret cooking classes.
The Texture Crew
Shrimp selection is where most people go wrong right out of the gate. You want large shrimp, not those tiny salad shrimp that look like they came from a dollhouse. Large shrimp stay juicy during high-heat cooking, and they have that satisfying meaty bite that makes this feel like a proper meal rather than a snack. Fresh is great if you can get it, but frozen works beautifully — just make sure to thaw them completely and pat them dry with paper towels. Wet shrimp are the enemy of good browning.
Asparagus season is basically a religious holiday in my house, but this recipe works year-round with whatever asparagus you can find. The key is trimming off those woody ends — bend each spear until it naturally snaps, and it'll break right at the tender spot. Cut them into two-inch pieces so they cook quickly and you get a perfect vegetable-to-shrimp ratio in every bite. If your asparagus is super thick, slice it in half lengthwise first so everything cooks evenly.
The Unexpected Star
Red bell pepper might seem like just a color addition, but it's actually providing crucial sweetness and crunch that balances the savory elements. I slice mine into thin strips that curl and char slightly at the edges, creating those smoky, almost caramelized bits that make each bite interesting. Don't substitute green bell pepper here — it's too bitter and will throw off the whole flavor balance. In a pinch, yellow or orange work just as well.
Snap peas are my secret weapon for adding pops of sweetness and crunch without any prep work beyond trimming the ends. They stay bright green and crisp-tender, providing textural contrast to the soft shrimp and slightly wilted asparagus. If you can't find snap peas, snow peas work too, but avoid regular peas — they'll turn mushy and sad.
The Final Flourish
Green onions get added at the very end so they stay bright and slightly crisp, providing a fresh onion flavor that's much milder than regular onions. I chop both the white and green parts, adding the whites earlier for sweetness and the greens at the very end for color and freshness. If you're feeling fancy, save a few of the green tops to sprinkle on top just before serving.
The cornstarch slurry is what transforms your sauce from watery to luxurious. Mix one tablespoon of cornstarch with one tablespoon of water until smooth, then add it during the final minute of cooking. It activates instantly, turning your pan juices into a glossy sauce that coats everything like edible velvet. Skip this step and you'll have flavored water pooling at the bottom of your plate — add it and you'll have restaurant-quality results.
Everything's prepped? Good. Let's get into the real action...
The Method — Step by Step
- Get your pan screaming hot — and I mean hot enough that a drop of water dances across the surface like it's auditioning for Riverdance. This is the moment of truth where most home cooks chicken out, but you need this heat to get proper browning on your shrimp. Heat your wok or largest skillet over high heat for at least two minutes. If you're using a non-stick pan, go with medium-high heat instead, but add an extra minute to the preheating time. That sizzle when you add the oil? It should sound like applause.
- Add your oil and immediately tilt the pan to coat every surface — we're creating a non-stick effect using heat and oil, not relying on whatever coating your pan claims to have. Use an oil with a high smoke point like vegetable or peanut oil; olive oil will turn bitter and sesame oil will burn faster than your ex's new relationship. Swirl it around until it looks like liquid mercury coating the pan, then immediately proceed to the next step. This is not the time to check your phone or answer the doorbell.
- Throw in your shrimp in a single layer and don't touch them for a full 90 seconds. I know every instinct is screaming at you to move them around, but trust the process here. Those shrimp need uninterrupted contact with the hot pan to develop the caramelized edges that make restaurant stir-fries look so appetizing. They should go from translucent gray to opaque pink with golden-brown spots. If they start curling into tight little balls, you've overcooked them — we want them just curled into a gentle C shape.
- Flip each shrimp individually using tongs or a spatula — yes, this takes an extra 30 seconds, but it ensures every surface gets that gorgeous sear. Cook for another 60 seconds on the second side, then immediately remove them to a plate. They'll finish cooking later when we add them back, so it's better to slightly undercook them now than to end up with rubbery seafood later. The pan should have beautiful browned bits stuck to the bottom — that's pure flavor gold.
- Add another teaspoon of oil if the pan looks dry, then immediately toss in your garlic and ginger. This is the aromatic moment that'll make your neighbors jealous — the scent should fill your kitchen with warm, spicy notes that make your mouth water. Stir constantly for 30 seconds — no more, no less. Garlic burns faster than a British tourist in the tropics, and bitter garlic will ruin your entire dish. You want it fragrant and just starting to turn golden at the edges.
- Now watch this part closely: add your asparagus and bell pepper all at once. The pan will steam and hiss dramatically — that's exactly what we want. Stir-fry for two minutes, keeping everything moving constantly. The vegetables should turn bright green and start to soften but still have plenty of crunch. If your asparagus pieces are wildly different sizes, add the thicker ones first and give them a 30-second head start. You're aiming for tender-crisp, not mushy and sad.
- Add your snap peas and continue stir-frying for another minute. These cook quickly and add that satisfying pop when you bite into them. Everything should be glistening with oil but not swimming in it — if there's excess oil pooling at the bottom, tip your pan slightly and spoon some out. The vegetables should look like they just came back from a spa treatment: vibrant, glossy, and full of life.
- Return your shrimp to the pan along with the white parts of your green onions. Pour in your soy sauce and oyster sauce, then toss everything together for 30 seconds. The sauce should sizzle and bubble, coating everything in a thin layer of savory goodness. If it looks like there's not enough liquid, don't panic — the vegetables will release some water, and we're about to thicken everything up.
- Give your cornstarch slurry one final stir — cornstarch loves to settle at the bottom like it's afraid of the action — then pour it directly into the center of the pan. Immediately stir everything together for 30-45 seconds. Watch the magic happen: your thin, watery sauce will transform into a glossy coating that clings to every shrimp and vegetable. Keep stirring until the sauce goes from cloudy to clear and shiny. Remove from heat, add the green parts of your green onions, and give it one final toss.
That's it — you did it. But hold on, I've got a few more tricks that'll take this to another level...
Insider Tricks for Flawless Results
The Temperature Rule Nobody Follows
Here's the thing about stir-fry that cookbook authors never mention: your ingredients need to be at room temperature before they hit the pan. Cold shrimp straight from the fridge will drop the pan temperature faster than an ice cube in hot tea, and you'll end up with steamed seafood instead of seared perfection. Take your shrimp out 15 minutes before cooking and pat them dry obsessively with paper towels. The same goes for your vegetables — if they're ice-cold from the fridge, they'll steam instead of sear. I learned this the hard way after wondering why my stir-fries always looked like cafeteria food.
Why Your Nose Knows Best
Don't trust the timer — trust your nose. When the garlic and ginger hit the pan, your kitchen should fill with an aroma that's warm and inviting, not sharp or bitter. If it smells acrid, your heat is too high or your garlic is burning. When the vegetables are perfectly cooked, they'll smell fresh and slightly sweet, not like overcooked broccoli from a mall food court. I once had a friend ask why my stir-fry tasted better than hers even though we used the same recipe. The difference? She was following the clock while I was following my nose.
The 5-Minute Rest That Changes Everything
After you finish cooking, let the stir-fry rest for five minutes before serving. I know, I know — you're hungry and it smells amazing. But here's why this matters: the sauce continues to thicken and coat everything more evenly, the flavors meld together in a way that makes them taste like they've been friends for years, and the shrimp finish cooking gently in the residual heat. Plus, this gives you time to plate your rice or noodles properly instead of dumping everything in a pile like you're feeding farm animals.
The Wok vs. Skillet Debate
Don't have a wok? Don't panic. A large, heavy skillet actually works better than a cheap, thin wok that most people buy at big box stores. The key is using the largest pan you own so everything can spread out in a single layer. My 12-inch cast iron skillet produces better results than my fancy carbon steel wok because it retains heat so well. The only rule is: no non-stick if you want proper browning. That coating prevents the Maillard reaction that creates those gorgeous caramelized bits.
The Leftover Makeover
If you have leftovers, store the rice and stir-fry separately. The rice will stay fluffy instead of absorbing all the sauce and turning into a starchy brick. When reheating, sprinkle a teaspoon of water over the stir-fry, cover it loosely, and microwave for 90 seconds. The steam brings everything back to life without turning your shrimp into rubber bands. I dare you to taste this reheated version and not go back for seconds — it's actually better the next day.
Creative Twists and Variations
This recipe is a playground. Here are some of my favorite ways to switch things up:
The Thai-Inspired Version
Swap the oyster sauce for fish sauce (use only 2 teaspoons — it's potent stuff), add a tablespoon of brown sugar to balance the saltiness, and finish with a handful of fresh cilantro and a squeeze of lime. The result is a sweet-salty-sour combination that'll transport you straight to a beach in Phuket, minus the jet lag and currency exchange fees. If you can't find fish sauce, soy sauce with a splash of rice vinegar works in a pinch.
The Spicy Sichuan Style
Add a tablespoon of chili-garlic sauce to your soy sauce mixture, swap the vegetable oil for chili oil, and throw in a teaspoon of Sichuan peppercorns with the garlic and ginger. The peppercorns create this fascinating numbing sensation that makes your tongue tingle like it's been plugged into a low-voltage socket. It's addictive in the way that makes you keep eating even when your nose is running and your forehead is sweating.
The Mediterranean Mashup
Replace the soy sauce with a mixture of lemon juice and white wine, swap the ginger for minced shallots, and finish with fresh oregano and crumbled feta cheese. It sounds weird until you try it — the briny feta plays beautifully with sweet shrimp, and the lemon brightens everything up like culinary sunshine. Use zucchini instead of asparagus if it's summer and your garden is producing more squash than you know what to do with.
The Low-Carb Bowl
Skip the rice entirely and serve this over cauliflower rice or spiralized zucchini. Add extra vegetables like mushrooms and broccoli to bulk it up, and double the sauce so you have plenty to coat all those veggie noodles. It's surprisingly satisfying — my carb-loving husband requests this version when he's trying to eat healthier but still wants food that tastes like actual dinner.
The Surf and Turf Upgrade
Add thinly sliced beef sirloin or chicken breast alongside the shrimp. Cook the meat first until it's about 80% done, remove it while you cook the vegetables, then add it back with the shrimp. Suddenly your simple stir-fry feels like a restaurant special, and you can feed those friends who claim they need meat to feel satisfied. Just make sure to slice everything thinly so it all cooks at the same rate.
The Breakfast-for-Dinner Remix
Serve the stir-fry over a bed of crispy hash browns instead of rice, add a fried egg on top, and finish with a drizzle of sriracha. The runny yolk creates this incredible sauce when mixed with the stir-fry flavors, and the crispy potatoes provide textural contrast that makes this feel like comfort food and health food had a delicious baby. It's weirdly perfect for those nights when you can't decide what you're craving.
Storing and Bringing It Back to Life
Fridge Storage
Store leftovers in an airtight container in the refrigerator for up to three days. The key is letting it cool completely before sealing it up — trapping hot food creates condensation that turns your beautiful vegetables into soggy messes. Spread it out on a plate for 15 minutes first, then transfer to your container. The shrimp will stay tender and the vegetables will maintain their texture better than you'd expect from a reheated stir-fry.
Freezer Friendly
While most stir-fries don't freeze well, this one actually holds up if you do it right. Freeze individual portions in freezer bags, squeeze out as much air as possible, and lay them flat so they freeze quickly and evenly. The texture won't be quite as perfect as fresh, but it's miles better than frozen meals from the grocery store. Thaw overnight in the refrigerator, then reheat with the water-sprinkle method. Future you will thank present you on those nights when cooking feels impossible.
Best Reheating Method
The microwave gets a bad rap, but it's actually perfect for reheating stir-fry if you do it right. Sprinkle a teaspoon of water over the top, cover loosely with a damp paper towel, and heat on 70% power for 90 seconds. The water creates steam that brings everything back to life without turning it into rubber. Stir halfway through, and finish with a fresh drizzle of soy sauce to wake up the flavors. If you're feeling fancy, reheat it in a hot skillet with a splash of oil for two minutes — it brings back some of that fresh-cooked magic.